Categories
Mobile Syrup

How to set up a hotspot on your Android or iPhone

Although likely common knowledge for most, we thought (given recent events) that it’d be helpful to share a quick guide on how to activate a mobile hot spot on your smartphone.

Mobile hot spots, if you aren’t familiar, allow you to turn your smartphone into a portable Wi-Fi connection using your mobile data. They’re pretty easy to use and can be a great way to connect, for example, your laptop when you’re on the go, or perhaps to get some work done when one of the biggest internet providers in your country suddenly goes down for hours on end.

With that in mind, here’s how to set up a hotspot:

Android

Android hotspot menu

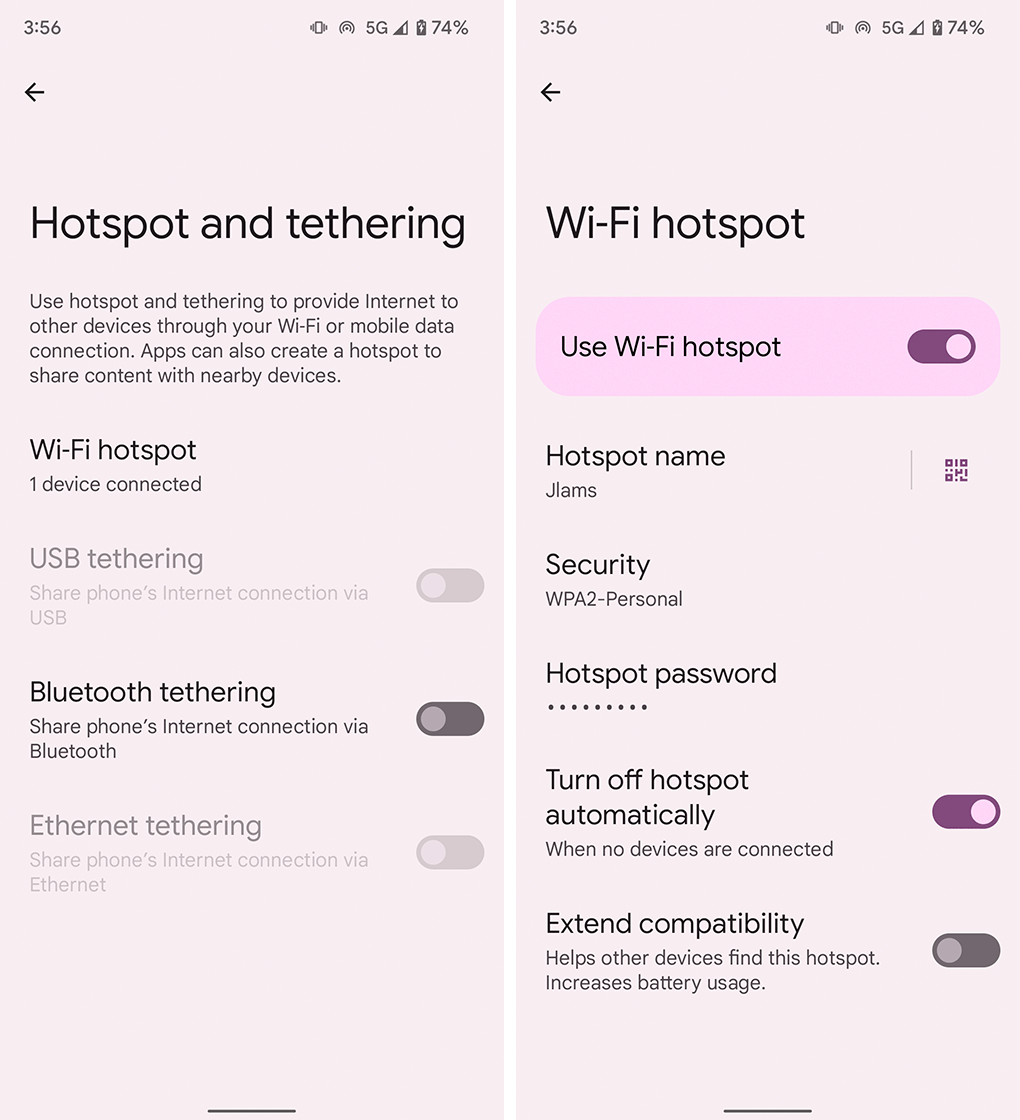
To set up a hotspot on your Android smartphone, you’ll want to head into the Settings app > Network and Internet > Hotspot and tethering. It’s worth noting the menu names and locations may differ slightly from manufacturer to manufacturer.

Some phones support multiple types of hotspots, including ‘Wi-Fi hotspot,’ ‘USB tethering,’ ‘Bluetooth tethering’ and ‘Ethernet tethering.’ These are just different ways to connect your phone to another device to access the hotspot. I typically use the Wi-Fi hotspot as it’s pretty reliable, but feel free to test them out and use what feels best for you.

Tapping ‘Wi-Fi hotspot’ should bring you into another menu where you can customize the hotspot’s settings, such as the hotspot name (this will be visible to people nearby and will be what you look for in the Wi-Fi menu on the device you want to connect). You can also set a hotspot password and security type, and there may be settings to automatically turn off the hotspot or to extend the range at the cost of the battery.

Once your hotspot is on, you can grab the device you want to connect and then head into the Wi-Fi settings and select your hotspot like you would any Wi-Fi network.

iPhone

iPhone hotspot menu

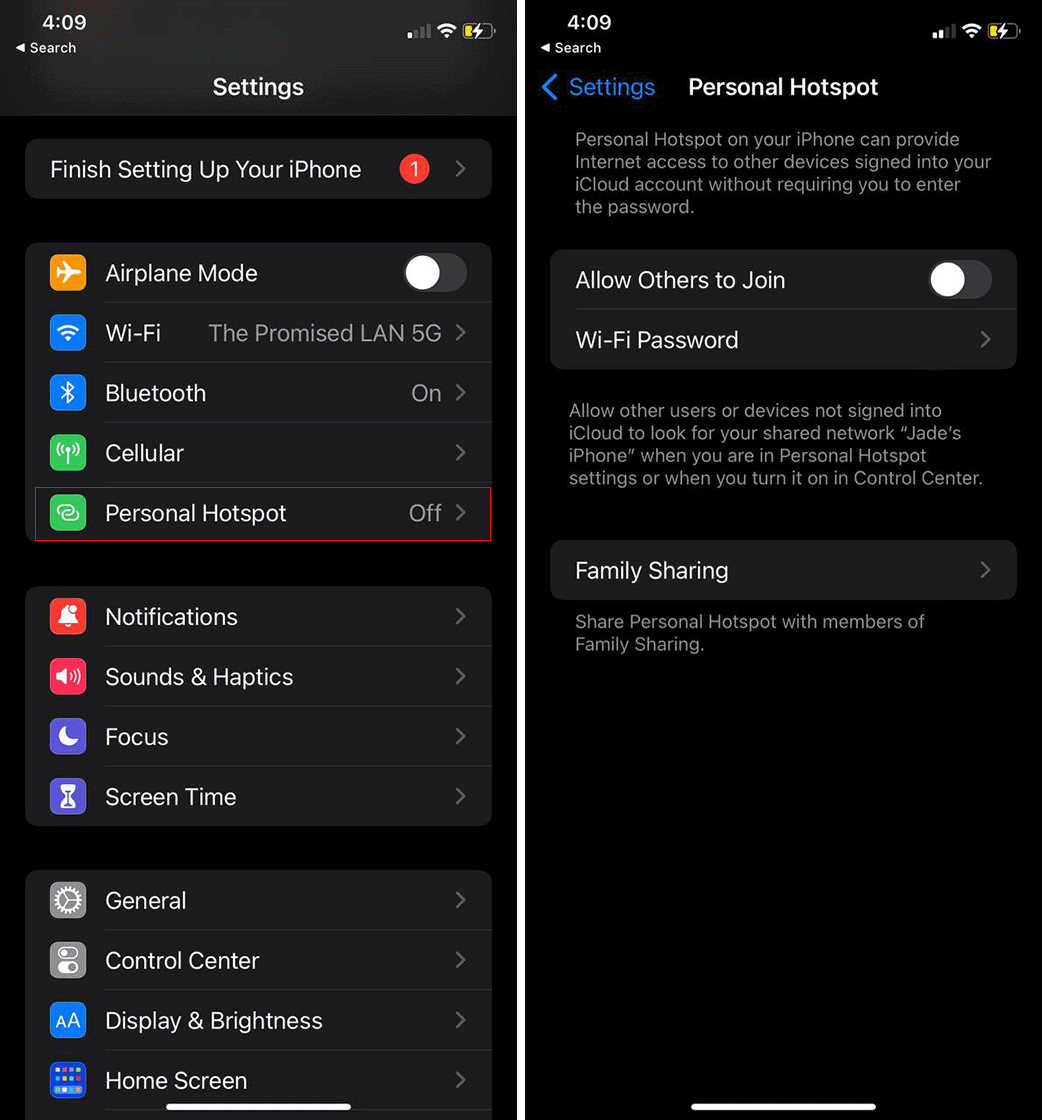
To use a hotspot on iPhone, just hop into the Settings app and tap ‘Personal Hotspot.’ iPhone has the benefit of that “Apple magic,” which means if you’re trying to connect another Apple device — like your iPad or MacBook — you should be able to easily connect as long as you’ve got the same iCloud account on both.

If not, or if you’re trying to connect a non-Apple device, you can toggle on the ‘Allow Others to Join’ option. iPhone doesn’t let you edit your hotspot name — it’ll just appear as “[Your name]’s iPhone” — but you can edit the password required to connect.

Users can also edit Family Sharing options from this menu, which can enable other Apple devices in your Family group to connect to your iPhone as a hotspot.

Some other things to keep in mind

While that about sums up everything you need to know to activate a hotspot, there are a few other things worth keeping in mind. First, hotspots use mobile data, so be careful what you do while connected, lest you burn through your data cap too quickly.

Next, some carriers may limit or restrict hotspot speed or access, so make sure to check what your provider allows.

Finally, your hotspot will likely be slower and less stable than a regular home internet connection. Still, a mediocre connection is better than none in a pinch.

Categories
Mobile Syrup

The best USB hubs for your accessories

As both desktop and laptops continue the race to get thinner and sleeker, there has been a victim watching from the sidelines: the USB port. Whether it’s having fewer ports on the computer or supporting exclusively USB-C ports, you likely need to find a way to get more USB ports on your computer.

The good news is that there are plenty of multi-function USB hubs out there for your needs. Maybe you have a lot of devices to connect to your workstation at home, or you need something portable for on-the-go tasks, there are plenty of options in an affordable range. We’ve included both budget and premium options on this list to meet all of your various needs. These are the best USB hubs to buy in 2021.

Anker PowerExpand Direct 7-Port USB 3.0 Type-C Hub

Anker USB Hub

If you have a newer MacBook with only USB-C ports, then you’ll know the struggles of trying to connect additional peripherals. Anker — arguably one of the top manufacturers of USB accessories — offers a slick premium hub that gives you plenty of options. It comes with seven ports, including a Thunderbolt USB-C, a USB-C data port, two USB-A ports, one HDMI, one SD card slot and one microSD card slot. This means you can plug in the latest devices with the fastest speeds, attach your MacBook to an external monitor, insert your camera’s SD card, and more. If you have a MacBook and are willing to pay a premium, this is a stylish hub that fits with the Apple aesthetic. If you don’t have a MacBook, this will still work — it just won’t blend in as naturally.

Buy at Amazon Canada for $79.99

Belkin USB-C Multimedia Hub

Belkin USB hub

Belkin, the other accessory-making juggernaut, has a USB-C multimedia hub to help people add more ports to their laptop when on the go or at home. Built for both Mac and Windows, this hub adds several port options: two USB-A 3.0 ports, one USB-C, one HDMI, one SD Card port, and even a gigabit ethernet port in case you need to connect the old fashioned way. The HDMI supports up to 4K video and there’s even an option for pass-through charging for up to 60W for your devices. This is the most expensive hub on the list, but Belkin has earned its solid reputation, and this is one of the few hubs that offers pass-through charging.

Buy at Amazon Canada for $99.99

Sabrent 4-Port USB 3.0 Hub

Sabrent USB hub

The Sabrent 4-port hub is cheap, fast, and portable. If all you’re looking for is a few extra ports, this is the cheapest option on the market, while still delivering decent performance. Each port comes with its own power switch, allowing you quickly . Best of all, this hub works with both Windows and Mac, without needing any drivers or installs.

Buy at Amazon Canada for $15.98

Anker 4-Port USB 3.0 Ultra-Slim Hub

Anker ultra slim usb hub

Anker’s ultra-slim hub is an attractive option that feels like a premium option, while fitting nicely within most budgets. Like the Sabrent hub above, this is a 4-port model that uses USB 3.0. The main differences here are the lack of power switches, and the form factor. While the Sabrent is compact, the Anker model can easily fit in the pocket of a bag for use anywhere. This is also a popular option to attach to the bottom of a desk as an invisible expansion to a desktop PC. For its price, this is the best slim USB hub on the market.

Buy at Amazon Canada for $19.99

WENTER 11-Port USB Data Hub Splitter

11-port usb hub

If you’re looking for quantity, you won’t need to look any further. Not only does it have 11 — yes, 11 — ports with individual power switches, it also features USB 3.0 for high speed transfers. This hub requires external power though, so you’ll need to plug it into the wall. But for at-home workstations, this is an affordable option with more ports than you’ll ever need.

Buy at Amazon Canada for $54.99

And those are the best USB hubs you can buy in 2021. If you have other tech items you’d like to see tech guides for, be sure to let us know in the comments down below.

MobileSyrup utilizes affiliate partnerships. These partnerships do not influence our editorial content, though MobileSyrup may earn a commission on purchases made via these links.

Categories
Mobile Syrup

The best SAD lights for Canadian winter

You can feel it in your bones. Winter is coming.

The days are getting shorter, which means there will be less sunlight. And less sunlight means that our energy levels tend to be lower and its harder to keep a positive mood.

A growing trend to help combat the winter blues is SAD lights. These special lights simulate sunlight and have been proven to help improve your mood. People living in Canada and the northern United States are affected more than most, particularly if they live and work somewhere with few windows to get any direct sunlight during the shortened days.

A good SAD light will have about 10,000 lux to provide similar results to morning sunshine, but different options exist depending on how much you want to spend. Somewhere just above $100 should be able to get something to handle all of your needs, but there are budget and premium options available as well.

Carex Day-Light Classic Plus

Carex Sad Light

Though Carex has a model of SAD light that’s a step down from the Day-Light Classic Plus you see here, the extra few dollars will get you a bigger light and more stable stand. Aesthetically it looks more like a studio light and it’s a bit more modern too. It’s white light comes with two settings. The “Task” setting can be used throughout the day, while the “Therapy” setting is ideal for dedicated time for mental wellbeing. The light is UV-filtered and 10,000 lux, meeting the clinical requirements to help with winter blues, circadian rhythm, jet lag, and more.

Buy at Amazon Canada for $170.07

Northern Light Technologies Flamingo

Northern Light Sad Light

If you’re willing to spend some extra cash, Northern Light’s Flamingo is an excellent option. The Canadian-made product can produce a 10,000 lux light up to a foot away, and instead of taking up desk space, it has a floor stand that can go up to 53-inches. This makes it a more convenient option for those that may not have a desk to place the light on, and the extra angle adjustments are a welcome feature. If you’re looking for a more versatile SAD light, this could be your answer.

Buy at Amazon Canada for $269.99

Circadian Optics Lumos Light Therapy Lamp

Circadian Optics Sad Light

The Lumos by Circadian Optics is a great option for those looking for a bit more flexibility. Though the light itself is smaller, the modern design of the Lumos offers more versatility when it comes to the settings and adjustment of the light. As with the other SAD lights on the list, it is rated for 10,000 lux, and it’s UV filtered. Those with less available real estate and the need for a more targeted light should consider looking here.

Buy at Amazon Canada for $102.92

Verilux HappyLight VT10 Compact

Verilux Sad Light

Those on a budget — or wanting to dabble in the SAD light space before fully committing — should look no further than the HappyLight VT10 by Verilux. It’s a portable, lightweight model that you can use on your desk or take with you as you travel, but you’ll still get the benefits of the 10,000 lux light. Because it’s smaller, it’s recommended to have longer sessions to get similar benefits to the larger lights, but if you’re using it on your desk during work or school then that shouldn’t be a problem. It may not be flashy, but the VT10 is an inexpensive way to test the technology.

Buy at Amazon Canada for $39.99

Philips HF3670/60 SmartSleep

Philips SmartSleep Light

I’m taking a bit of liberty with this one, but it’s good to know your full spectrum of options as you research ways to help with those winter blues. If you like products that have connected apps, and you don’t mind dropping some extra cash, Philips’ SmartSleep is a great way to help you sleep better and feel more relaxed throughout the day. Yes, it has some extra bells and whistles such as a clock, FM radio and wind down exercises before bed, but the main selling point for the Philips Smartsleep is its ability to simulate sunsets and sunrises. This helps with your circadian rhythm during the winter’s short days, giving structure to your sleep. It’s not technically a SAD light, but for this is a Smart Home light that’s well worth your attention.

Buy at Amazon Canada for $425.99

MobileSyrup utilizes affiliate partnerships and publishes sponsored posts. These partnerships do not influence our editorial content, though MobileSyrup may earn a commission on purchases made via these links.

Categories
Mobile Syrup

How to change the default browser in Windows 11

If you’re among the lucky ones who successfully updated their PC to Windows 11, great! We hope you’re enjoying it. However, some things have changed from Windows 10, like how to set a default browser. That’s why we put together this handy guide.

Also, if some of this sounds familiar, that’s because when we wrote about default browser settings in Windows 11 back during the preview period. Not much has changed, which is good news if you already learned how to change the default browser in Windows 11 and bad news if you’d prefer a simple process for setting defaults. Anyway, let’s get into it.

To set a default browser in Windows 11, you need to open Settings > Apps > Default apps. Unfortunately, this is where things get… weird.

Microsoft now requires Windows 11 users pick the app that they want to make default (in the case of a browser, you’d pick Chrome, Firefox, Brave or another browser of your choice from the list of apps). In the next screen, users should see a list of related file types (for example, ‘.html’ files).

You’ll need to go through this list and click on each file type, then select the app from the pop-up. For example, click ‘.htm’ and then click Chrome, Firefox, etc. from the pop-up list. In some cases, you may see a ‘Before you switch’ pop-up that will try and encourage you to stick with Edge — you can click ‘Switch anyway’ to bypass it.

Once that’s done, you should be good to go. It is worth noting, however, that some apps have built-in default switchers that can help users avoid doing this. Firefox Nightly, for example, let me click a button in Firefox’s settings menu to change my default browser — I didn’t have to open the Windows 11 settings menu. While more apps might do this in time, for now, it’s hit-and-miss which apps will support it.

Edge has considerable staying power

Additionally, some apps might not switch over every file type, which could mean opening certain things will throw you back into Edge (or another default) instead. Moreover, some parts of Windows 11 completely ignore the default browser setting.

In particular, the fancy new widget pane (accessible by clicking the blue square icon on the taskbar, not to be confused with the Start icon with four blue squares). Some items in the widgets pane will still open in Edge. The Verge points out that an app called ‘EdgeDeflector‘ can help redirect links that will always open in Edge to open in the default browser instead.

You’ll need to grab the latest version (1.2.3.0), which supports Windows 11. Still, the app isn’t perfect and some items might still open in Microsoft Edge. Maybe that will change in time with future updates.

Categories
Mobile Syrup

How to install Windows 11 on your Windows 10 PC

Microsoft finally dropped Windows 11 this week after several months of confusion around which the new operating system would support.

Although the OS is available now, some of that confusion still remains. That said, people are actually able to download and try Windows 11 now, so hopefully people smarter than me will figure out all the details soon.

For the time being, if you have supported hardware and want to install Windows 11, there are two main ways to go about it — the safe way and the fast way. And for those who aren’t sure if they can install Windows 11 on their device, Microsoft recently re-released its upgrade compatibility check tool that shows if Windows 11 supports your PC. You can download that here (it’s at the bottom of the page).

If your hardware is compatible with Windows 11, here’s how to install it:

The Safe Way

The safest, easiest way to install Windows 11 on your Windows 10 PC is through your computer’s built-in ‘Windows Update’ tool. To access it, press the ‘Windows’ and ‘I’ keys, or tap the Windows key and search ‘Settings.’ Then, click ‘Update & Security.’

If you’re lucky, you’ll see a big blue block that says something like “Upgrade to Windows 11 is ready.” From there, just click the ‘Download and install’ button to start the process.

If you don’t see the update banner, it’s likely because Microsoft hasn’t started rolling out the update to your device yet. The company is taking its time with the rollout and it may take a few days, weeks or even months for the upgrade banner to appear in Windows Update. However, when it does show up, it should mean Microsoft is confident your PC is ready for Windows 11.

Another reason why the Windows 11 upgrade banner won’t show up is your PC’s hardware isn’t compatible. Again, you should use the compatibility check tool mentioned up top to verify that your PC is good to go before starting this process.

The Fast Way

For those with less patience and, ideally, the technical know-how to troubleshoot any issues that pop up, there is a faster way to upgrade to Windows 11.

Microsoft’s ‘Download Windows 11‘ website offers several options for getting the update. The first, and the one I’d recommend for most people, is the ‘Installation Assistant.’ It’s just a bit of software the effectively lets users bypass the Windows Upgrade wait and install Windows 11 right away. The main caveat is, of course, that you may encounter more bugs and issues if Microsoft hasn’t deemed your PC ready.

It’s the route I went with on my desktop since my hardware was compatible, but I didn’t have the update option in Windows Update. All you need to do is download the Windows 11 Installation Assistant, run it and follow the steps (which mainly involves waiting for it to download and install Windows 11).

Microsoft lists a few things people should be aware of before starting the Windows 11 update process, including that you need a Windows 10 licence, your PC must be on Windows 10 version 2004 or higher, it needs at least 9GB of free space and it must meet the Windows 11 hardware requirements.

As for bugs, I’ve only had Windows 11 running on my desktop for about an hour or two now but I haven’t experienced anything truly problematic. That said, I didn’t expect to — I tested the Windows 11 preview on a laptop and didn’t run into any significant issues there. Still, if you want to avoid bugs as much as possible, wait for the upgrade to hit the Windows Update menu on your PC. And, worst case scenario, if you do encounter bugs, you have 10 days to go back to Windows 10 — you can read more on downgrading here.

The other options on Microsoft’s ‘Download Windows 11‘ website are more involved tools for edge cases. There are options for creating Windows 11 Installation Media or Disk Images (ISO) for doing clean Windows 11 installs. Most people likely won’t need to use these tools, but it’s good to know that they’re there if you need them.

Overall, the Windows 11 upgrade process is relatively simple if you have officially supported hardware. Unfortunately for those who don’t, the process is a little more complicated (but the tools offered on Microsoft’s ‘Download Windows 11’ website should be able to help). Either way, if you’re not prepared to deal with bugs and issues of new software, you may want to hold off on upgrading to Windows 11 for the time being.

Besides, Microsoft will support Windows 10 until October 2025, so there isn’t a huge rush to upgrade.

Categories
Mobile Syrup

Your guide to ‘Cinematic Mode’ with Apple’s iPhone 13

Every year when Apple releases a new iPhone, we almost always see at least some level of camera improvements.

Alongside the upgrades, Apple typically showcases stunning photos using its latest iPhone, putting a lot of focus on camera quality, image processing and low-light photography.

However, recently the tech giant has placed more of an emphasis on video. For example, the iPhone 11 lineup brought with it QuickTake and the iPhone 12 Pro and Pro Max introduced Apple ProRAW in iOS 14.3.

This year, Apple’s iPhone 13 lineup features what Apple is calling ‘Cinematic Mode.’

What is Cinematic Mode?

To understand Cinematic mode, you first need to understand ‘Portrait Mode,’ which Apple unveiled alongside the iPhone 7 Plus. Portrait Mode blurs out the background of your photo, leaving the person, pet, or object in focus. This creates what is called a bokeh or depth-of-field effect. When the feature was first introduced, Portrait Mode was limited to the iPhone 7 Plus’ 2x telephoto lens.

The 1x wide-angle lens was used to detect depth and create the bokeh effect. Portrait Mode was inherited by every two-lens iPhone after the iPhone 7 Plus and excluded by every single-lens iPhone until the iPhone XR was released. The iPhone XR used software within iOS to create the blur effect instead of relying on additional lenses.

“Cinematic Mode only works on Apple’s iPhone 13 lineup.”

Cinematic Mode brings the bokeh effect of Portrait Mode over to your videos. When you select Cinematic Mode in your iPhone 13’s camera app, it detects a person, pet, or object and places them in focus. The background and foreground blurs around your subject, placing the attention squarely on them. When two people are in your frame, Cinematic mode focuses on whoever is closer until the closer subject turns away. The focus then shifts to the further away subject in the frame.

Cinematic mode gets its name from the bokeh effects used in cinematic films. Apple’s goal with this exclusive iPhone 13 feature is to democratize cinema-quality video, allowing you to take the best video of your pets you possibly can — at least, that’s what I’ll be using it for.

How to use Cinematic Mode

  1. Launch the camera app on your iPhone 13, 13 mini, 13 Pro, or 13 Pro Max
  2. Swipe left to right twice anywhere on the screen to select Cinematic Mode
  3. Press the red circle to start or stop recording

The bokeh effect will automatically set itself. However, if you want to adjust it before recording, tap on the ƒ symbol in the top right-hand corner (vertical orientation) or top left (horizontal orientation). A slide will appear in the bottom third of your screen where you can adjust the bokeh effect between 2.0 and 16. 2.0 will be the harshest blur, where 16 will have the weakest.

While in Cinematic Mode, you can perform a small swipe up (vertical orientation) or a small swipe right to left (horizontal orientation) in the middle of your screen to reveal three buttons.

This hidden menu has a lightning bolt, a +/- symbol, and the ƒ button. Tapping on the lightning bolt will allow you to turn on or off your iPhone’s flashlight if you need additional lighting while recording. Cinematic Mode only works in well-lit environments, just like Portrait Mode.

Tapping on the +/- icon will allow you to adjust how much light your camera takes in (also known as exposure). This will enable you to create a lighter or darker tone in your video.

The ƒ button allows you to adjust the bokeh effect just like the original ƒ button did.

You can also tap on the 1x button in the lower third of your screen to change your lens to the 3x zoom if you would rather use the telephoto lens and be closer to your target. However, you can’t use the 0.5x ultra-wide lens in Cinematic Mode.

How to edit your recordings

  1. Find the Cinematic recording you would like to adjust in the photos app
  2. Tap edit in the top right-hand corner
  3. Tap on the ƒ button in the top left-hand corner to bring up the bokeh slider
  4. Adjust the bokeh effect by using the slider in the lower third of your screen

To remove the bokeh effect after recording in Cinematic Mode, tap on the yellow Cinematic button at the top of the screen.

Suppose you want to edit Cinematic Mode video on another device. In that case, you must either use AirDrop or iCloud Photos and use one of the following devices running iOS 15 or later:

  • iPhone XS, iPhone XR, and later
  • iPad Pro 12.9-inch (3rd generation and later)
  • iPad Pro 11-inch (1st generation and later)
  • iPad Air (3rd generation and later)
  • iPad mini (5th generation and later)

Apple says macOS will support editing Cinematic Mode video in a future macOS update.

There are some limitations

Perhaps most important to note is Cinematic Mode only works on Apple’s iPhone 13 lineup. This includes the iPhone 13, iPhone 13 mini, iPhone 13 Pro, and iPhone 13 Pro Max. If you have an older iPhone, even an iPhone 12 Pro running iOS 15, you will not see this feature in your camera app. Cinematic Mode is also limited to 1080p HD recording at 30 frames per second (fps).

For the vast majority of iPhone users, this quality limitation won’t be an issue. However, hard-core video buffs who want to get the best possible quality likely won’t want to use Cinematic mode.

As mentioned earlier, Cinematic Mode can use the 1x wide-angle lens and the 3x telephoto lens but not the 0.5x ultra-wide-angle lens. This means if you have an iPhone 13 or iPhone 13 mini, you will only be able to record at 1x, where if you have an iPhone 13 Pro or iPhone 13 Pro Max, you’ll be able to pick between 1x and 3x.

Categories
Nouvelles quotidiennes

Tour Berlin in a Trabi

See Dresden or Berlin from behind the wheel of a classic East German car: the Trabant, nicknamed the Trabi – one of the most iconic vehicles to come out of the communist bloc, reports Routard.

A German company called TrabiSafari is offering guided tours throughout the cities, where visitors can actually drive and experience the unique vehicles for themselves. In caravans of at least four cars, a guide takes the lead car and offers an informative presentation through the car’s radio, explaining the sites on this urban safari.

Guests can choose from three tours. The Berlin-Classic tour takes drivers through the once-divided city, touching on its historical roots as well as present-day culture, while the Maxisafari tour highlights the past and present of Dresden. The Wall Ride, meanwhile, allows visitors to explore the Berlin Wall up-close and even go through a pretend checkpoint inspection.

The tours take between one and two hours and cost anywhere from $40 to $120 per person, depending on the route chosen and number of passengers per car. Basic instruction on how to operate the vehicle is included as part of the tour.

Categories
Nouvelles quotidiennes

France offers free Haut-Languedoc hiking guide

Beach or mountains? That’s often the choice traveler’s have to make when planning a vacation.

If you enjoy the mountainous landscape, the Parc naturel régional du Haut-Languedoc (Regional Natural Park of Upper Languedoc) in France offers a beautiful trek for hikers. Voie Verte (Green way), is a 60-km path in Massif Central, situated between Toulouse and Montpellier, that offers a breathtaking panorama.

To help your understanding of the local flora and fauna, the park offers a free 24-page guide entitled Voie Verte du Haut Languedoc Passa Pais. The guide is available at French tourist offices.

Voie Verte is a former railway line which has been closed to motor traffic and transformed into a hiking trail that can be traveled on foot, horseback or bicycle.

Created in 1973, the park is situated in the south of the Massif Central within the Aveyron, Hérault and Tarn departments of France. These areas are considered the Haut-Languedoc, compared to the Bas-Languedoc.

In addition to the 82,000 people who reside within its boundaries, the park provides a habitat for more than 240 species of birds, in a stunningly diverse range of climate and scenery. 


Categories
Nouvelles quotidiennes

Virginia travel guide now online

Virginia has released the 2011 edition of its Virginia is for Lovers travel guide, highlighting family-friendly and romantic attractions throughout the state.

This will be a significant year for Virginia as Shenandoah National Park celebrates its 75th anniversary, and the state kicks off a four-year event in honor of the 150th anniversary of the American Civil War.

"This four-year commemoration features Virginia’s many battlefields, re-enactments, museum exhibitions and special events that will shed light on America’s bloodiest conflict. We invite you to explore Virginia’s many Civil War sites to learn about Virginia’s pivotal role in the war and its legacies," writes state Governor Bob McDonnell in the guide’s introduction.

The guidebook is divided into thematic sections, such as family fun, history and heritage, outdoor adventure, fishing, farming, state and national parks, Chesapeake Bay and the Shenandoah Valley. The guide also contains a special section on movies that have been filmed in the state, which include Mission Impossible III, The New World, and Hannibal.

An interactive version of the guide is now available on Virginia’s tourism website.

Categories
Nouvelles quotidiennes

First French-language guidebook for Yukon and Alaska


With the introduction of the first comprehensive French-language guide to the region, French-speaking travellers now have their own guidebook to the northern reaches of Alaska and the Yukon.

Titled Fabuleux Alaska et Yukon (Fabulous Alaska and Yukon), the guidebook features 208 pages of information about major cities, sites and attractions in the northern state and province.

The section on Alaska focuses on the cities of Juneau, Haines, Skagway, Fairbanks, Seward, Valdez and Anchorage as well as Glacier Bay National Park and the Columbia Glacier in Prince William Sound. For the Yukon, much of the focus is on Dawson City and Whitehorse, along with Kluane National Park and Tombstone Territorial Park.

The guidebook is designed for travellers arriving by car, camper-trailer, or Arctic cruise ship, and covers popular cruise destinations such as the Kenai Peninsula and Alaska’s south-east, while providing detailed information on significant roadways like the Alaska Highway.

Full-colour photographs accompany detailed information and archival materials, giving travellers a glimpse into the historical context of the Gold Rush, Native settlements, and the current state of the region today.