Categories
Cottage Life

11 courses to teach you how to build and renovate a cottage

For the adventurous DIYers out there, have you considered embarking on your own cottage-building journey? Not only will you avoid the headaches of the housing market, but you’ll also have the freedom to customize your home away from home any way you please. We’ve rounded up 11 online and in-person courses to teach you how to build and renovate a cottage. 

From floor-to-ceiling windows to an entertaining-sized kitchen or even a secret hideaway, you can bring your wildest architectural dreams to life. And let’s not forget the added bonus of being able to build a cottage that’s eco-friendly and up-to-date with all the latest codes.

If you’re feeling intimidated by the thought of constructing a cottage from scratch, fear not. There are cottage- and home-building courses offered in-person and online. They’ll teach you how to build a strong foundation, plus everything you need to know about framing, constructing a roof, and installing doors and windows.

Home and Cottage: Construction, TDSB 

In-person

Ready to get your hands dirty and learn how to build your dream cottage? The Toronto District School Board has you covered with exciting in-person construction courses. Get ready to roll up those sleeves and dive deep into building codes, permits, foundation building, and waterproofing. Plus, they will cover the basics of framing floors, walls, roofs, and trusses. 

Sign up for the nine-week course every Tuesday from April 4 to May 30 or every Wednesday from April 5 to May 31. Classes run from 6:30 p.m. to 9:30 p.m. The sign-up deadline is April 12 and April 13, respectively. The total cost, including materials, is $261.

DIY University

Online

Calling all DIY enthusiasts: don’t miss out on becoming the ultimate handyperson and master the art of construction through a variety of free and paid classes. Choose from topics like building a tiny house, adding electrical outlets, or kitchen storage, plus learning basic skills for laying concrete or drywall. 

With 162 instructor-led, on-demand, or skills workshops, there is something for everyone’s future or current cottage. Plus, they offer course bundles for bathroom remodelling, new homeownership, and outliving.

Building Industry Workshop: House Construction, buildABILITY 

Online and in-person

Time to get started on your new cottage build by joining buildABILITY for two half-days of workshops where you’ll learn the fundamentals of building a home.

Whether you prefer online or in-person learning, buildABILITY has it all. This online database covers everything from house construction to roof framing. By the end of the course, you’ll be equipped with all the construction terms, understand the construction process, know how to work with municipalities on the development process, explore fire and sound control methods, and learn how to finish the interior and exterior.

You can also check out the other options, such as the science of building better basements or construction technology and building science. 

The virtual class is $349 and takes place on April 5 and 12 from 1 p.m. to 5 p.m. In-person classes will resume in spring 2023. Check the website for details.

Wild Abundance’s Carpentry, Tiny House, and Home Building Workshops

In-person

Wild Abundance offers a variety of classes on a rolling basis, so there is always something new to learn. Right now, they offer in-person women’s-only and all-gender courses to ensure everybody feels welcome in the building and construction space. 

You can sign up for basic or advanced carpentry, how to build environmentally-friendly tiny houses, and timber framing classes. Plus, you can join their tiny house academy online. 

Find all the dates online. The best part? They offer a sliding scale pricing system, where you pay what you can afford. 

UnBEATable’s Comprehensive Log Building Course

In-person

Looking to build a cottage oryour dream log cabin but don’t know where to start? Look no further than UnBEATable’s three-week, 120-hour course that will teach you how to build a log shell from start to finish. 

From Monday to Friday, 8 a.m. to 5 p.m., you’ll learn how to work with tools, select the logs, build the shell, and read site plans. Also, UnBEATable provides a list of required tools and equipment on their website so you can come fully prepared.

The course starts on April 17 and costs $3,750, plus GST. If you’re interested in learning about roof systems, there’s a course starting on May 8 that costs $1,200, plus GST. 

Passive House Design and Construction Training

Online

Get ready to build a cottage that’s energy-efficient and cost-effective by joining the Canadian Passive House Institute. The online course is jam-packed with 13 modules and over 90 training videos to teach construction techniques, building science, and economical ways to save money.  

Complete the course full-time in six days or follow at your own pace. The cost of the course is $499. Looking to be certified? Add on the PHPP Introduction course and the CPHD Prep Course. 

The Pat Wolfe Log Building School

In-person

Roll up those sleeves because the Pat Wolfe Log Building School offers a one-of-a-kind learning experience to prepare you to build your own log cabin. In-person classes start in the spring and fall, with one-, four-, and ten-week options. 

The one-week course is a great introduction to log building, while the four-week course is perfect for owner-builders. The ten-week course is designed for own-builders who also want to pursue a career in the industry. 

Spring courses are available from April 17 to June 23, and fees range from $750 to $4,000, depending on the duration. Fall courses start on September 11 and end on November 17. Register using the online form

Tiny House Workshops

Online and in-person

Learn how to build a cottage that’s small and cozy from expert Kenton Zerbin, who has been building DIY tiny homes since 2010. All Canadians can access this specialized training with convenient locations in Toronto, Montreal, Edmonton, Lethbridge, and Ottawa. 

Join this in-person two-and-a-half-day workshop for $499 (dates to be announced soon), or get instant access to the online workshop covering the same topics for $349. Both courses will discuss design, utilities and legalities, and construction—everything you need to build your own tiny home from scratch. 

Home Depot DIY Workshops

In-person

Shop and learn in the same place with Home Depot’s free in-person workshops for adults and children. There aren’t any adult classes running at the moment, but new seminars are released on a rolling basis and vary from store to store. 

Tip: new children’s classes happen on the second Saturday of each month. 

The York Academy 

In-person

Looking to become a construction pro? Then get ready to put in some work with the York Academy. Learn different construction and home renovation techniques during their training courses starting on April 3 for full-time students (running Monday to Thursday, 9:00 a.m. to 4:00 p.m.) or on April 22 for part-time students (running Saturday to Sunday, 8:30 a.m. to 5:30 p.m.).

These programs are perfect for individuals looking to gain practical experience in work site conditions, blueprints, foundation building, carpentry, dry walling, flooring, basic electrical, and basic plumbing. With this training, you’ll have your dream cottage up and running in no time. 

Udemy New Home Construction Program 

Online

Don’t have much time to spare? No problem. Udemy has a virtual on-demand series of eight courses. Prepare to build your own cottage by learning different build styles, building lingo, design criteria, and building codes.

The best part is you can access the course anytime and from anywhere. Each class costs $27.99, with a 30-day money-back guarantee.

Categories
Mobile Syrup

How to manage your smartphone’s cloud backup

A critical part of owning a smartphone these days is managing the associated cloud storage holding backups of your photos, messages, contacts, and more. Unfortunately, most people neglect this, often to their detriment, when an ageing smartphone gives up the ghost, or a clumsy hand sends it rocketing to the floor, never to work again.

As someone who spent years working at a cellphone store (and who still serves as the resident IT guy for friends and family), cloud storage often ended up causing problems during the upgrade process. With that in mind, it might be a good idea to check in on your cloud storage, make sure you have space for your phone’s backups, and more. Here’s how to manage it.

iPhone

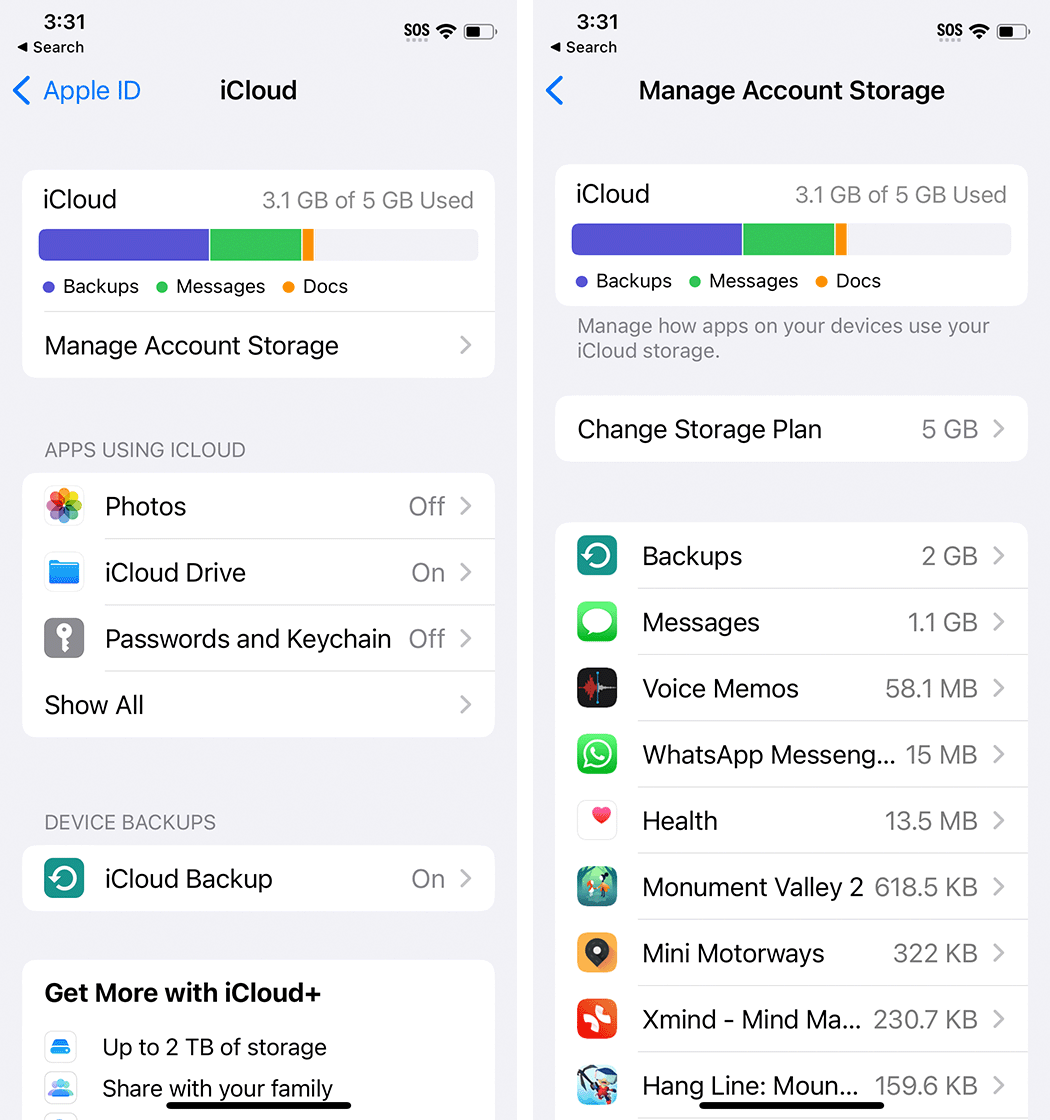
Every Apple ID comes with 5GB of free iCloud storage that can be used for backups, but chances are you’ve already filled it with photos and other storage-heavy content. To clean up your iCloud from an iPhone, open Settings > Tap your name > iCloud. In this menu, you’ll see a breakdown of what’s using up your storage, followed by an option to manage your storage. Below are some apps that use iCloud, like Apple Photos, a Device Backups section, ‘Advanced Data Protection’ (which will let you encrypt your iCloud data, although the feature isn’t available in Canada yet), and finally a toggle to turn on access to your iCloud data from the web. You may also see ads pushing you to upgrade your iCloud storage.

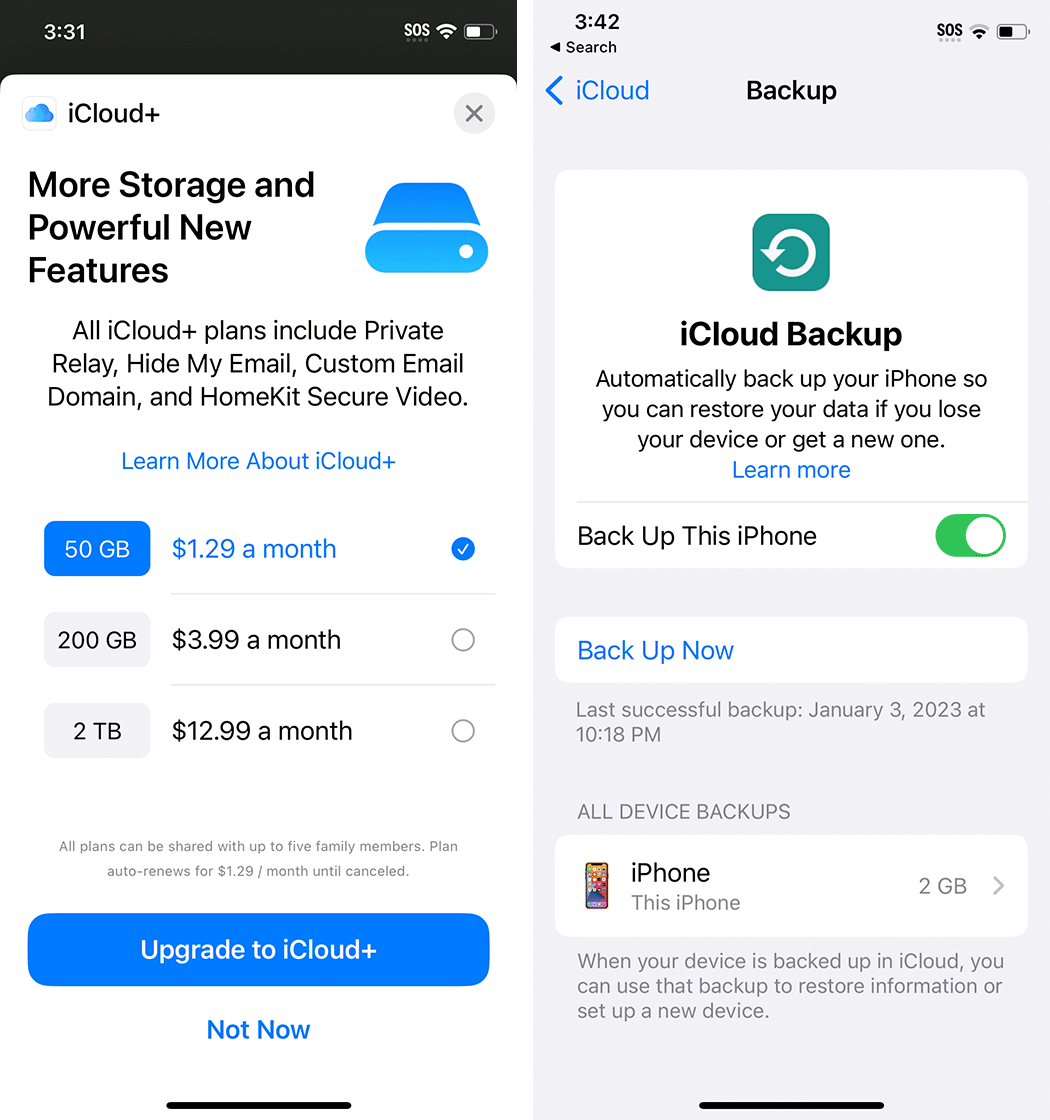
Tapping ‘Manage Account Storage’ brings up a list of everything stored in your iCloud along with how much space is being used by that thing. Most of my storage is used up by Backups and Messages because I disabled Photos backup (more on that in a moment). This list can be handy if you want to clear out any large items — simply tap an item and tap ‘Delete’ on the next screen to remove it from iCloud. You can also expand your iCloud storage from this screen with the following options and prices in Canada (as of January 6th, 2023):

  • 50GB – $1.29/mo
  • 200GB – $3.99/mo
  • 2TB – $12.99/mo

Paying for iCloud also gives you access to iCloud+ features like Private Relay, Hide My Email, and more — learn about those here.

iCloud Photos will likely be the thing gobbling up most of your iCloud storage. It’s a system for backing up photos and videos from your iPhone and it’s a great way to protect your pictures in the event you break or lose your iPhone. As I mentioned above, I don’t use iCloud to back up my pictures because I prefer Google Photos and I primarily use Android phones. If you don’t want to back up images to iCloud, you can turn this feature off (but I’d strongly recommend using another backup service to protect your pictures, whether that’s Google Photos, Microsoft OneDrive, or something else).

Most importantly, check the Device Backups section to ensure your iPhone is backing up to iCloud. This will make it easier to restore your data on a new iPhone.

Android

Android’s backup system is fairly complex, thanks partly to manufacturers offering their own backup systems on top of what’s available as part of Android. My recommendation is to make sure the Android backup system is set up and good to go first, and then look into setting up the manufacturer backup system (for example, Samsung Cloud backup for Galaxy phones).

You can manage your backups from two places on Android. The first is through the Google One app, and the second is by heading into the Settings app and going to the ‘Backup’ section. It might be in a different spot depending on your phone — on my Pixel 7, it’s in Settings > System > Backup, while on a Galaxy S10e I checked it was in Settings > Accounts and backup > Back up data under the Google Drive header.

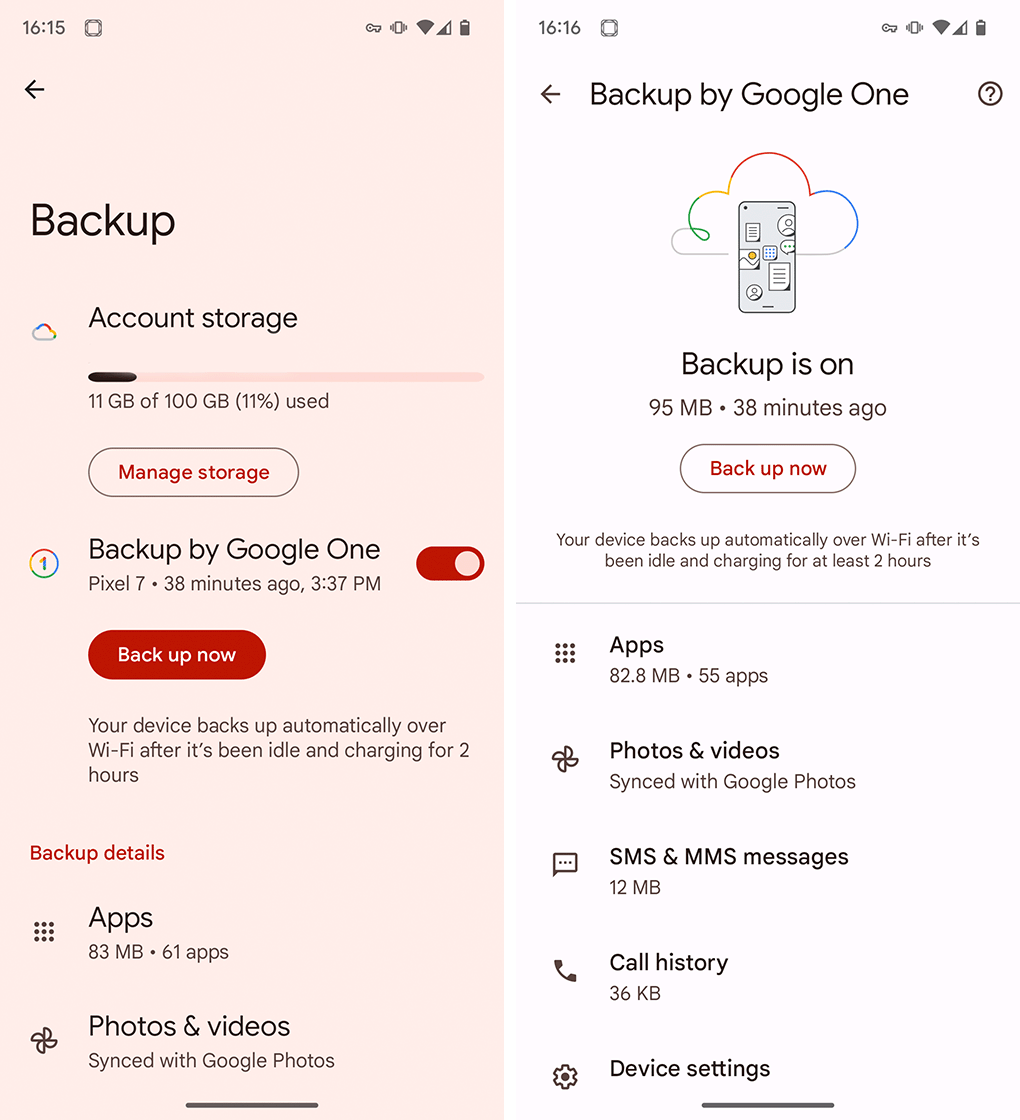
Regardless, you should end up on a screen showing your Google account storage, an option to manage the storage, and then backup details for your device, including a ‘Back up now’ button and a list of what’s included in the backup and how much space it takes up.

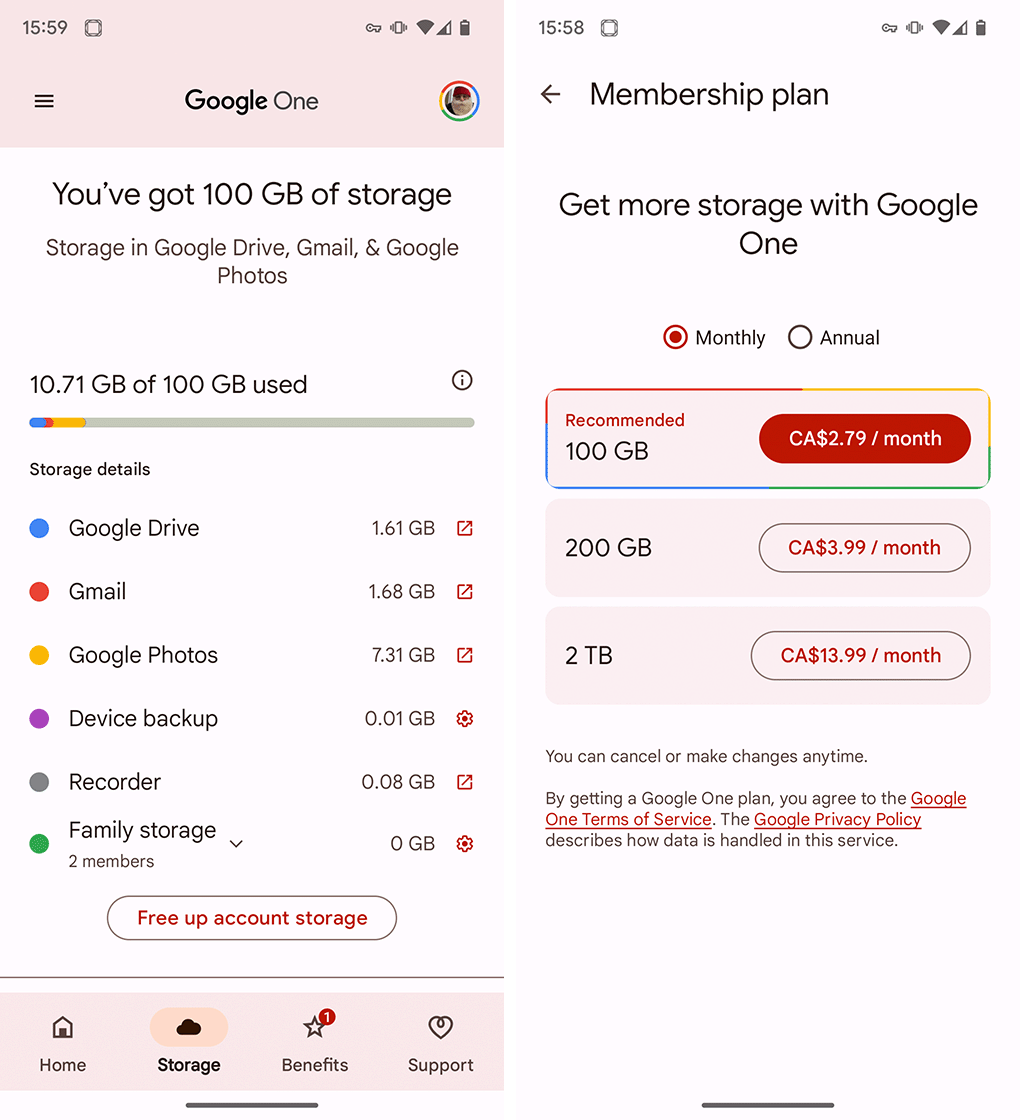
Android backups are stored in Google One cloud storage, which is shared across various Google services, including Drive, Gmail, and Google Photos (it’s worth noting that while photos are listed in the device backup section, the Google Photos app handles the backup). You get 15GB for free and can upgrade your storage to:

  • 100GB – $2.79/mo or $27.99/year
  • 200GB – $3.99/mo or $39.99/year
  • 2TB – $13.99/mo or $139.99/year

Controlling what gets backed up and what doesn’t is a little more confusing than it is with the iPhone. In the Backup menu in my phone’s Settings app, I could only view a list of what was backed up. However, if you head into the Google One app to view your backup, there’s a ‘Manage backup’ button that takes you to a menu with options to toggle off certain categories, such as device data, multimedia messages, or photos and videos. However, other parts of the Android backup interface will bounce you to Google Photos to manage what gets backed up.

Again, your photo library will probably take up the most space in your device backup, so being able to manage that separately is the most important thing — none of the other stuff in my backup takes more than 100MB of space.

Categories
Mobile Syrup

Hate that new Search button in iOS 16? Here’s how to turn it off

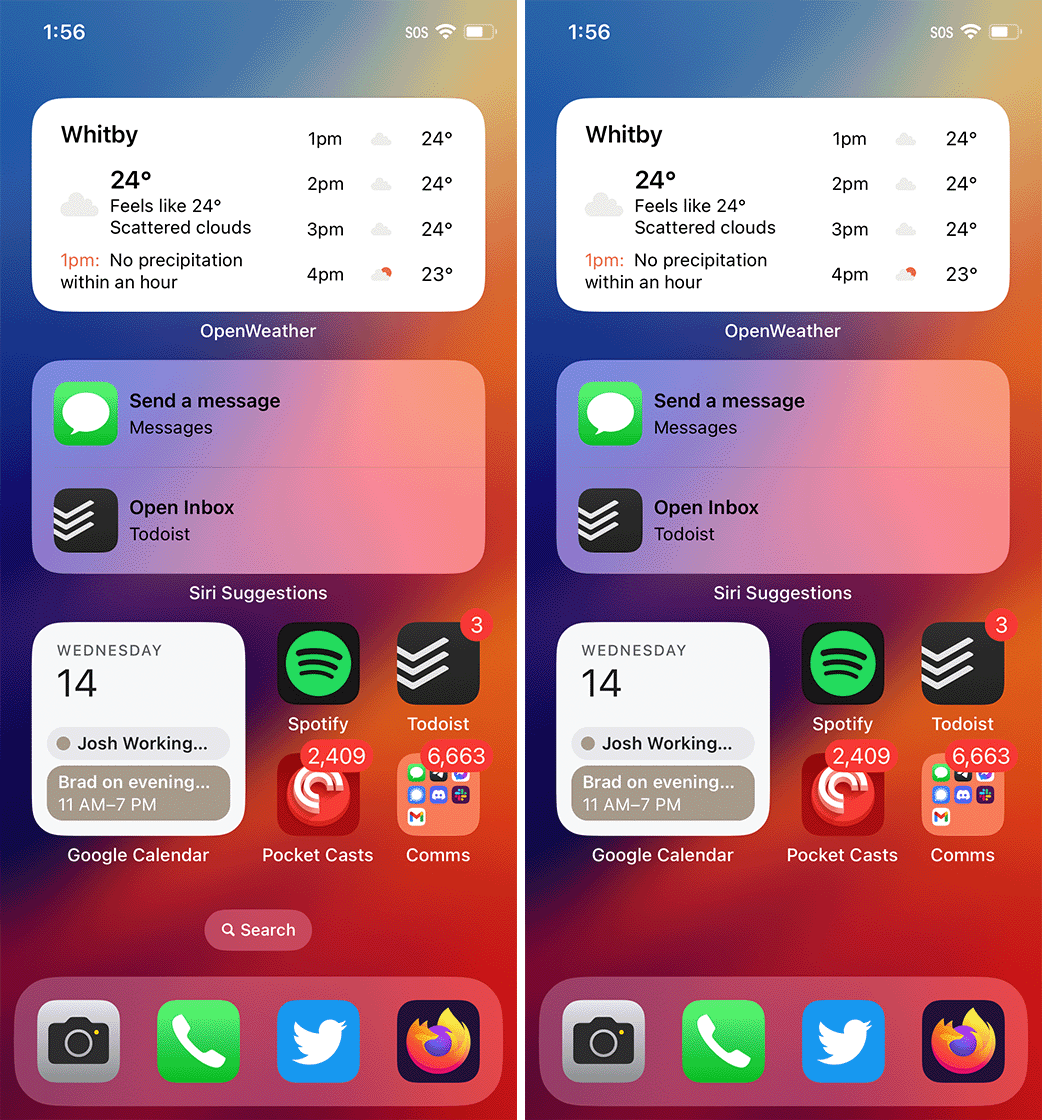
iOS 16 brought a ton of helpful new features to iPhones, but not every change was welcome. For example, the new ‘Search’ button that now appears on the home screen.

The Search button sides below your apps and above the dock where the home screen indicator used to be (the indicator still shows up when you swipe between home screens). But, for most iPhone users, the button will likely be useless since you can swipe down on the home screen to open Search instead.

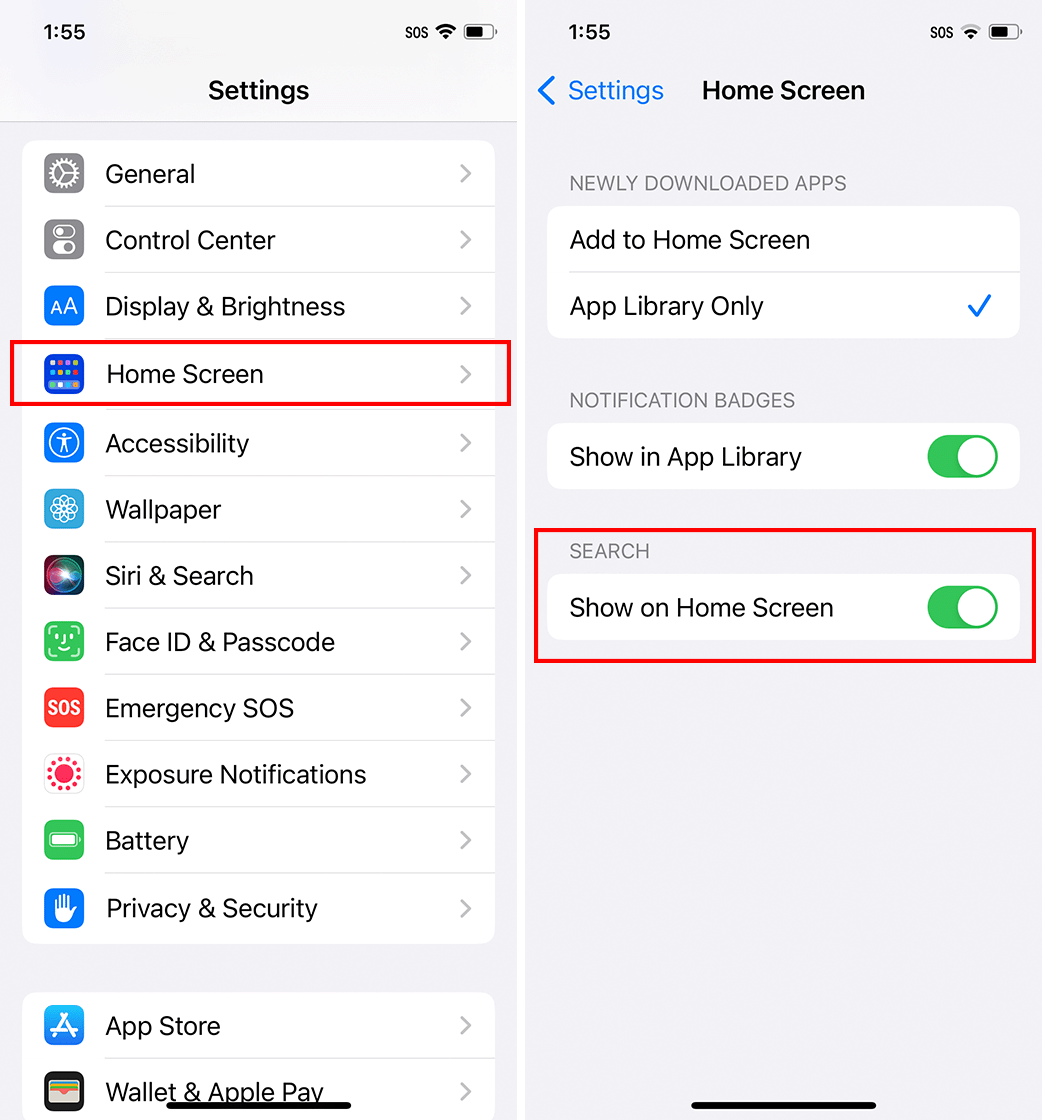
So, if you want that Search button gone and your precious home screen indicator back, here’s what you need to do:

  • Open Settings
  • Scroll to and tap Home Screen
  • Find the Search section
  • Tap the toggle next to ‘Show on Home Screen.’

That’s all there is to it. If you want to go back to having a Search button, just follow the same steps to bring it back.

If you want to learn more about iOS 16, check out the various MobileSyrup guides, including how to customize your lock screen, how to enable the battery percentage icon, and more.

Categories
Mobile Syrup

Here are some of the smartphone trade-in programs available in Canada

It feels like the cost of new smartphones is always going up. Sure, you can get a phone on a contract with your carrier to ease the cost, but you’ll just end up paying the cost of the phone (and more!) through monthly financing, bill tabs, or other expenses.
One sure-fire way to reduce the cost of your new smartphone is to trade in your old one. Most companies offer some kind of credit or discount for trading in an older phone, especially if it’s in good condition. Plus, it helps the environment by giving the phone a second life as a used device or by recycling the parts.

The thing is, it’s not always easy to know how much your old phone is worth before you get a new one. So, here are some of the ways to check your phone’s trade-in value before you buy.

Note that most companies offer an “estimated” value online that can vary based on the condition of your device. Some sites let you input details about the device’s condition to get a more accurate estimate. Either way, keep the condition of your phone in mind when checking trade-in values since you might not get the full amount.

Manufacturer websites

Want to buy your new smartphone right from the source? Manufacturers often have trade-in programs and let you check your phone’s value online. Here’s how to do it with some popular phone makers:

Apple

Apple lets customers trade in eligible devices for credit (or if Apple deems there’s no value for the device, it will recycle it for free). The tech giant’s website lists estimated trade-in values for several of its devices, although the bad news here is if you want to trade in a non-Apple device with Apple, the company won’t give you anything for it. Bummer.

Still, if you want to trade in your old iPhone, iPad, Mac, or Apple Watch, you can get decent value for it from Apple.

Check out Apple’s trade-in page here.

Samsung

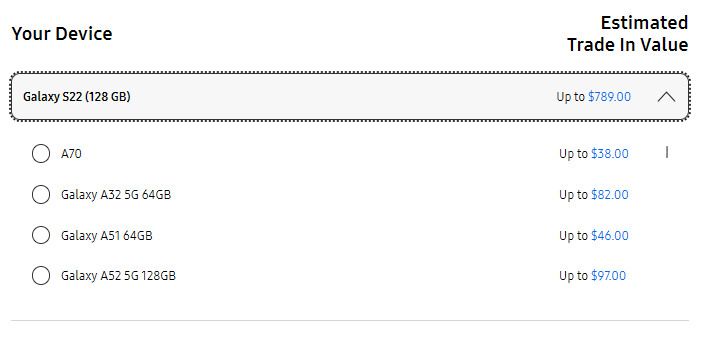
Samsung’s website asks customers to select the type of device they’re trading in and which Samsung device they want to purchase before listing trade-in values. For example, if you’ve got a phone to trade in, you can select ‘Smartphone,’ pick the new Galaxy device you want, and then select the exact smartphone you have from the drop-down list.

Samsung’s list includes a variety of devices, including Galaxy, iPhone, Pixel, and more. Unfortunately, it appears you can’t mix and match devices — i.e. if you have a tablet to trade in, you can only put it towards a Samsung Galaxy Tab, not a smartphone.

Check out Samsung’s trade-in page here.

Google

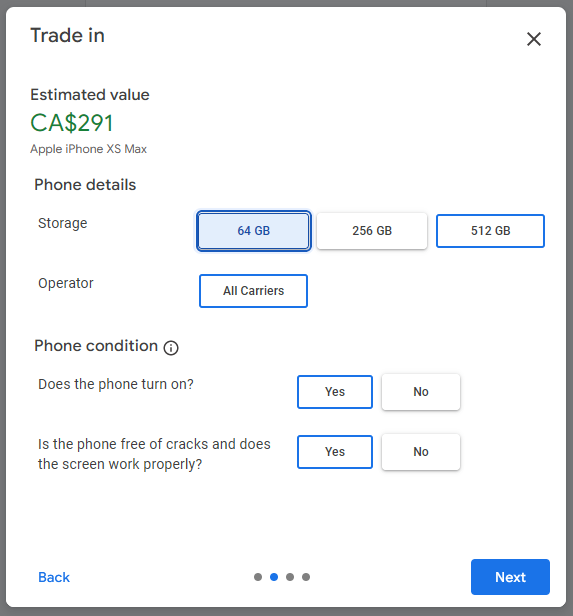
Google accepts Google, Samsung, and Apple devices for trade-in toward a new Pixel smartphone. The Google Store automatically asks customers if they want to trade in during the check-out process, but oddly the company makes you sign in with your Google account first before you can see estimated trade-in values for your old phone.

Once you sign in, you can choose a manufacturer and eligible device from the drop-down menus and then fill in some info about the device. For example, adding details like how much storage the phone has, whether it’s locked to a carrier, if it turns on and if it’s free of cracks and scratches can impact the estimated value you’ll get.

Google also has a whole page dedicated to explaining its trade-in process. Interestingly, Google’s trade-in page says it accepts devices from LG and Motorola as well, but neither showed up as options when I actually attempted a trade-in.

You can learn more here.

Retailers

Some stores also offer trade-in programs and will take your old device in return for a gift card or store credit of some kind. Check out some of the options below:

Best Buy

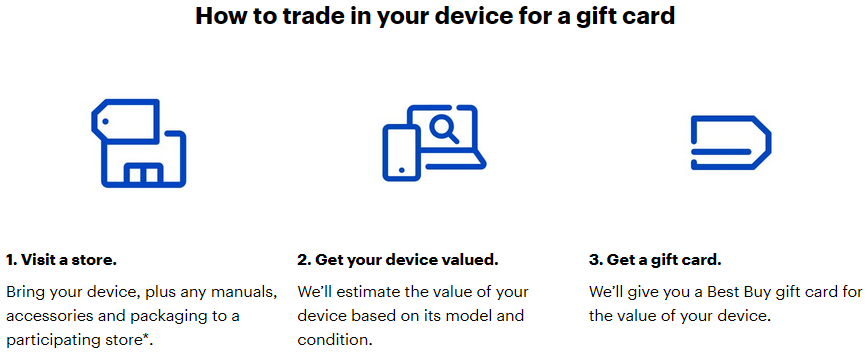
Best Buy offers gift cards for a variety of tech products ranging from smartphones to laptops to even cameras and game consoles. You can select the item category you want to trade in on Best Buy’s website and receive an estimate of the gift card value you’ll receive.

It’s worth noting you’ll need to go into a Best Buy store to give them your device and get your gift card, but at least you can get an estimate of how much you’ll get online first.

Check out Best Buy’s trade-in program here.

The Source

Source: The Source

The Source similarly offers a trade-in program that gives gift cards for old tech. While the store doesn’t offer as robust a value estimation tool as Best Buy, you can still get an idea how much you’ll get for smartphones, tablets, and more.

Learn more here.

Carriers

Most Canadian carriers or providers offer trade-in programs, along with online tools to estimate the trade-in value of a device. To keep things short, we’ve included a simple list of providers with trade-in options and links to respective trade-in pages or tools below.

That should cover all the major trade-in programs available in Canada. If we missed one you think is worth mentioning, let us know down below.

Categories
Mobile Syrup

Here’s how to find the best possible deals on Prime Day

Amazon’s Prime Day is just around the corner. After being delayed in Canada in 2020, and outright cancelled in 2021, Canadians can now shop for their favourite electronics at heavily discounted prices.

From smart home gadgets, headphones and peripherals to wearables, robot vacuums and laptops, Prime Day presents a bombardment of deals and promotions — so much so that selecting items becomes a little overwhelming. Adding to this is the uncertainty of stock of highly sought-after products, including the latest-gen consoles.

Thankfully, some tools on the internet can help us keep track of stock and prices, ensuring that you always get the best deal possible.

CamelCamelCamel🐪🐪🐪

One of the most reliable tools that can alert you about Amazon stock, product price and price history is CamelCamelCamel. A website and extension that lives on your browser, Camel allows you to select products that you’re interested in buying and sends you an email notification the moment it detects a price decrease/discount on it. In the case of sought-after products, like the PlayStation 5 or the Xbox Series X, Camel will send you an email notification about the product being in stock.

The service isn’t limited to electronics and can be used to track any product on Amazon’s super vast catalogue. Further, Camel is a free tool and can even be used with fewer features without signing up. CamelCamelCamel supports Amazon United States, Canada, Europe and Australia.

To simply check the historical prices of a product on Amazon, head to Amazon, navigate to the product listing, copy its URL and paste it on the top ‘Find Amazon Products’ bar on Camel.

This is also where you can add your email and set a price drop percentage. Whenever the price of the product drops to the set percentage, you’ll get an email notification. I like to set it to “Any Price Drop,” so I receive a notification whenever the price heads south.

In the example below (second screenshot), we can see that the Samsung Odyssey monitor was available for $2,062 in early June. Considering the abundance of incoming deals on Prime Day, the monitor’s price will likely go down to that level again. So instead of getting it now for $2,594, I can set a price drop alert and purchase it for a better price.

Price Dropper

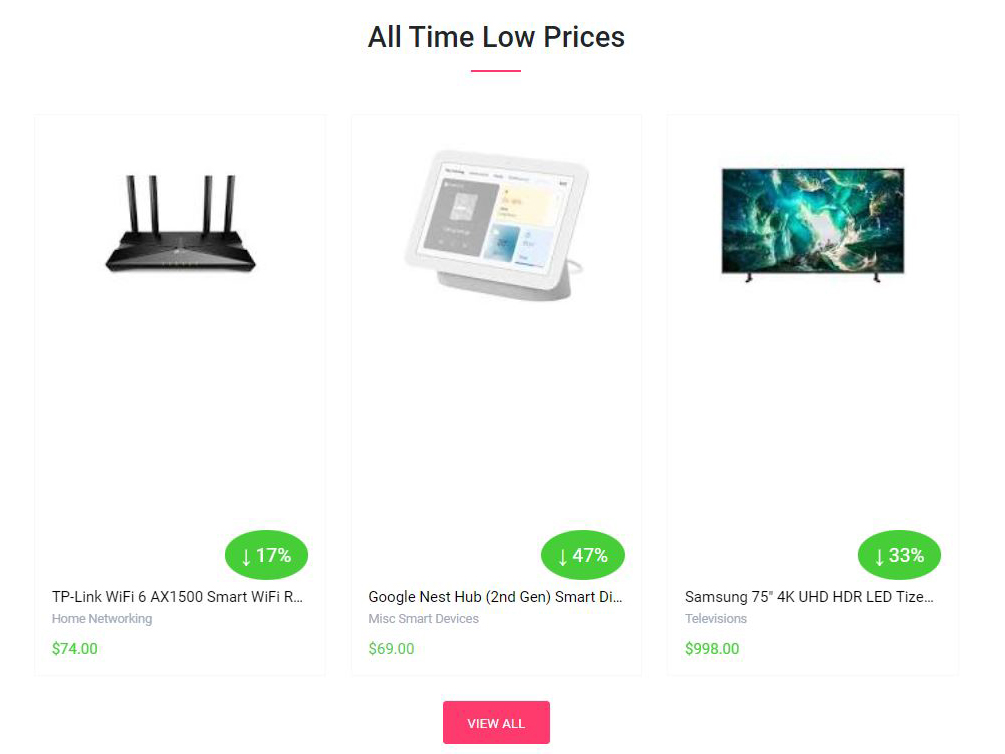
Unlike Camel, which only tracks products listed on Amazon, pricedropper.ca can track over 100 Canadian retail websites, including Best Buy, Apple, Canada Computers, Canadian Tire, Costco, EB Games GameStop, Microsoft, Newegg, Razer and countless more. However, we will use Price Dropper only to track Amazon.

The website’s homepage displays different sections, including ‘Featured Price Drops,’ ‘All Time Low Prices,’ and ‘Latest Price Drops’ which allow you to stay on top of the trends.

You don’t need to create a Price Dropper account to track historical pricing; however, you’ll have to sign up if you want to be notified about a discount.

The procedure works similarly to Camel. You locate the product you want to track and copy its URL. Head to the ‘+ New Product’ tab on the top right and paste and paste the URL. To just check the pricing, click on ‘Search,’ also located on the top right, and enter the product’s name.

In the example below, I can clearly see that the Acer monitor is currently sitting roughly $2 above its all-time low listing, giving me confidence that the deal I’m getting is likely the best one.

Following the right Twitter accounts

Twitter is more than just a hate-spewing microblogging platform. If you’re following the right accounts, it can be a place to learn and grow your circle. Some Twitter handles that focus primarily on Canadian retailer stock and product pricing are a must-follow if you’re trying to find the best Prime Day deals.

These are the most notable Twitter accounts that I and others at MobileSyrup follow, and you should, too, if you want to stay on top of deal trends:

@Lbabinz — “Video Game deals in Canada 🇨🇦, preorders, news. Nintendo, PS5, Xbox, PC.”

@GameDealsCanada — “Why pay full price for games, Canada?”

@CDNnotify — “Info to help out the Canadian sneaker and #PS5 community”

Bonus

RedFlagDeals is like Reddit but for Canadian deals. It publishes several new deals, promotions and flyers on its forum-style website across more than 70 categories, including Fashion & Beauty, Health & Wellness, Sports & Recreation, however, we use the platform primarily for its Computers & Electronics Threads, TV Threads and Video Game Threads.

RFD has full-time employees scouring for bargains, coupons, and freebies, plus thousands of users, who can also add threads about notable promotions they discovered.

Right now, RFD has a special ‘Early Prime Day Deals’ section right on the homepage. Check it out here.

Image credit: Amazon

Categories
Cottage Life

How to share a rental cottage (while keeping the peace)
Splitting a rental cottage with a big group is a great way to keep costs down. But a dozen friends or family members in close proximity can create some challenges. 

The key is communication and planning, says Samantha Aguirre, who has split a cottage with friends every summer for the past eight years. She shares a few tips to keep things running smoothly so your group can have a memorable cottage getaway.

1. Communicate before the trip

The first step should be discussing everybody’s expectations. While you may be content to lay in a hammock for a week, others might have a long list of must-haves. To make all this communication simpler, create a text chain or group chat to help coordinate the trip. “We have a group chat on Instagram,” Aguirre says. “We confirm everything there so everyone’s on the same page.”

2. Nominate one person to take charge

It can be helpful for one person to take the lead, Aguirre says. “I tend to be the organizer. We found through the first couple years of cottaging together that it’s just easier to have one person who takes charge.” It’s also better for your host if they have one person as a point of contact for the rest of the group.

But the organizer doesn’t need to do the entirety of the work. Ask people to volunteer to manage different parts of the trip, such as driving, navigating day trips, or bringing games and movies to the cottage. 

3. How to split the costs

As the group’s organizer, Aguirre pays the full price and then collects the split from each member of the group. It’s typically a simple formula, though she admits it’s trickier when people visit for the weekend, for example, rather than the full week. 

There are a few ways you can divide the costs of a rental cottage. It can be split by person, by room, or proportionally, per person per night. If this sounds like too much math for a vacation, you can use an app like Splitwise to help keep track of shared expenses. You’ll also need to consider what happens if someone drops out and whether they’re still responsible for any costs. 

4. Master cottage meal planning

Meal planning can be simple if you plan ahead and stick to the basics. Aguirre asks everybody to bring their own snacks, but otherwise, she buys the majority of the meals and then splits the costs. She even does some prepping before the trip. “It just makes life easier. We just pull things out of the freezer, let it defrost and cook it.” Alternatively, if you’re sharing the cottage across multiple families, each family can be responsible for one day or one meal, from the prep to the cleanup.

5. Determine sleeping arrangements ahead of time

Not all beds are created equal. Rather than first come, first serve, try to allocate rooms during the planning stage to avoid any squabbles. But Aguirre says her group has never had any disputes over sleeping arrangements. “The single guys crash on the bunk beds, the couples take a room with a double bed, and the odd straggler who’s up the latest takes the couch,” she says. “Sometimes we try to get the drivers a good bed if they’re doing a lot of driving for a day trip.” 

Categories
Mobile Syrup

Here’s what’s new on Crave in April 2022

Bell has announced all of the new movies and shows coming to its Crave video streaming platform in April.

Series and movies like Season 2 of The Flight Attendant, Halloween Kills, the third season of HBO’s A Black Lady Sketch Show, Season 3 of Barry, The First Lady starring Viola Davis as Michelle Obama, and the Canadian movie Night Raiders.

Below is all the content coming to Crave in April 2022:

April 1st

  • 61 — HBO + Movies 
  • Jerrod Carmichael Stand UP Special — HBO + Movies 
  • Night Raiders — HBO + Movies 
  • Soccer Mom Madam — HBO + Movies
  • The Dark Knight — HBO + Movies
  • The Dark Knight Rises — HBO + Movies 
  • The Forever Purge — HBO + Movies 
  • Fairview: Season 1
  • Mary Makes it Easy: Season 1B
  • Chicago — Starz 
  • Drive — Starz
  • Lazy Susan @11pm ET — Starz 
  • My Best Friend’s Girl — Starz 
  • Speed Racer — Starz
  • Suffragette — Starz
  • Thor: Tales of Asgard — Starz 
  • The Winning Season — Starz

April 2nd

  • Kid-E-Cats: Season 1, Episodes 33-52
  • Super 4: Episodes 41-52
  • That’s Joey: Episodes 33-52
  • Zak Storm: Season 1, Episodes 11-29

April 4th

  • The Invisible Pilot: Season 1 @9pm ET — HBO + Movies 

April 5th

  • Tony Hawk: Until the Wheels Fall Off @9pm ET — HBO + Movies 

April 6th

  • Transplant: Season 2
  • Barney’s Version — Starz 

April 7th

  • Tokyo Vice: Episodes 1-3 — HBO + Movies

April 8th

  • A Black Lady Sketch Show: Season 3, Episode 1 @11pm ET — HBO + Movies 
  • Midway — HBO + Movies
  • Highway Thru Hell: Season 10 — HBO + Movies 
  • Last of the Giants: Season 1 — HBO + Movies 
  • Hope Floats — Starz
  • Miss Firecracker — Starz
  • Moulin Rouge — Starz
  • Never Let Me Go — Starz
  • Osmosis Jones — Starz 
  • Inherent Vice — Starz
  • Ride Along 2 — Starz
  • Wall Street — Starz
  • Wall Steet: Money Never Sleeps — Starz

April 9th

  • Appolo’s Tall Tales: Episodes 33-52

April 15th

  • Halloween Kills — HBO + Movies 
  • Needle In A Time Stack — HBO + Movies 
  • The Good Father: The Martin Macneill Story — HBO + Movies 
  • La Madrina: The Savage Life of Lorine Padilla
  • Cookie Monster’s Foodie Truck
  • Elmo’s World
  • Paul Rabliauskas: Uncle
  • Supermarket Sweep: Season 2
  • Wellington Paranormal
  • Up Dish: Season 1
  • A Stork’s Journey — Starz
  • Goodbye Christopher Robin — Starz 
  • Sharktopus — Starz
  • Sharktopus Vs. Pteracuda — Starz
  • Sharktopus Vs. Whalewolf — Starz
  • Sisterhood of the Travelling Pants — Starz
  • Sisterhood of the Travelling Pants 2 — Starz
  • The Secret Life of Walter Mitty — Starz
  • Walk The Line — Starz 
  • Whip It — Starz 

April 17th

  • The First Lady

April 20th

  • Portraits From A Fire — HBO + Movies 
  • Cypress Hill: Insane In The Brain
  • The Day We Left

April 21st

  • The Flight Attendant: Season 2, Episodes 1-3 — HBO + Movies

April 22nd

  • Living The Dream: Season 2C
  • Heavy Rescue 401: Season 6
  • A Hidden Life — Starz
  • Focus — Starz
  • Lucy in the Sky — Starz 
  • M*A*S*H — Starz 
  • Shark Tale — Starz 
  • The Beach — Starz 
  • The Visit — Starz
  • Thirteen — Starz 
  • Creation Stories — HBO + Movies
  • Torn From Her Arms — HBO + Movies 

April 23rd

  • Percy’s Tiger Tales Specials

April 24th

  • Gaslit — Starz 
  • Barry: Season 3 @10pm ET — HBO + Movies
  • The Baby @10:30pm ET — HBO + Movies 
  • The Man Who Fell From Earth: Episode 1

April 25th

  • We Own This City: Episode 1 @9pm ET — HBO + Movies 
  • Gentleman Jack: Season 2 @10pm ET — HBO + Movies 

April 27th

  • The Survivor @8pm ET — HBO + Movies 

April 29th

  • I Love That For You: Season 1, Episode 1
  • Mud Mountain Haulers: Season 1
  • Dead Ringers — Starz 
  • Donnie Darko — Starz 
  • Lost in Translation — Starz
  • Liar Liar — Starz 
  • Machete — Starz 
  • Miller’s Crossing — Starz 
  • New Order — HBO + Movies
  • The Humans — HBO + Movies 
  • This is the Night — HBO + Movies 
  • Bushwick Bill: Geto Boy

April 30th

  • Blippi Wonders: Episodes 1-3

Last Call

  • Life’s Too Short: Season 1 (April 7th)
  • Think Like A Dog (April 8th)
  • Planet of the Humans (April 12th)
  • Random Acts of Violence (April 14th)
  • Rogue Earth (April 14th)
  • American Woman (April 16th)
  • Supermarket Sweep: Season 1 (April 17th)
  • Anthropocene: The Human Epoch (April 19th)
  • ETalk: A BEll Let’s Talk Day Special (April 25th)
  • 2019 Rock and Roll Hall of Fame (April 25th)
  • Viena and the Fantomes (April 29th)
  • 1917 (April 30th)
  • 3:10 To Yuma (April 30th)
  • A Very Harold & Kumar Christmas (April 30th)
  • Afghan Luke (April 30th)
  • American Psycho (April 30th)
  • Aquamarine (April 30th)
  • Beautiful Creatures (April 30th)
  • Blood Quantum (April 30th)
  • Can You Keep A Secret? (April 30th)
  • Crank (April 30th)
  • Crank 2: High Voltage (April 30th)
  • Dolittle (April 30th)
  • East of Eden (April 30th)
  • Enchantimals: Spring into Harvest Hills (April 30th)
  • Enchantimals: Tales From the Everwilde: Season 1 (April 30th)
  • Enemy (April 30th)
  • Four Kids and It (April 30th)
  • Gabrielle (April 30th)
  • Hall Pass (April 30th)
  • J. Edgar (April 30th)
  • Man Down (April 30th)
  • One Survivor Remembers (April 30th)
  • Parental Guidance (April 30th)
  • Punisher: War Zone (April 30th)
  • Ride Like A Girl (April 30th)
  • Sexy Beast (April 30th)
  • The Firm (April 30th)
  • The Hangover Part II (April 30th)
  • The Hunt (April 30th)
  • The Hurt Locker (April 30th)
  • The Ides of March (April 30th)
  • The Iron Lady (April 30th)
  • The Mechanic (April 30th)
  • The Wolfman (April 30th)
  • Things I Do For Money (April 30th)
  • W. (April 30th)
  • Zero Dark Thirty (April 30th)
Categories
Cottage Life

One hour is all it takes to salvage a busted lamp

Table and floor lamps can have a long life. But as they age, their three main electrical components—socket, cord, and plug—may need to be replaced. With a few simple techniques that make sure you do it safely, about $20, and an hour of your time, you can have a like-new, rewired lamp. 

Start by unplugging the lamp and removing the shade and bulb. With a screwdriver or a strong pair of hands, remove the upper shell of the socket. The socket shell, the sleeve, and the base (which is usually secured onto a threaded rod with a set screw) can be reused if they’re in good shape. If the shell is metal, make sure that you check that the cardboard insulation sleeve inside is intact. 

If you are just replacing a damaged lamp cord, unscrew the wires from the socket terminals. It’s probably best, though, to replace the socket itself while you’re at it, since the switch often breaks over time. In that case, unscrew the socket base from the lamp, leaving the old cord attached. You can use that old cord as a pull wire, attaching old to new, to get the replacement up from the base to the socket. 

Whenever you’re wiring, it’s important to know which wire is which. The side of the new lamp cord with raised ridges or printing is the neutral conductor. That wire goes to the silver screw on the socket. The other wire, on the smooth side, is hot; it goes to the brass screw. 

With the wires identified and threaded through the secured socket base, pull the two wires apart for a few inches to create two single wires. Then tie them into an underwriter’s knot. If anyone pulls on the cord, this knot prevents damage to the wire or the terminal connections.

Strip the end of each wire, wrap it clockwise around the corresponding terminal screw, and tighten it. Everything else goes back together just as it was when you started.

You’ll save time (and often money) by buying a lamp cord with the plug already attached, but if you’re only replacing the plug, be careful that you attach the wires correctly. It’s the same principle as in the socket. The ridged, neutral wire connects to the wide prong on the plug. Those different-sized prongs mean you can only plug the lamp in one way—the safe way.

Categories
Mobile Syrup

The fastest ways to open the camera on Android and iOS

It doesn’t matter if you shoot photos on iOS or Android, nearly every modern smartphone features a stellar camera packed into its rear, but half of the battle is getting the device out of your pocket and opening the shooter fast enough to catch that special moment.

Both mobile operating systems are rife with quick access toggles and gestures to launch their respective camera apps without tapping on the main camera app. These are some of the more common ways we use to snap pictures in a flash:

Android

On Android, the situation varies depending on what device you own, but there are still a few constants that prevail across nearly all modern Android smartphones.

My favourite way to open the camera on Android is to double-tap the power button. This is easily the fastest way to open a camera and has allowed me to snap pictures and videos that I would have likely missed if I was using an iPhone.

Some Android phones also allow you to add a camera button to your quick toggles in the notifications shade, but this isn’t the case with all devices. Another thing that’s pretty random and misaligned across Android is gestures to open the camera. For instance, OnePlus devices can be set up so if you draw an ‘O’ on your lock screen, the camera opens. However, I’ve never found this feature to be particularly useful.

I’d recommend just using the double tap on the power button for most people since it’s the fastest route.

iPhone

Beyond tapping on the classic camera app, there are a few other ways to launch the mobile camera with an iPhone and iOS 15.

With the first method, you’re greeted with is a small camera icon at the bottom right of your lock screen. If you tap and hold on this icon, it quickly opens up the camera. This is the fastest way to take a picture if your iPhone is off. Opening the camera this way also prevents others from going through your camera roll if you have a password.

The other abstract way to open the camera is from the ‘Control Centre.’ On iPhone X and newer devices that don’t feature a physical Touch ID button, you can access this by swiping down from the top right-hand side of your screen. Then, you should see a camera icon at the bottom of the screen. Tap that, and the app will launch. With older iPhones that still have a Home Button, you’ll need to swipe up from the bottom of the screen to open Control Centre.

If you don’t see the camera icon, you can add it to Control Centre by navigating to your device’s settings app, selecting Control Centre and adding the camera.

Sometimes I’ll also pull down to use the iPhone search function to pull up the camera, but I get by between these two methods and the default app.

I’ll also mention that if you take a ‘Live photo’ with your iPhone (the ones that move a bit like a gif), you can readjust the images in the Apple Photos app to choose a slightly earlier frame as the main photo.

Categories
Mobile Syrup

How to reset your Windows 11 computer

Sometimes, you need to reset your Windows PC. There are a ton of reasons for it — maybe something isn’t working properly, so you want to reset and try to fix it. Or perhaps you need to return a work or school PC and you want to clear your data off it. Or, maybe you want to start fresh and clear out years of digital clutter in one fell swoop.

Whatever the reason, Windows has a somewhat approachable reset tool. Before we get into how to use the reset tool, I want to note that this article will focus on Windows 11 since it’s the newest (and current) version of Windows. Most of these steps should apply to previous versions of Windows (very little, if anything at all, has changed here since Windows 10), but some things may look a little different.

With that said, let’s get into it.

How to reset Windows

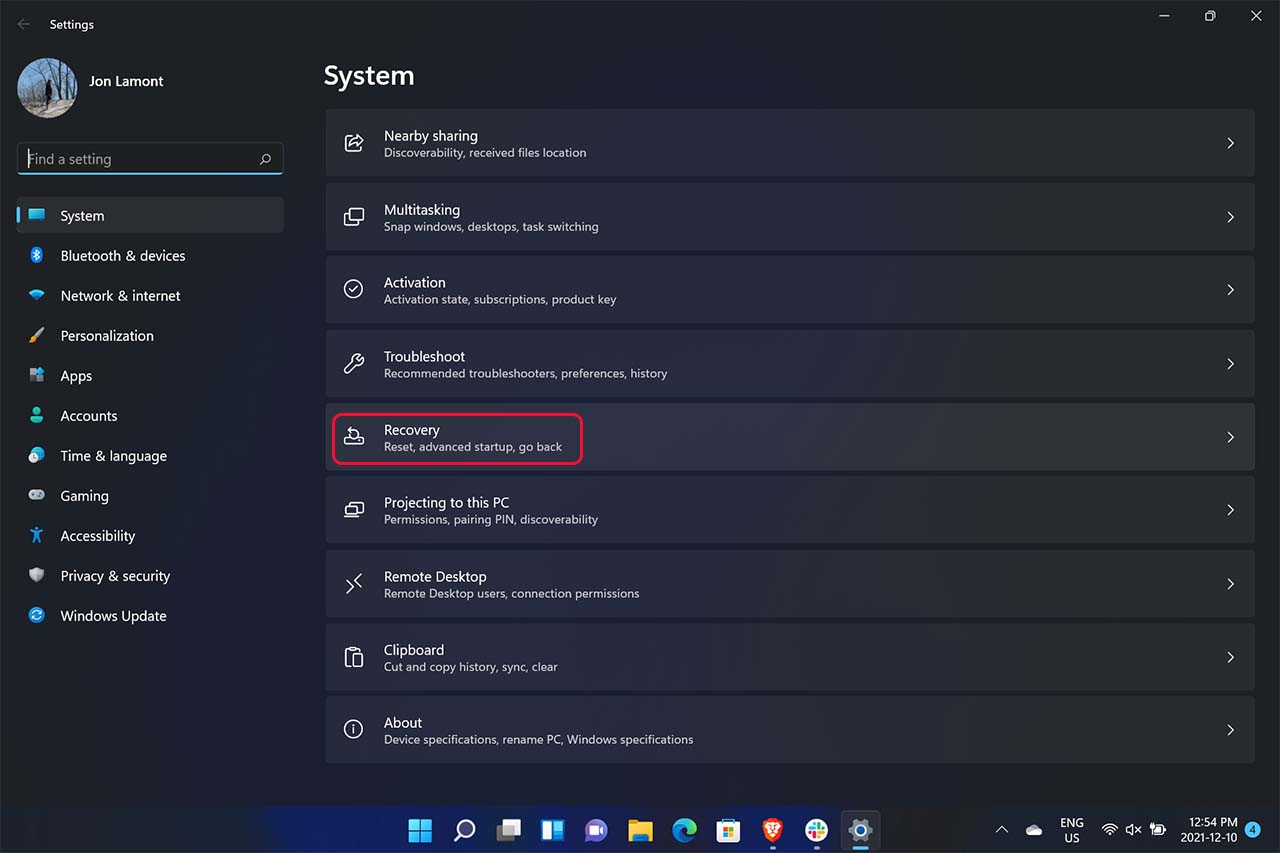
First things first, you need to open Settings then scroll down and click ‘Recovery.’ There are a few troubleshooting tools here you can play with, but for the purpose of this article, we’re going to go straight for ‘Reset this PC.’ Click the ‘Reset PC’ button to open the reset tool.

If for some reason you can’t access the settings app, you can boot your PC into the Windows Recovery Environment by holding the Shift key and clicking restart. Then click Troubleshoot > Reset this PC to get to the reset tool.

Once you open the reset tool, you’ll just need to click through and select a few options. Don’t worry, I’ll explain them as we go.

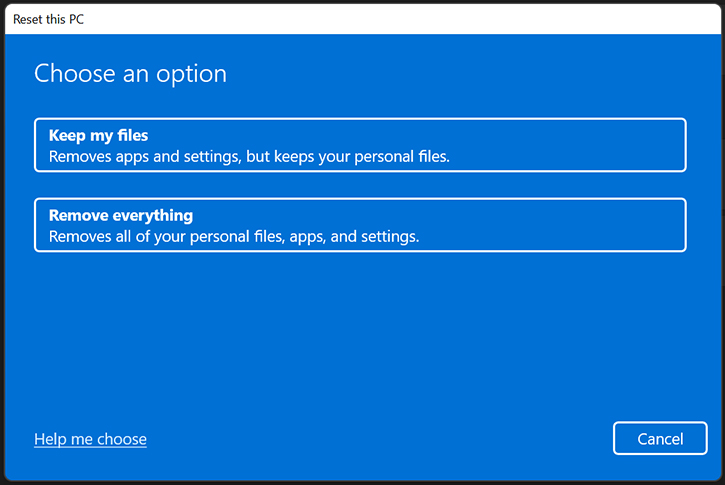
The first choice is between ‘Keep my files’ and ‘Remove everything.’ If you’re just looking to try and fix and Windows issue and don’t want to lose anything, the first option for you. Anyone wanting to clean house — for example, on a work laptop you’re giving back to IT — you’ll want option two.

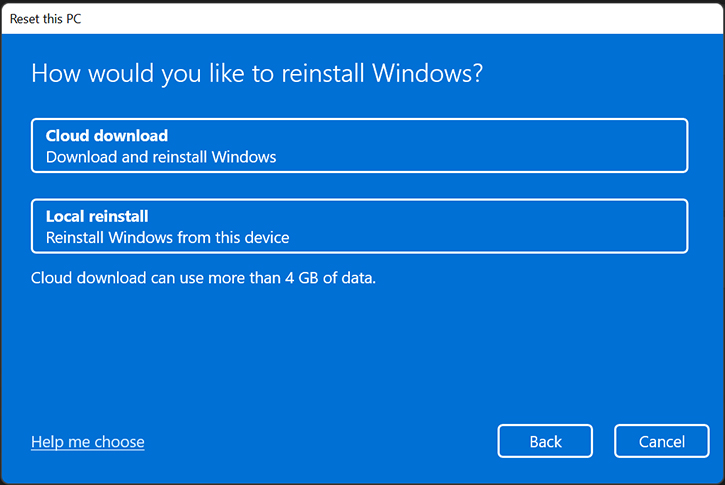
Next up, the reset tool will ask how you want to reinstall Windows. You can choose to reinstall from the cloud via an internet connection or use a local reinstall from files stored on-device.

I almost exclusively use the local restore to avoid waiting for a download (although the estimated 4GB size Microsoft lists isn’t huge). As someone who regularly resets review units to return them once I’ve finished testing, I’ve also never had an issue with using local reinstall. That said, there may be instances where cloud reinstall is the way to go, so make the selection based on your needs.

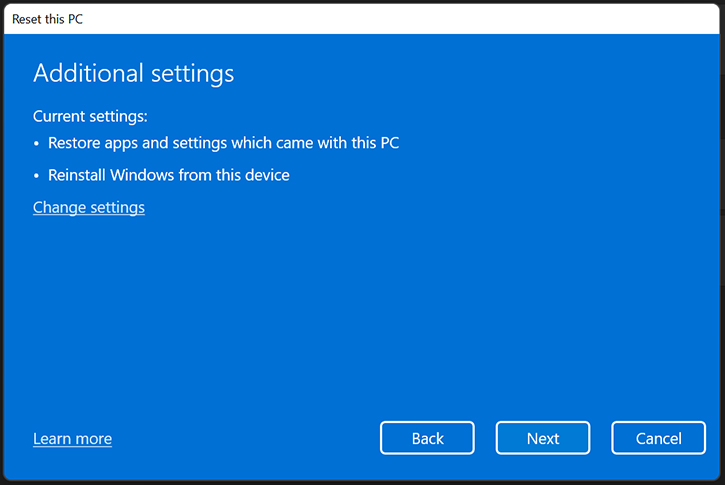
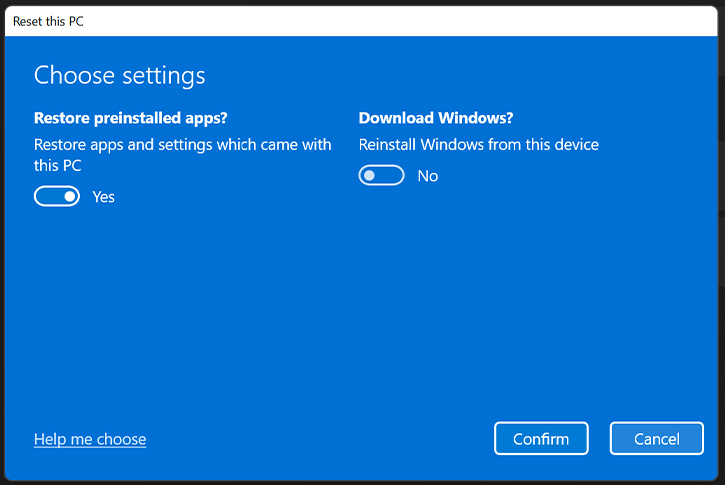
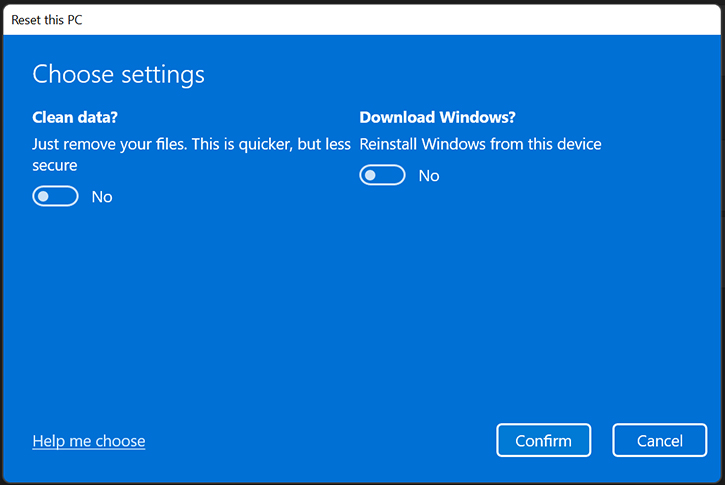
Next up is the ‘Additional settings’ screen, which lists out the current reset options you’ve selected. However, there are almost always more options worth looking at if you click ‘Change settings’ at the bottom of the list.

For example, if you’re doing a reset and keeping your files, clicking ‘Change settings’ will give you a toggle to restore preinstalled apps and settings that came with your device.

When doing a full reset, on the other hand, this section includes an option to ‘Clean data.’ It takes longer, but it fully removes your files from the drives. I highly recommend cleaning your drive if you’re doing this before giving away that device as it should help prevent someone from recovering any of your personal files down the line.

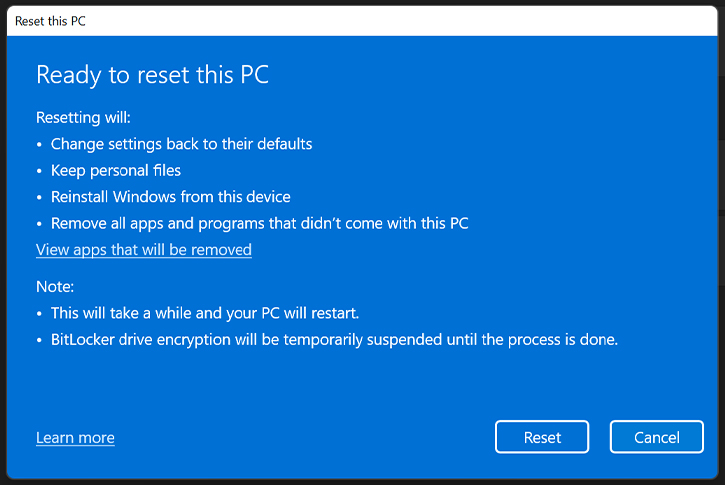
Finally, the last screen in the reset tool will give a summary of what will happen when you reset. This should include all the options you’ve selected so far. Review the list and, if everything looks good, click ‘Reset’ to start the process. Depending on your device, the size of your drives and other factors, the reset can take anywhere from a few minutes to an hour or more. If you’re resetting a laptop, you should plug it in and leave it plugged in throughout the process.

That should be it. You’ll need to wait while Windows runs through the reset process. When it’s done, you’ll either be able to go back to using your computer (if you kept your files) or run through the whole initial set-up process again, as if you just bought a new computer.