Categories
Mobile Syrup

Bug affecting Safari on macOS, all iOS browsers, could reveal browsing history

Apple prepared a fix for a WebKit bug that could reveal users’ recent browsing history and possibly their identity. However, it’s not clear when the tech giant will release updates with the fix.

According to MacRumors, a WebKit commit (typically refers to a revision made to code) on GitHub fixes a bug. However, Apple has not said when users could expect macOS, iOS or iPadOS updates to arrive with the fix. A January 14th blog post from FingerprintJS noted that the bug was reported to Apple on November 28th, 2021.

MacRumors previously reported about the bug on January 16th, which involves a JavaScript API called IndexedDB, a commonly-used tool for storing data on people’s computers. Specifically, the bug exists in the way WebKit — the open-source engine powering Apple’s Safari browser — implemented IndexedDB.

In short, the bug allows any website that uses IndexedDB to access the names of IndexedDB databases generated by other websites. Put another way, a website can access a list of other websites you’ve visited (even from different tabs or windows) if they’ve stored data using this API. Typically, browsers apply same-origin policy to IndexedDB to prevent sites from accessing anything outside of their own IndexedDB database.

Moreover, sometimes websites include unique user-specific identifiers in IndexedDB database names. MacRumors pointed to YouTube as an example, which creates databases that include users’ authenticated Google User ID in the name. Malicious actors could use this identifier to fetch personal information about users through Google APIs, such as their profile picture or name.

The WebKit bug affects Safari on macOS Monterey, iOS 15 and iPadOS 15. On iOS and iPadOS, Apple also forces third-party browsers to use the WebKit engine — that means browsers like Chrome and Edge running on iOS/iPadOS 15 are also affected. However, the bug doesn’t affect older versions of macOS, or iOS and iPadOS 14.

Ultimately, that means iOS and iPadOS users can’t really do anything to protect themselves from the bug beyond installing the software patch whenever Apple makes it available. For macOS users, however, switching to another browser would work.

Those interested in learning more about the bug should check out a deep-dive on it from FingerprintJS.

Source: MacRumors, (2), FingerprintJS

Categories
Mobile Syrup

Here’s how to take/make FaceTime calls on macOS Monterey

If you’re running iOS 15 and macOS Monterey, answering incoming FaceTime calls or starting new ones has never been easier.

Before we look into how to make/take calls, here are a few things worth noting:

  1. Your iPhone and Mac device should be signed in to iCloud with the same Apple ID
  2. Your iPhone and Mac device should be signed in to FaceTime with the same Apple ID
  3. Your iPhone and Mac device should be connected to the same Wi-Fi network

Settings on your iPhone

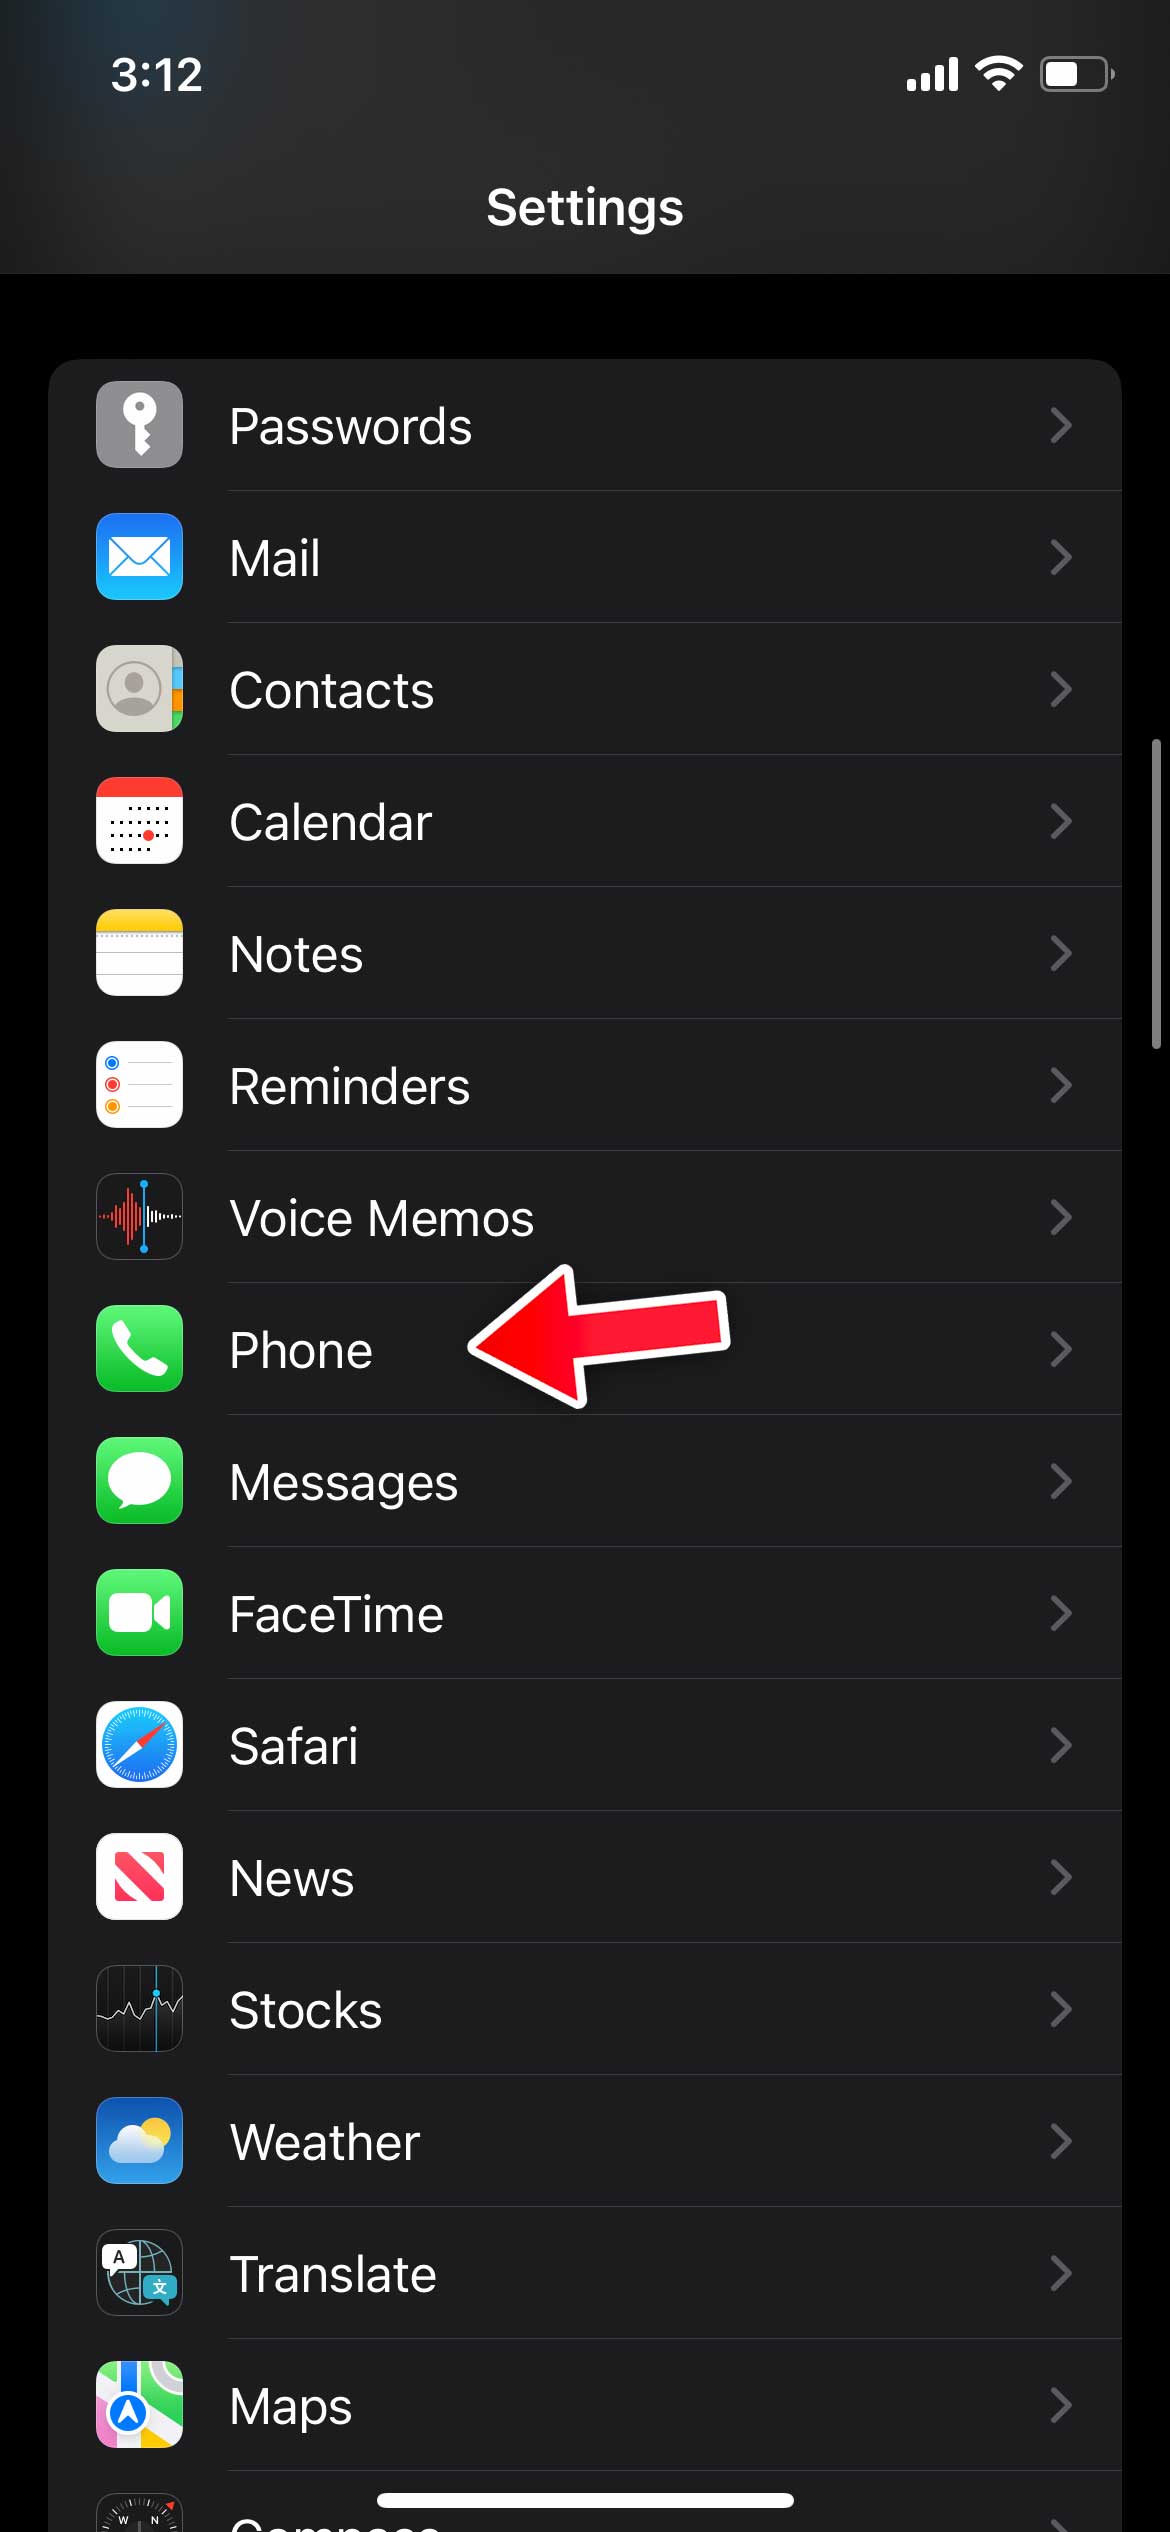
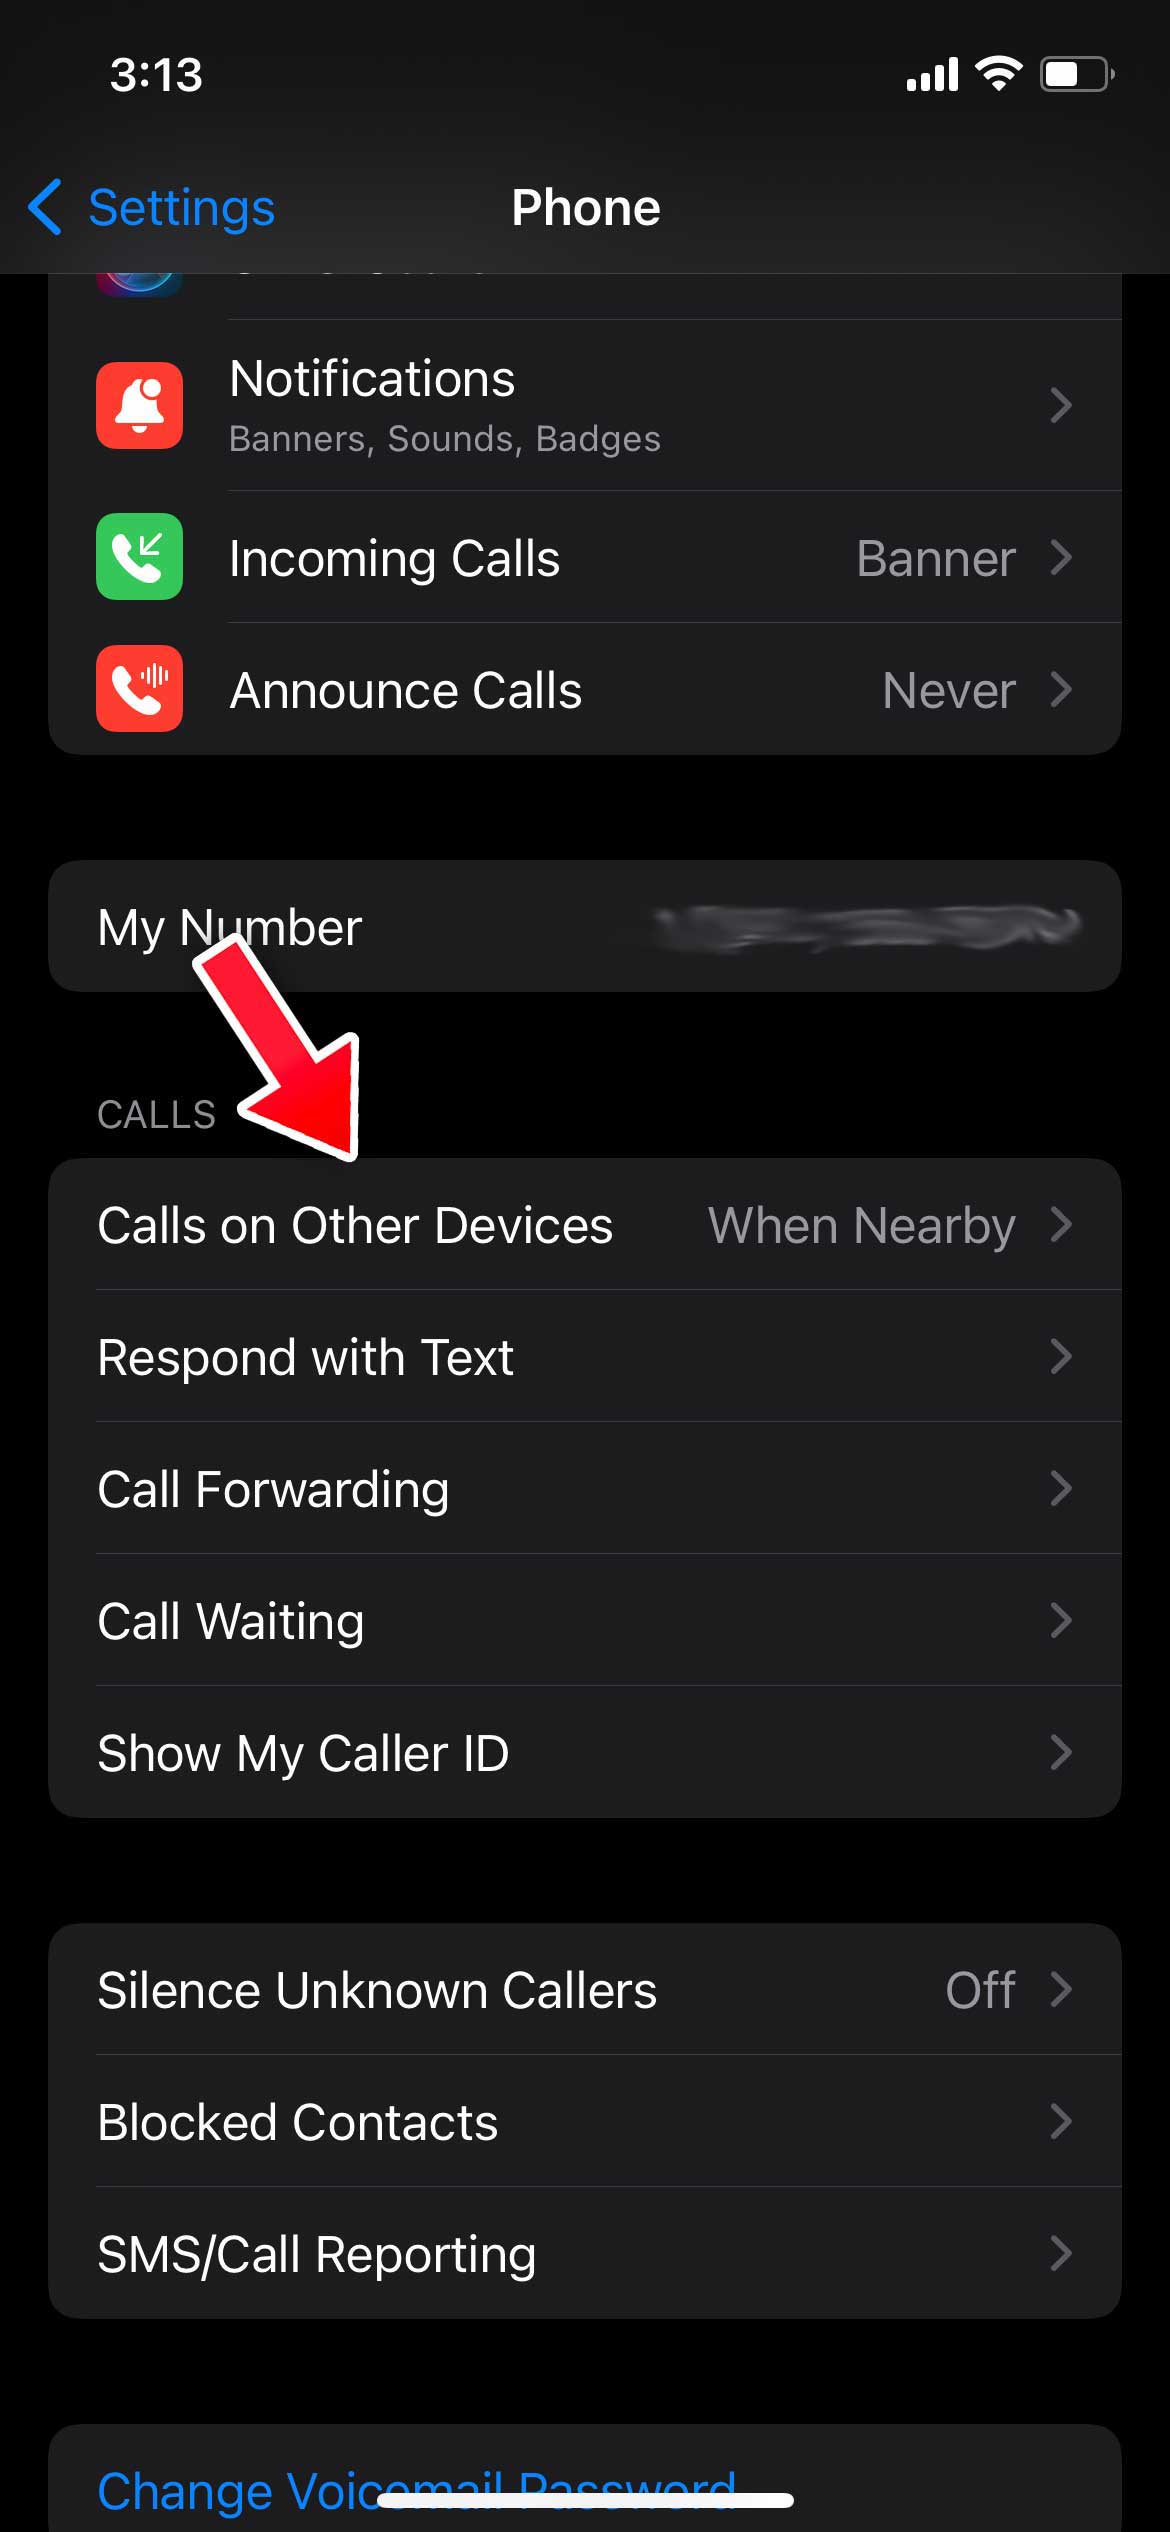
Your Mac can not take/make calls unless your iPhone allows it. To turn the feature on, head to ‘Settings,’ scroll down to ‘Phone’ and tap on ‘Calls on Other Devices.’

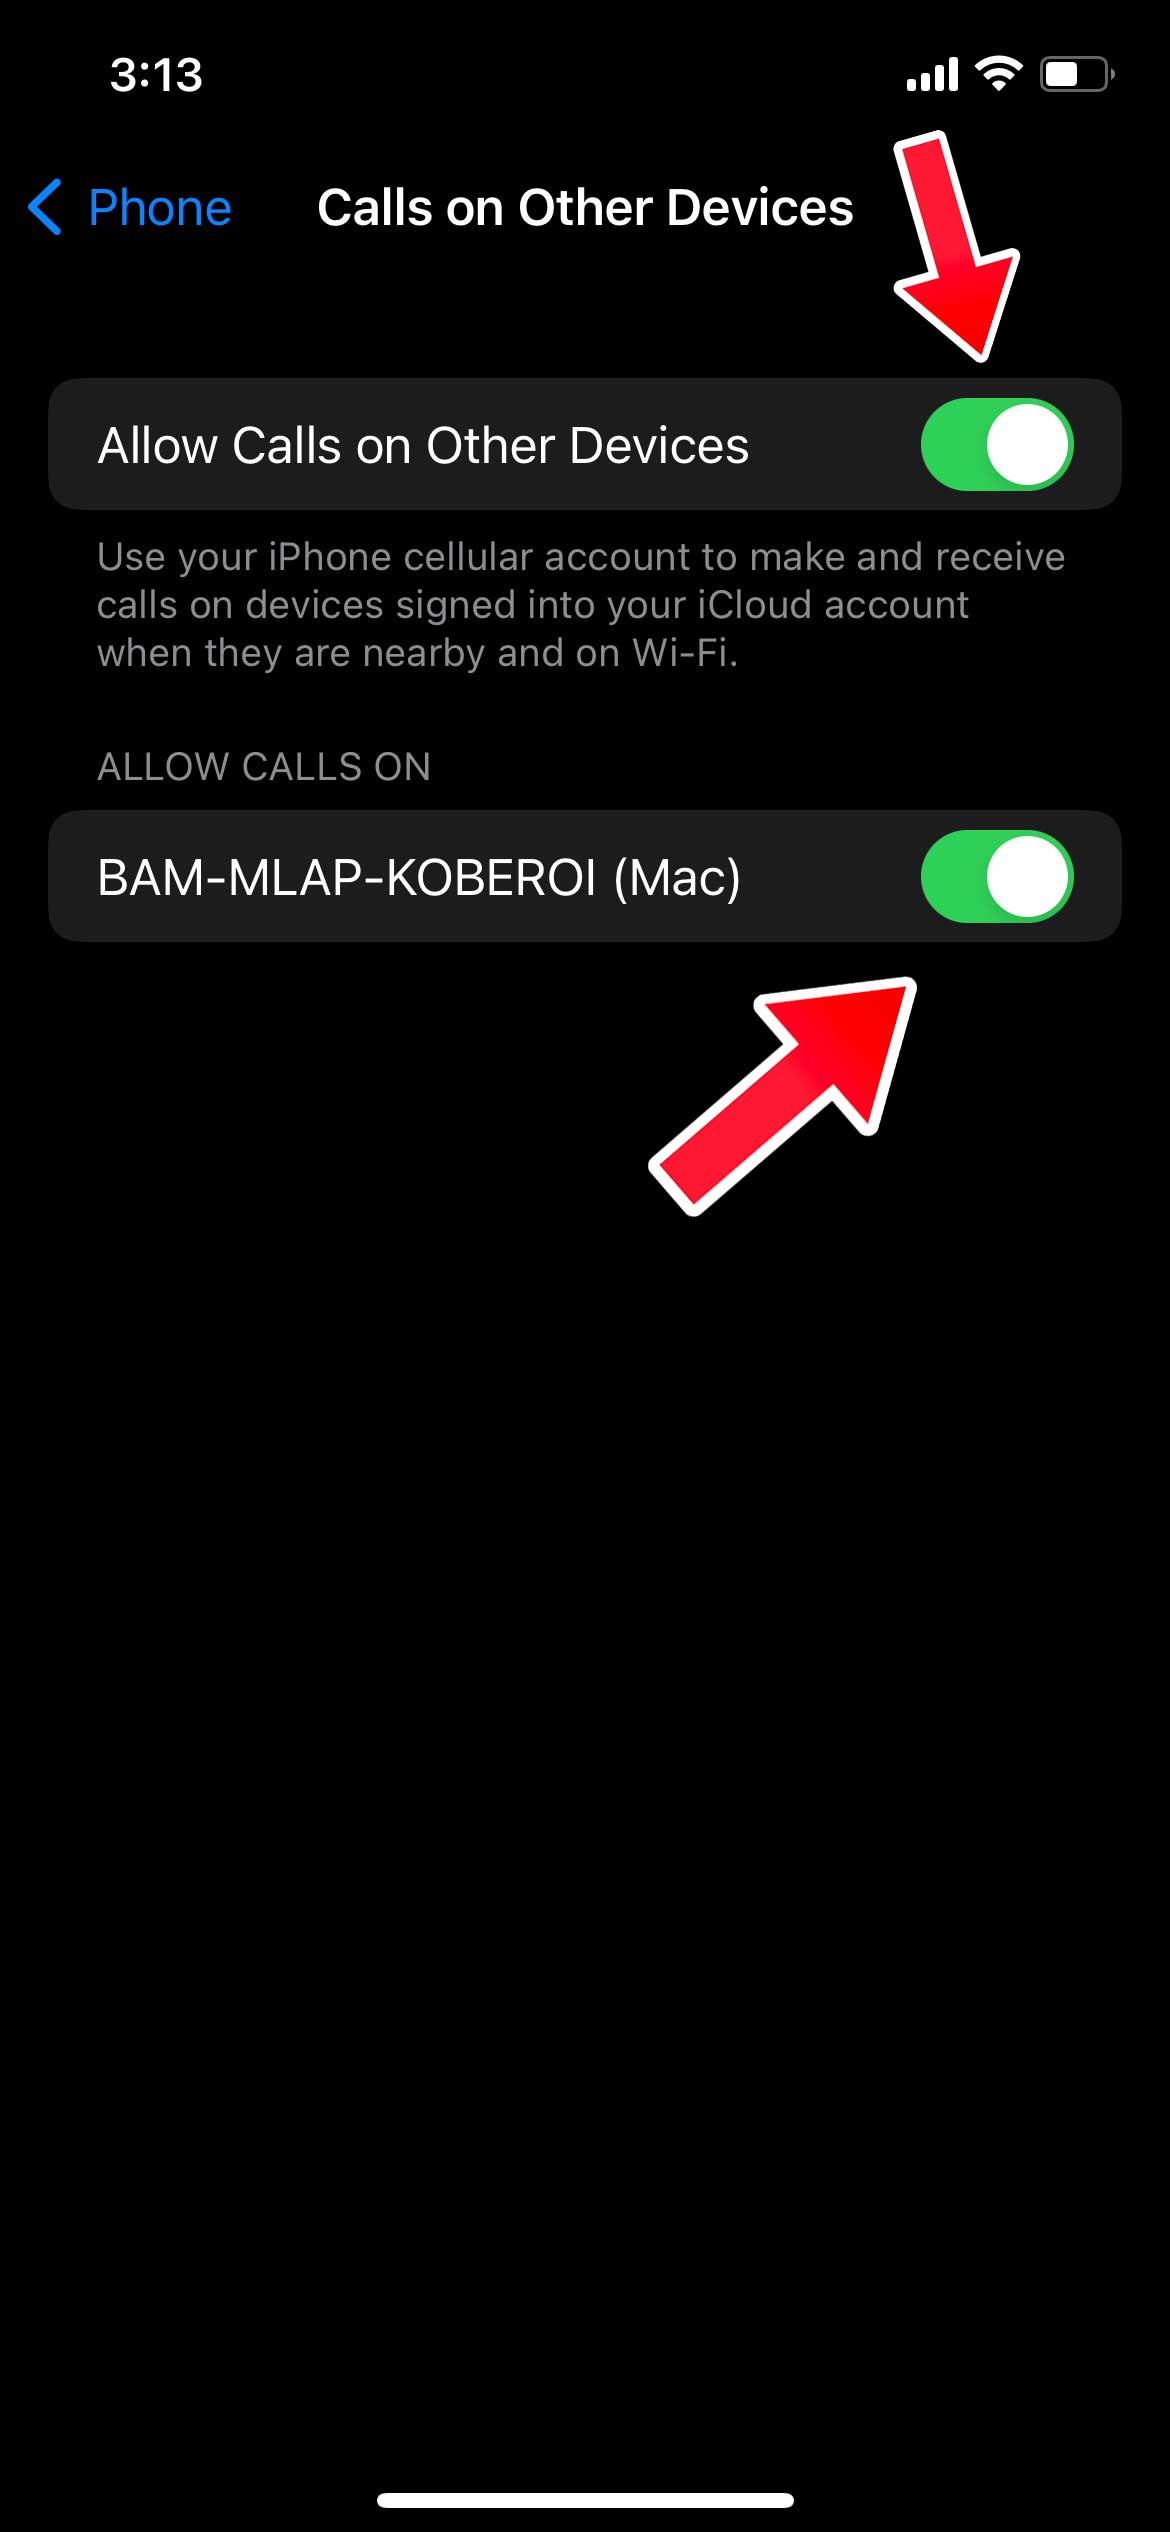
Toggle on ‘Allow Calls on Other Devices’ and a list of devices with the same iCloud account will appear below. From there, proceed to select your Mac.

Settings on your Mac

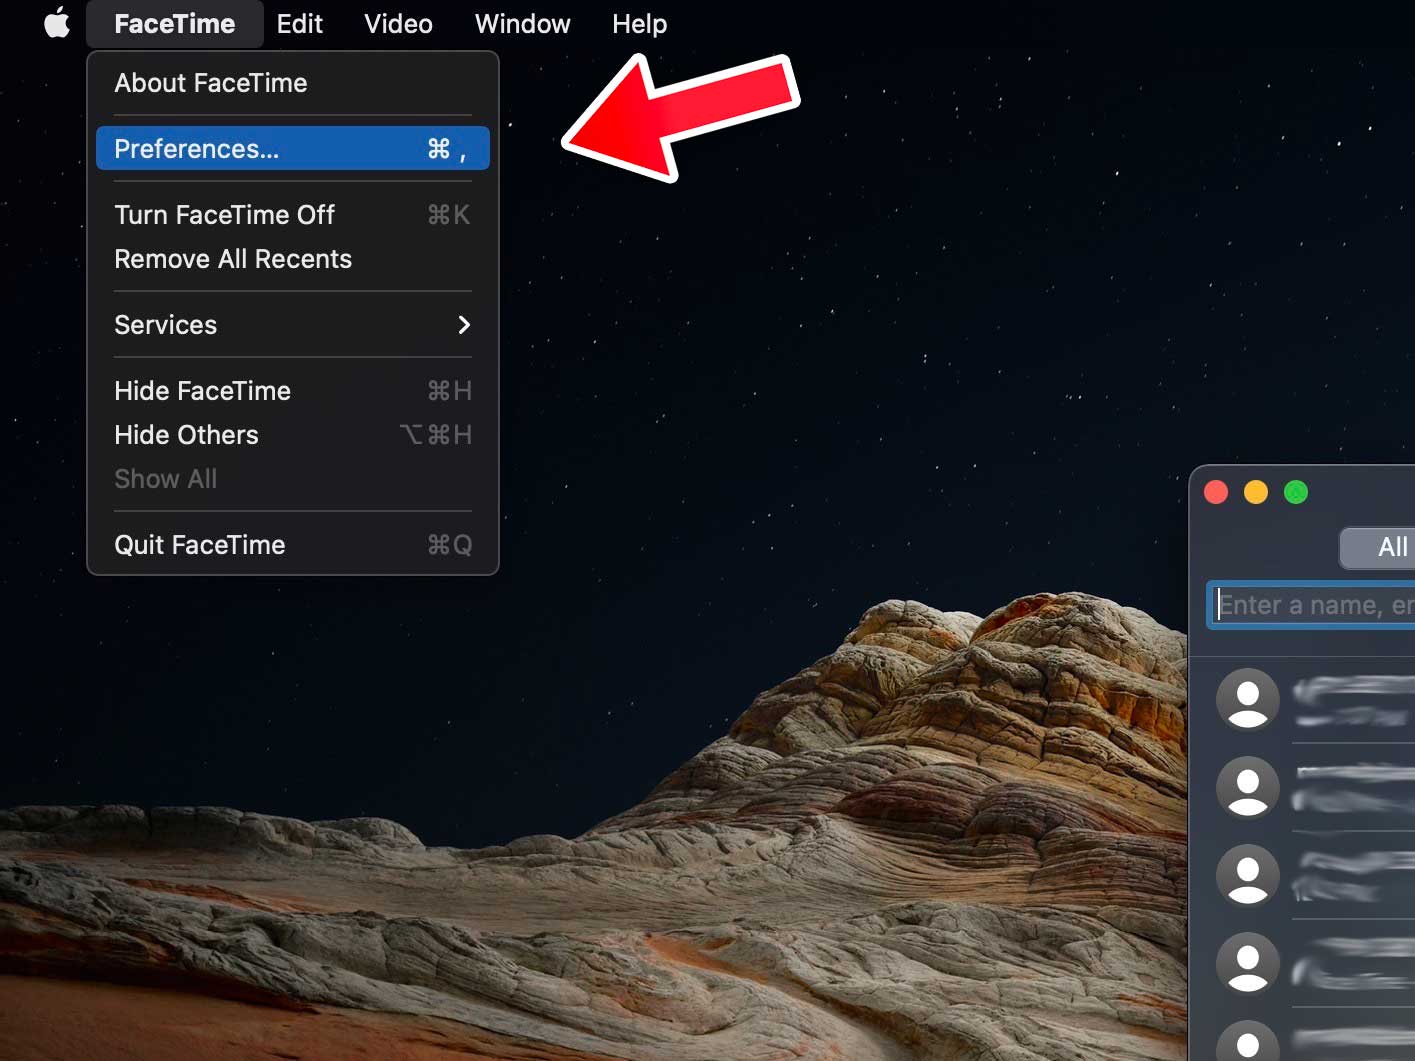
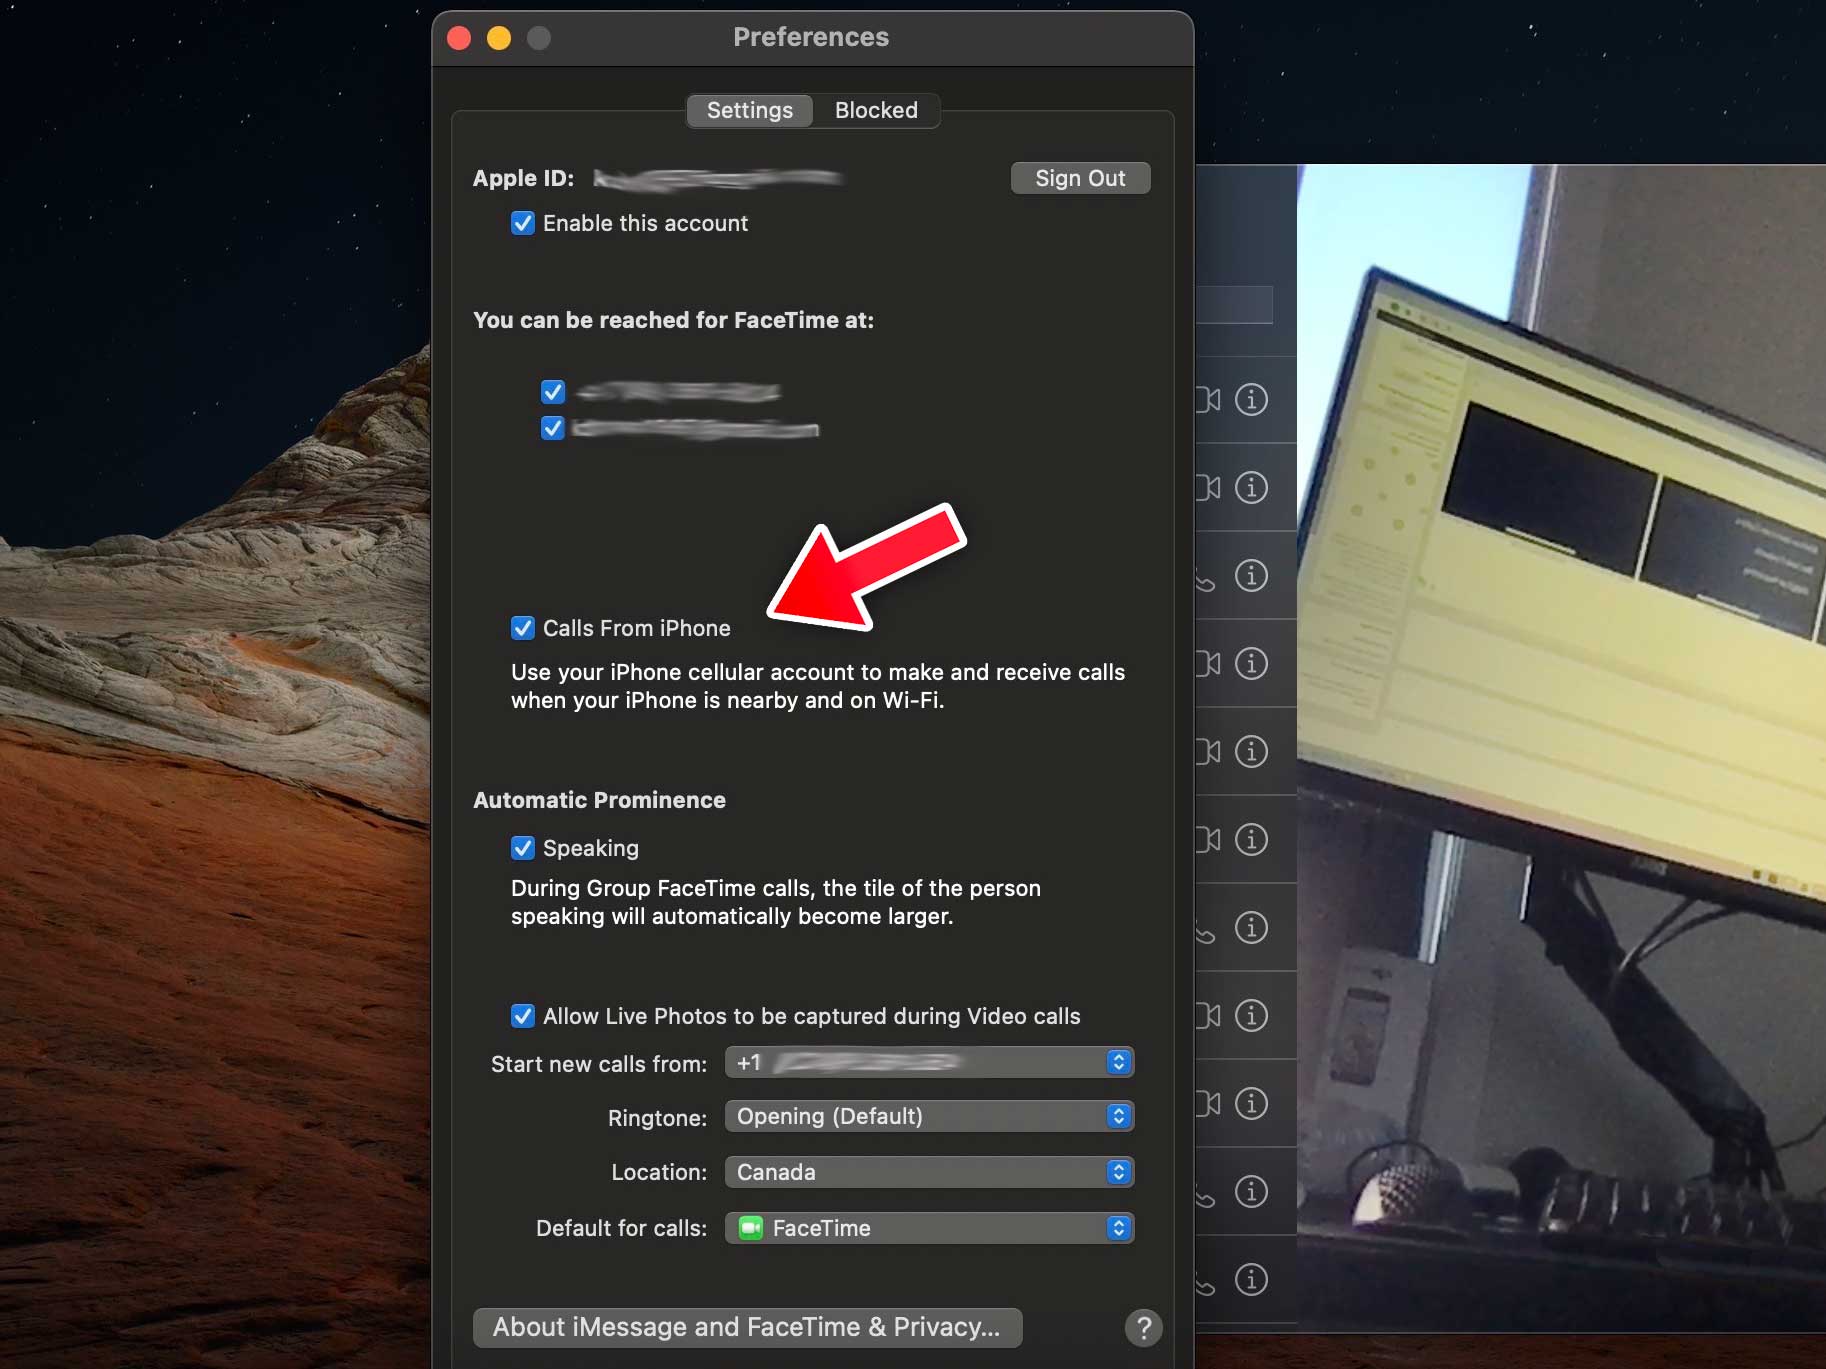
Open the FaceTime app on your Mac and head to the top bar. Tap on FaceTime on the top left and select ‘Preferences.’

A new pop-up window will open where you need to check ‘Calls From iPhone.’

How to make FaceTime calls from your Mac

Once you’ve completed all the steps listed above, making FaceTime calls from your Mac would work similarly to how you do it on your iPhone.

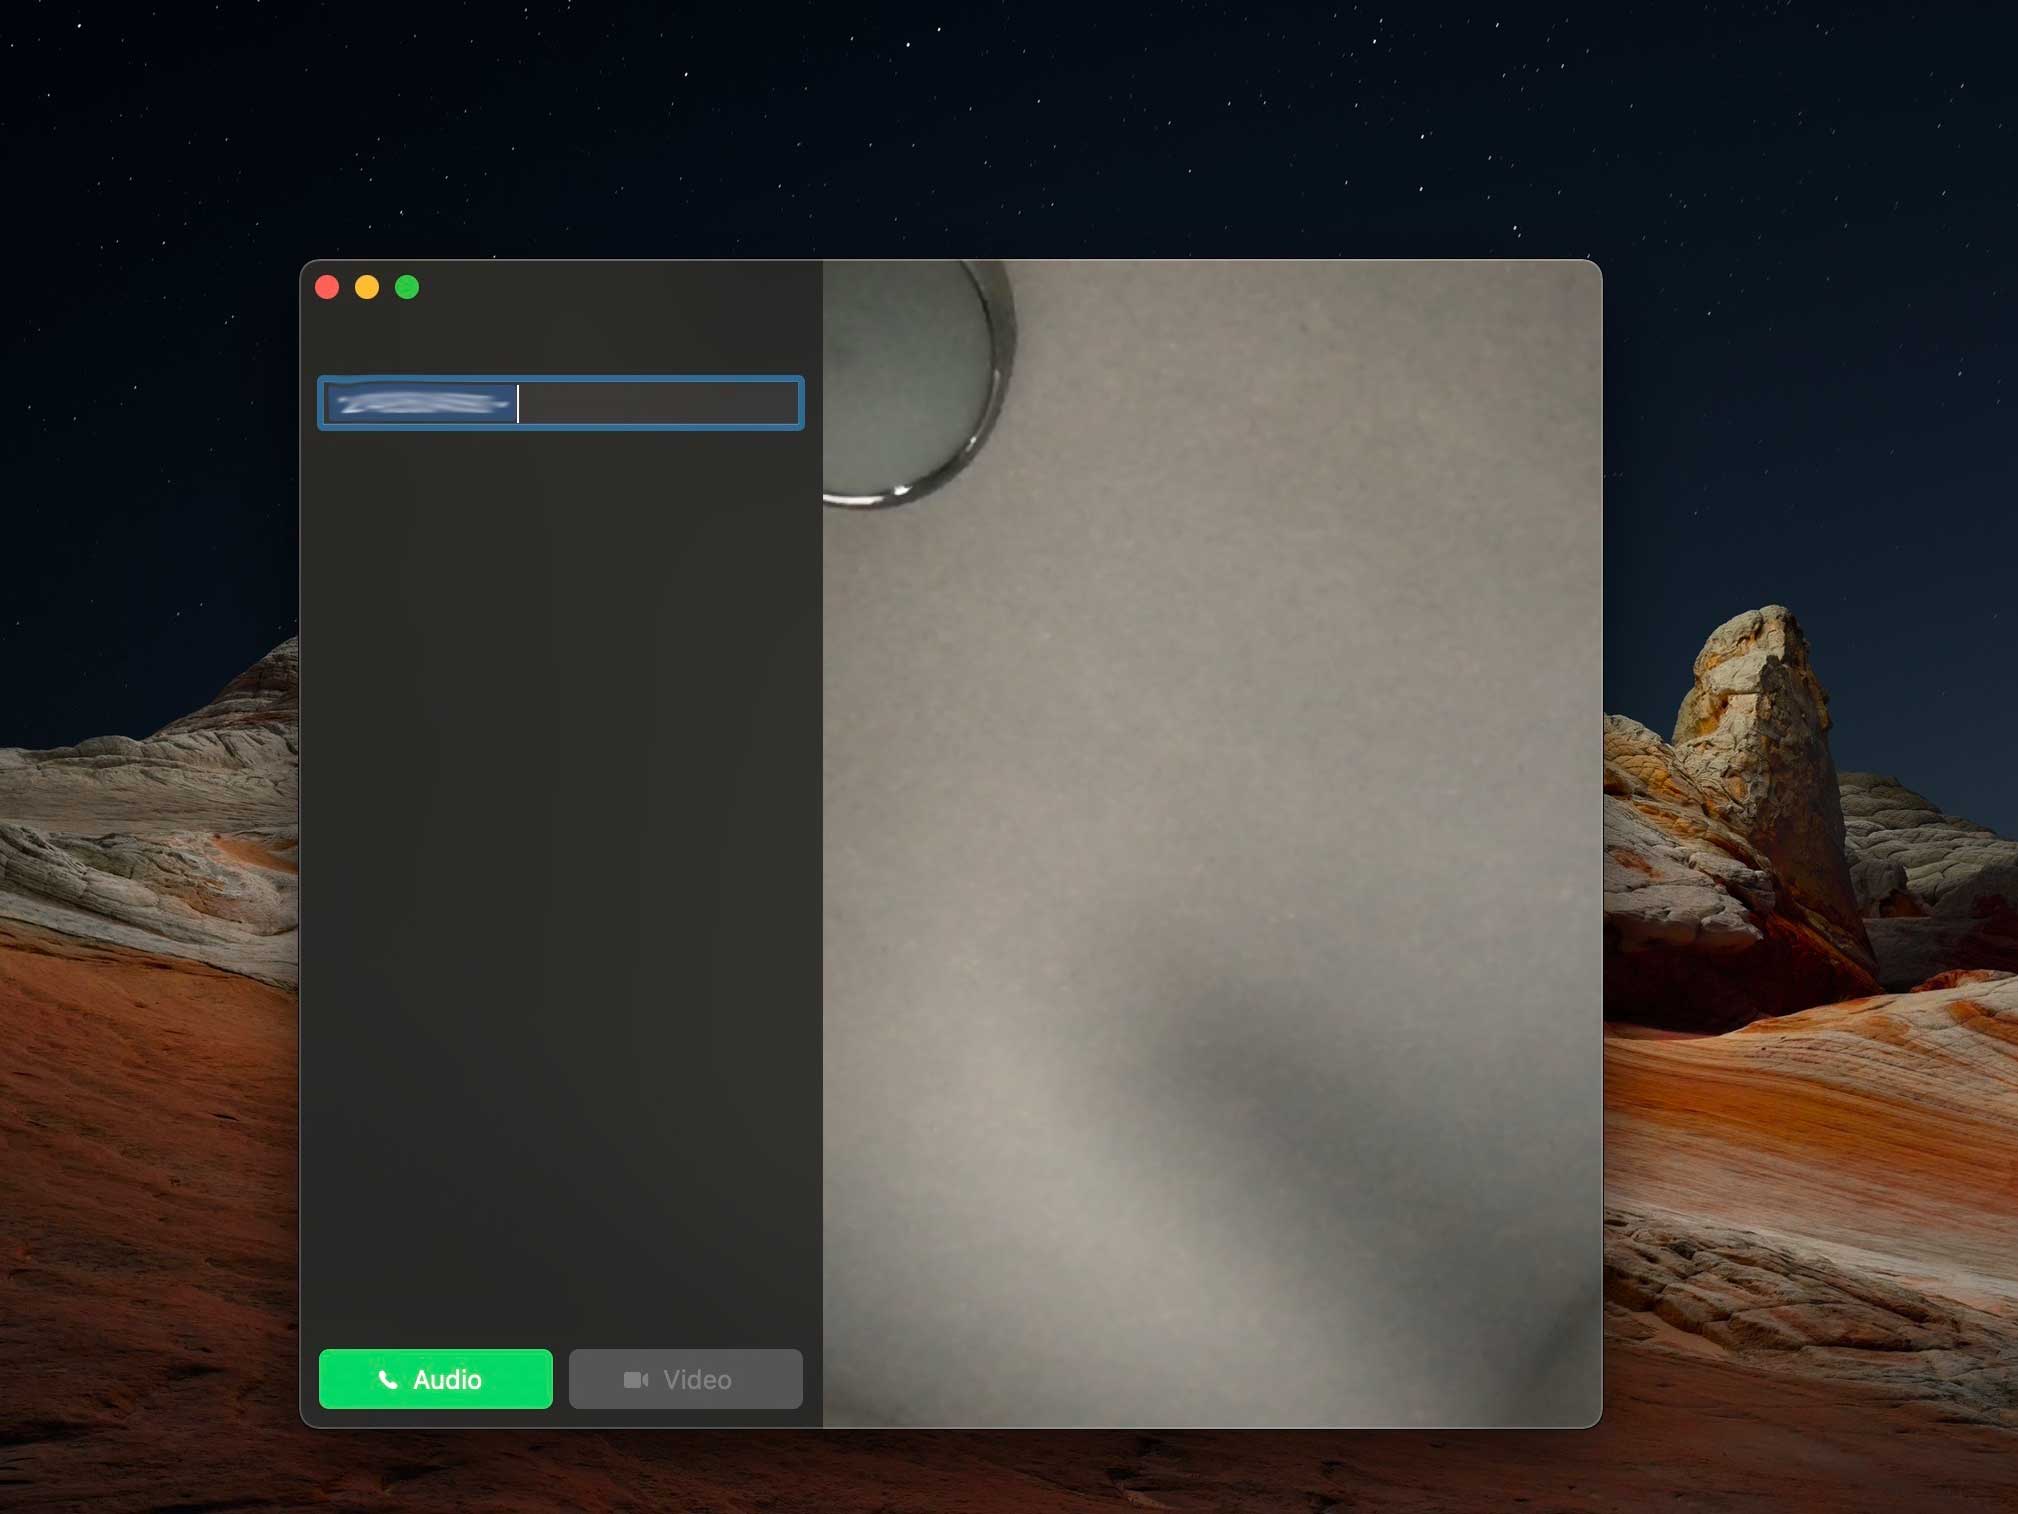
Open the FaceTime app on your Mac and enter the phone number you want to call. You will be presented with two options, ‘Audio’ and ‘Video.’ Proceed with however you wish to contact the person.

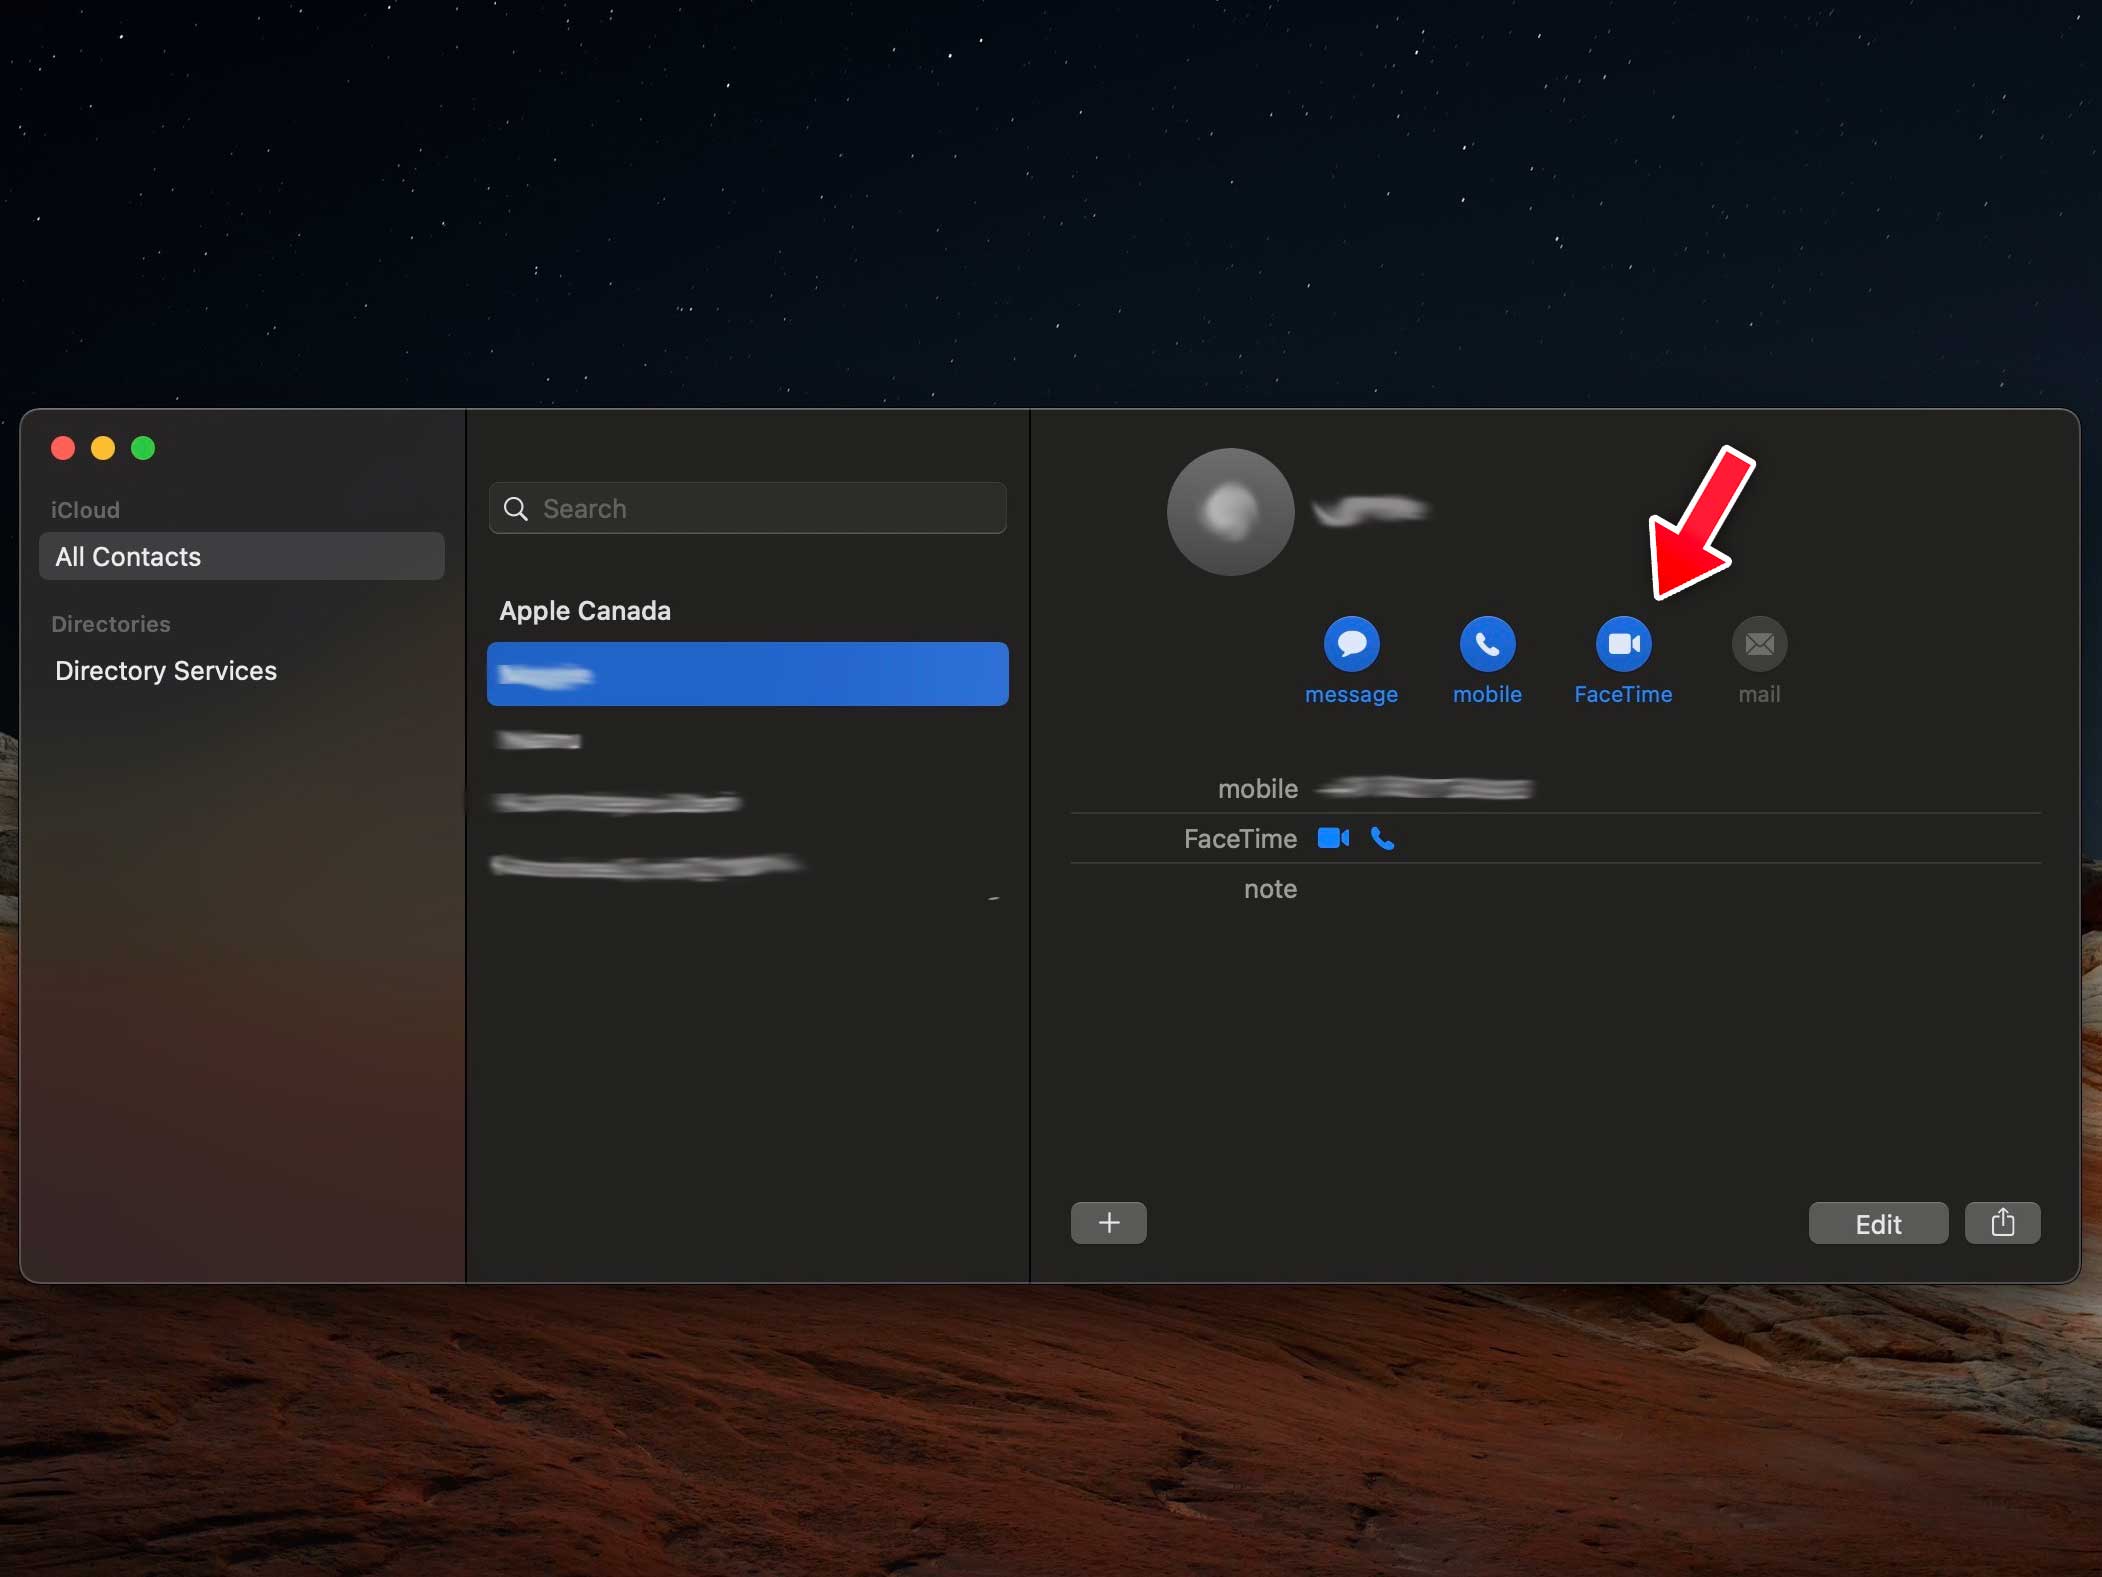
An easier way would be to go to contacts, click on the person’s name you want to call, and then tap FaceTime.

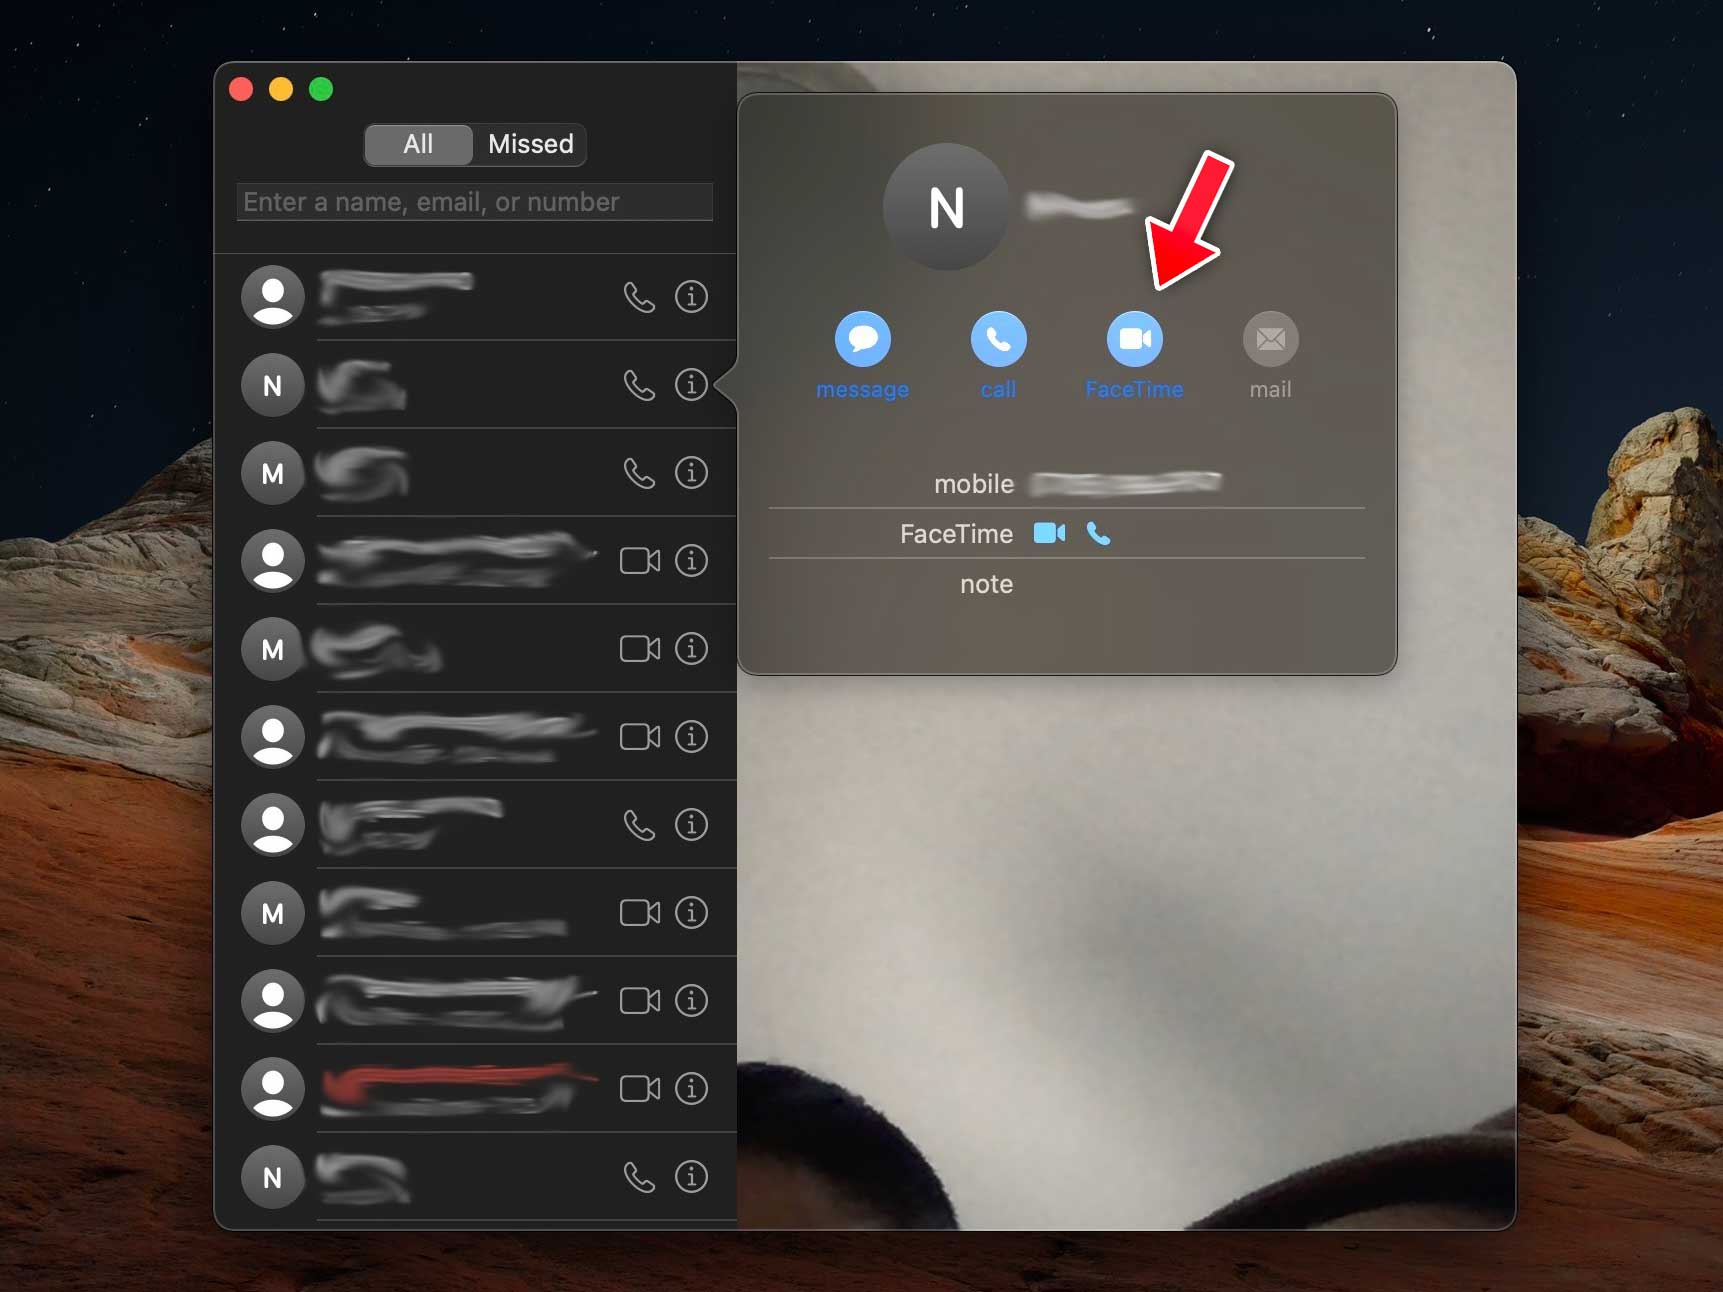
Further, clicking the (i) button/information button in your recent call history will bring up a pop-up, from which you can also initiate a FaceTime call.

Accepting FaceTime calls from your Mac

The only pre-requisite to accepting FaceTime calls on a Mac is that you ensure you’ve followed all the settings mentioned above. To re-iterate, your iPhone and Mac device should be signed in to iCloud and FaceTime with the same Apple ID, along with being connected to the same Wi-Fi network.

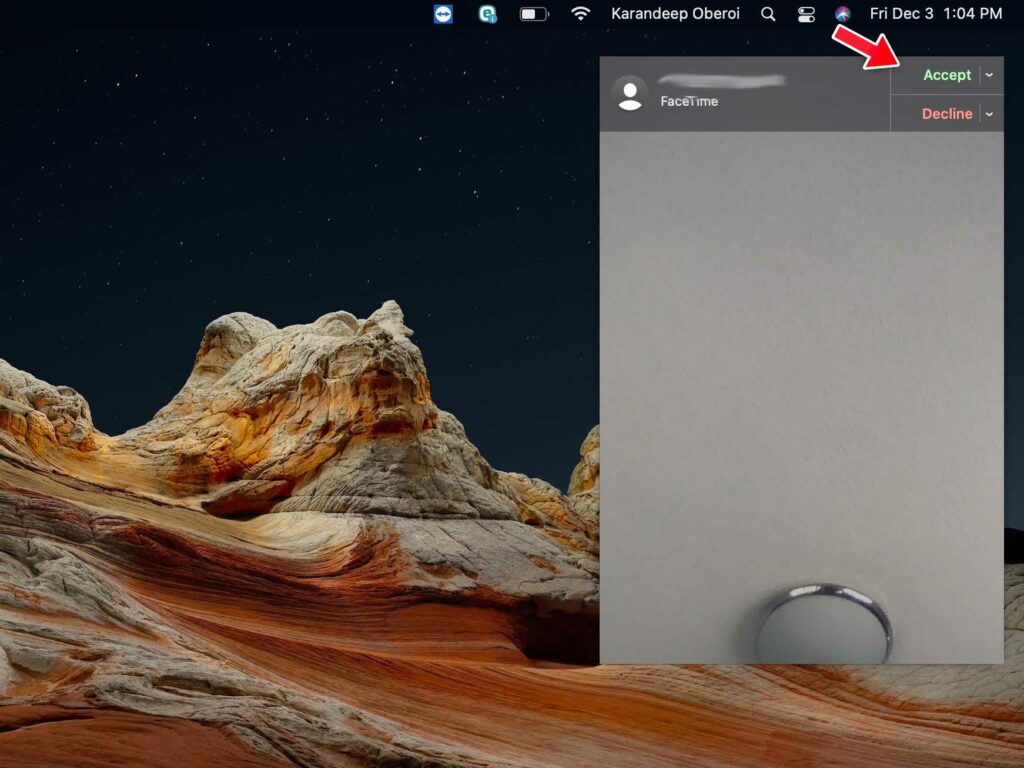
Any incoming FaceTime call on your iPhone will also ring on your Mac, provided your Mac is active. When your phone rings, a pop-up will automatically appear on the top right of your Mac screen.

See the image below for reference:

Once accepted, you can add more people to the call, change audio options, including Voice Isolation and Wide-Spectrum mode, pause the call, SharePlay and much more.

Categories
Mobile Syrup

Apple says it fixed an issue with the T2 security chip that bricked some Macs

Apple’s macOS Monterey update brought a few frustrating bugs with it. However, the company says it’s fixed one of the more frustrating flaws that bricked some older Mac devices after installing the update.

Apple says it identified a problem with the T2 security chip and rolled out an update that fixed the problem. You can read the full statement below (as shared by Rene Ritchie on Twitter):

“We have identified and fixed an issue with the firmware on the Apple T2 security chip that prevented a very small number of users from booting up their Mac after updating macOS. The updated firmware is now included with the existing macOS updates. Any users impacted by this issue can contact Apple Support for assistance.”

9to5Mac elaborates, noting that Apple deployed an updated version of the ‘bridgeOS’ firmware that runs on the T2 chip, which should prevent the problem from happening to other people. However, it, unfortunately, seems like the update won’t fix machines already impacted by the bug. Instead, Apple says affected users should contact Apple Support for assistance.

Below is a list of Mac computers that feature the Apple T2 security chip:

  • iMac (Retina 5K, 27-inch, 2020)
  • iMac Pro
  • Mac Pro (2019)
  • Mac Pro (Rack, 2019)
  • Mac mini (2018)
  • MacBook Air (Retina, 13-inch, 2020)
  • MacBook Air (Retina, 13-inch, 2019)
  • MacBook Air (Retina, 13-inch, 2018)
  • MacBook Pro (13-inch, 2020, Two Thunderbolt 3 ports)
  • MacBook Pro (13-inch, 2020, Four Thunderbolt 3 ports)
  • MacBook Pro (16-inch, 2019)
  • MacBook Pro (13-inch, 2019, Two Thunderbolt 3 ports)
  • MacBook Pro (15-inch, 2019)
  • MacBook Pro (13-inch, 2019, Four Thunderbolt 3 ports)
  • MacBook Pro (15-inch, 2018)
  • MacBook Pro (13-inch, 2018, Four Thunderbolt 3 ports)

Source: Rene Ritchie (Twitter) Via: 9to5Mac

Categories
Mobile Syrup

What is Apple’s new iOS 15 Focus mode and will it work for me?

With the launch of Apple’s new software updates this fall, ranging from macOS Monterey to watchOS 7 to iOS 15, one feature that all users will encounter regardless of their device is a new spin on ‘Do Not Disturb’ called ‘Focus.’

While Do Not Disturb blocks all notifications from reaching you, you can set Focus mode to more subtly restrict who and what can send you notifications at a given time. Basically, this is Apple admitting that its notifications are overwhelming, and ‘Focus’ is a way of solving this problem.

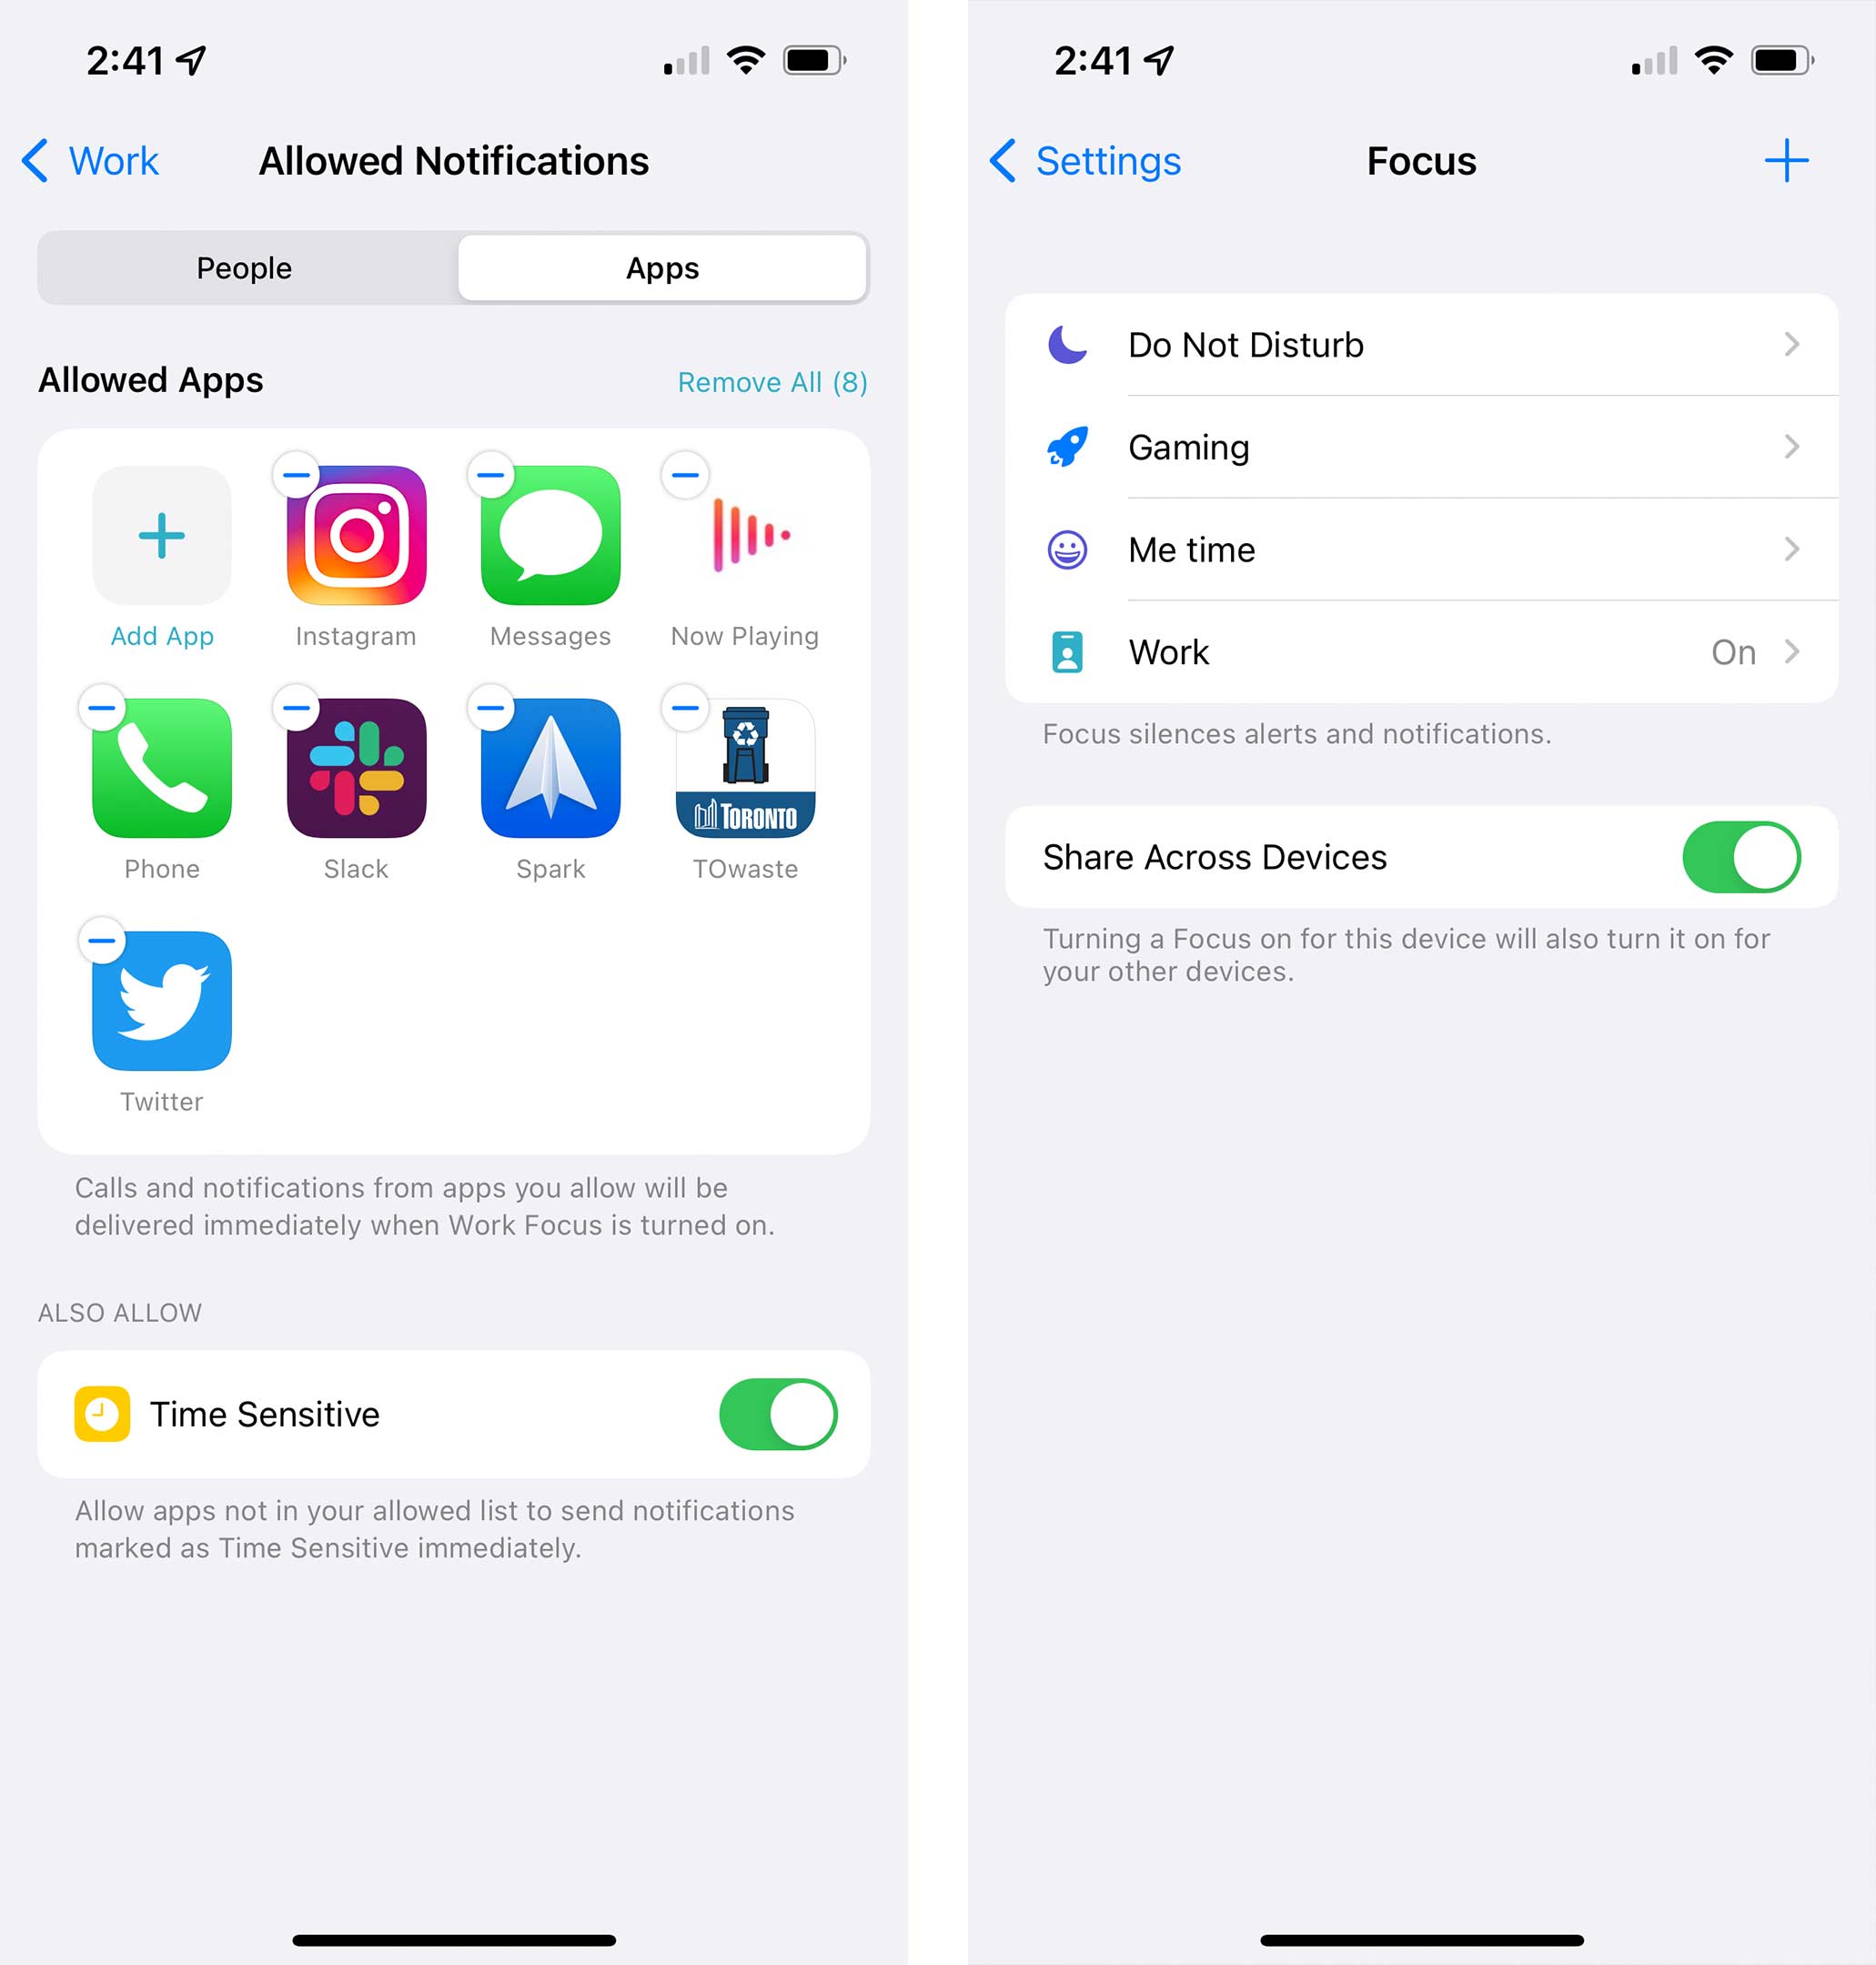
For the purpose of this article, I’ve set up Focus on an iPhone. However, once you have it on one of your Apple devices, it will apply to all your Apple hardware running the latest software. So now that I’ve set up Focus on my Phone, it restricts notifications on my iPad, Apple Watch and MacBook. You can disable this if you’d rather have individual Focus modes on each device.

That said, not all apps can use the feature. For example, some of the critical apps I’d like to block, like Discord, don’t integrate into Focus. Hopefully, that will change as apps update to support iOS 15.

For now, Focus isn’t as helpful as I’d like it to be, and in many situations, Do Not Disturb actually works a bit better since it’s easier to just lock everything down. However, depending on how well you can separate your work time from your play time, this new feature may work well for you.

My Focus mode strategy

To test out the feature, I set up two Focuses — one for work, one for post-work — and Do Not Disturb for when I want to lock things down a little further.

For my work Focus, I kept it fairly open to allow people to call and text me, but I shut down notifications for all apps that don’t relate to work. I also kept notification badges on the Home Screen since I needed to keep track of things during the day.

The after-work Focus is a little less restricted, so I allowed lots of apps to send me notifications, but I decided to try limiting Slack and email. These are a bit tough since I’m not sure how comfortable I am with the possibility that I might miss something important for work. Still, I’ll give it a try. I also turned on a feature to hide notification badges on my Home Screen during this time.

I scheduled both of these to come on automatically during and after work. I also turned off my Do Not Disturb schedule, and I’m hoping with Focus I can just manually use Do Not Disturb when I really want zero distractions.

How to set up your own

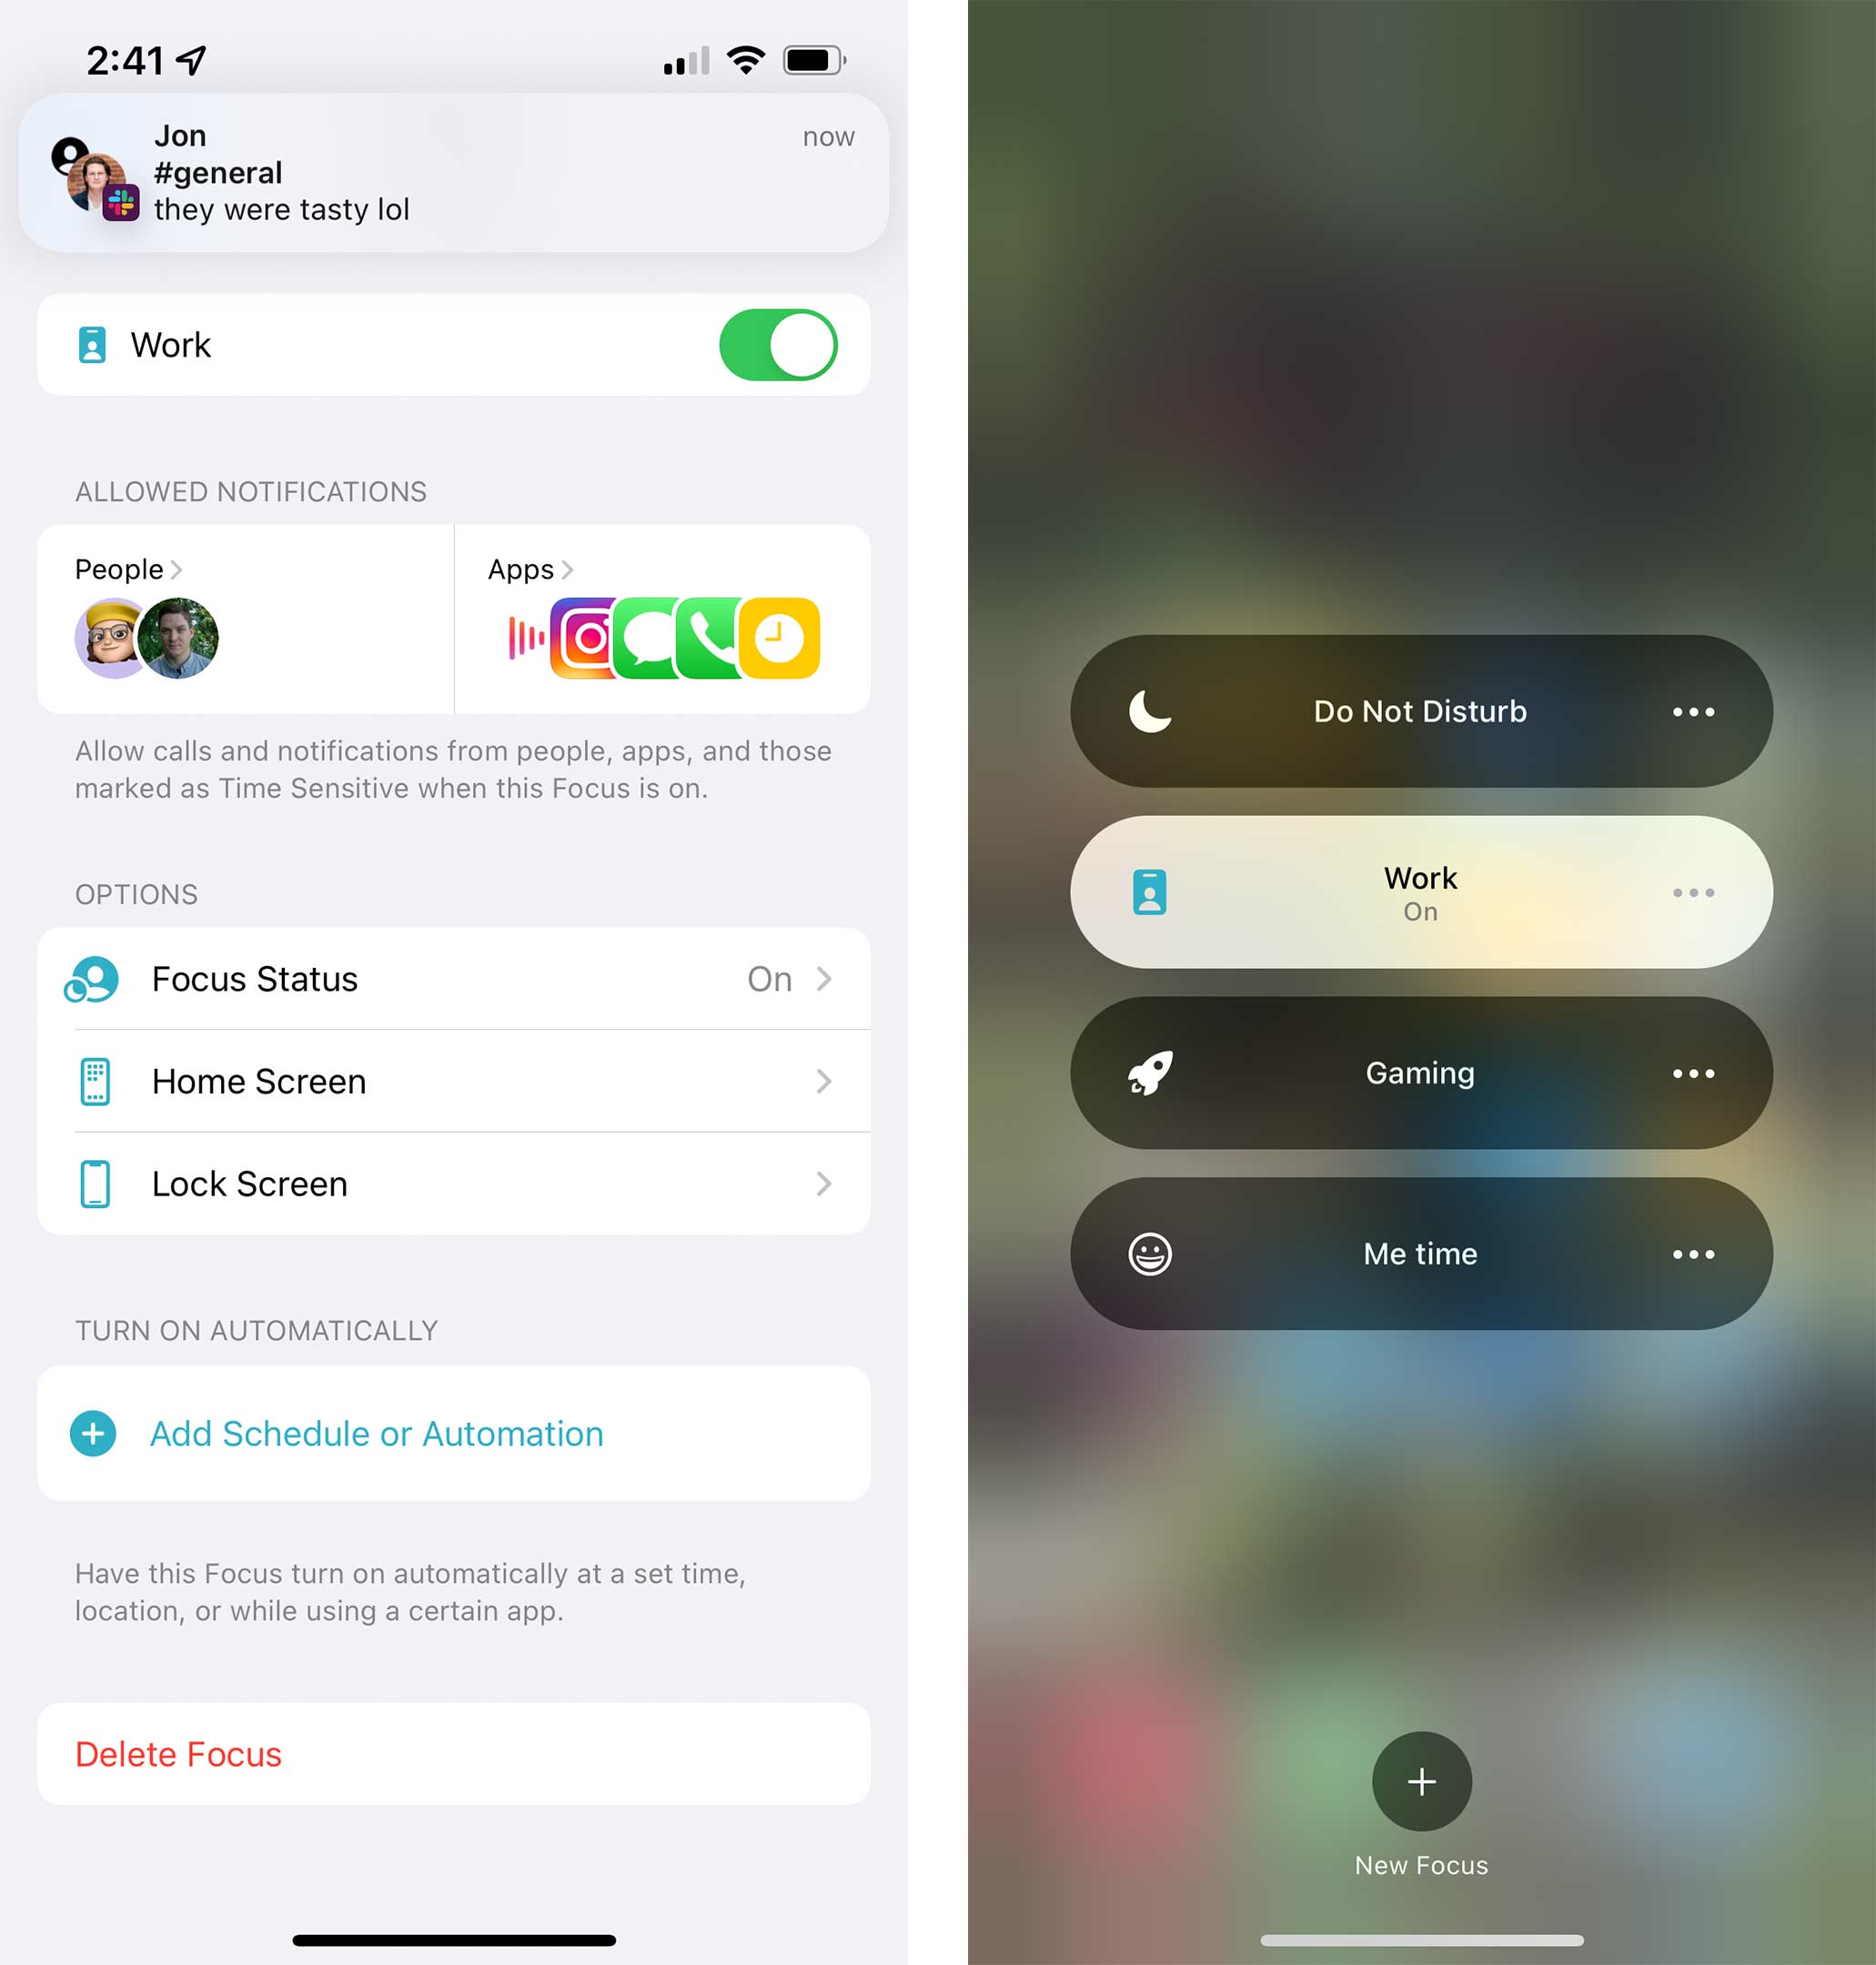
If you want to set up your own Focus mode, there are a few ways to do it on your phone. You can either enter the Focus section in the Settings app or open Control Centre and hold down on the new Focus button.

You can also set one up on your Mac, but since the modes persist across all Apple devices, I find it makes the most sense to run it on your phone since that’s where most people will receive the majority of their notifications. 

Once you open the Focus section, you can select a new name for a Focus and then the first thing you’ll need to do is decide what contacts you want to allow to reach you when the mode is enabled. After that, you’ll choose what apps can send you notifications during that time, too.

Once that is set up, you can choose some other settings like if you want home screen badges, or you can even set a custom screen as your home screen during that time which is cool. However, you can only select from the screens you’ve already made. It would have been nice to have an option to create a custom home screen that appears when each mode is enabled.

You can also dim the lock screen and hide notifications from it if you want. Another cool feature allows you to set up automation so the Focus mode can turn on whenever you get to a particular location or open a specific app. For example, Apple showed it being used to turn on a notification blocking mode whenever you open a reading app.

If you don’t want to turn them on automatically, you can manually enable them from Control Centre. The one thing to keep in mind when you do is that your other Apple devices that are running the latest software will enable the same mode. So if you block your notifications in one place, they’ll be blocked everywhere.