Categories
Mobile Syrup

Here’s how to take/make FaceTime calls on macOS Monterey

If you’re running iOS 15 and macOS Monterey, answering incoming FaceTime calls or starting new ones has never been easier.

Before we look into how to make/take calls, here are a few things worth noting:

  1. Your iPhone and Mac device should be signed in to iCloud with the same Apple ID
  2. Your iPhone and Mac device should be signed in to FaceTime with the same Apple ID
  3. Your iPhone and Mac device should be connected to the same Wi-Fi network

Settings on your iPhone

Your Mac can not take/make calls unless your iPhone allows it. To turn the feature on, head to ‘Settings,’ scroll down to ‘Phone’ and tap on ‘Calls on Other Devices.’

Toggle on ‘Allow Calls on Other Devices’ and a list of devices with the same iCloud account will appear below. From there, proceed to select your Mac.

Settings on your Mac

Open the FaceTime app on your Mac and head to the top bar. Tap on FaceTime on the top left and select ‘Preferences.’

A new pop-up window will open where you need to check ‘Calls From iPhone.’

How to make FaceTime calls from your Mac

Once you’ve completed all the steps listed above, making FaceTime calls from your Mac would work similarly to how you do it on your iPhone.

Open the FaceTime app on your Mac and enter the phone number you want to call. You will be presented with two options, ‘Audio’ and ‘Video.’ Proceed with however you wish to contact the person.

An easier way would be to go to contacts, click on the person’s name you want to call, and then tap FaceTime.

Further, clicking the (i) button/information button in your recent call history will bring up a pop-up, from which you can also initiate a FaceTime call.

Accepting FaceTime calls from your Mac

The only pre-requisite to accepting FaceTime calls on a Mac is that you ensure you’ve followed all the settings mentioned above. To re-iterate, your iPhone and Mac device should be signed in to iCloud and FaceTime with the same Apple ID, along with being connected to the same Wi-Fi network.

Any incoming FaceTime call on your iPhone will also ring on your Mac, provided your Mac is active. When your phone rings, a pop-up will automatically appear on the top right of your Mac screen.

See the image below for reference:

Once accepted, you can add more people to the call, change audio options, including Voice Isolation and Wide-Spectrum mode, pause the call, SharePlay and much more.

Categories
Mobile Syrup

You can now access Amazon Prime Video directly from a Mac app

Amazon has had its Prime Video app available on Windows for a while now, and it’s about time macOS users get access to the vast catalogue directly from their home screen.

Amazon’s Prime Video app is now available to download for free from the App Store, giving macOS users the option to download content for offline streaming. Having a native app means you’ll be able to select the quality of the content you’re while streaming or downloading, along with other native macOS features like AirPlay and Picture-in-Picture.

Additionally, there’s now a separate in-app ‘store’ page where you can rent or buy shows and movies, with your regular Prime payment information carrying forward to the Mac app. It’s worth noting that to access the app, you have to be running macOS Big Sur or a later version.

The new app will automatically sync your playing history across all of your devices, allowing you to continue playback on your Mac wherever you pause it on your iPhone.

An Amazon Prime Video subscription is included at no additional cost with an Amazon Prime membership, which costs $79/year. Additionally, you can find a complete list of movies and shows hitting Amazon Prime Video Canada in November here.

Categories
Mobile Syrup

macOS Monterey using up insane amounts of RAM with new bug

If you’ve recently upgraded your Mac to macOS Monterey, you might notice some apps using ridiculous amounts of RAM.

Some users are reporting apps like Firefox and Control Centre using between 20GB and 70GB, according to MacRumors. In our testing, when I used Final Cut Pro X on the new MacBook Pro with 16GB of RAM, there was a point where it boosted all the way up to 67GB of RAM usage.

My first reaction was to assume that the app was trying to use SSD space as a substitute for RAM to push my files around.

I’m not so sure now, and perhaps the RAM usage wasn’t designed to boost up that high. It only happened to me once, but MacRumors says that affected users quickly ramp up RAM usage again after restarting their computer.

With all of this in mind, if you have a Mac with only 16GB of RAM, it might be better to wait a few more days or weeks before updating to Monterey to make sure that you don’t run into this issue.

Source: MacRumors

Categories
Mobile Syrup

Some users experiencing USB bugs in macOS Monterey

As macOS Monterey rolls out to Macs around the world, some users are experiencing a bug related to USB-C hubs no longer working with their Mac.

A report published by Cult of Mac outlines a Reddit user that found their MacBook Pro hub’s USB-C ports stopped working after updating to Monterey, but that their HDMI port still functioned normally. The user was able to remedy this by using an official Apple-certified hub.

Other users experienced USB-C display monitor issues and power throughput bugs when using external USB-C accessories.

This issue also appears to be affecting both Intel and Apple chip Mac devices and there is no clear fix from Apple yet. Hopefully, a future build of the OS update will remedy the problem, but for now, it appears that dongle compatibility is spotty.

I’ll also note that during my time with macOS Monterey so far, the main issue I’ve encountered consistently is Safari crashes every time I try to drag a tab out of its window to create a separate window.

Source: Cult of Mac

Categories
Mobile Syrup

Apple’s macOS Monterey update will be available starting today

After a long wait, Apple’s latest version of macOS — dubbed macOS Monterey — will be available starting Monday, October 25th.

Apple first unveiled Monterey back at its Worldwide Developers Conference (WWDC) in June 2021. The company went on to beta test the software before eventually announcing it alongside the new MacBook Pro in October.

Starting October 25th, you’ll be able to download and install the update on your supported Apple computer (you can find out which Macs will support the new software here). Unfortunately, Intel Macs will get the update but some of the new features will be reserved for computers running Apple Silicon, like the M1 CPU or the new M1 Pro or Max chips.

How to install macOS Monterey

It’s not clear what time on the 25th the software update will become available, but when it does, here’s how to update.

Start by clicking the Apple icon in the top-left corner of the screen on your iMac, Macbook or other Apple computer. Click System Preferences > Click ‘Update Now’ or ‘Upgrade Now.’ Apple notes on its update support website that ‘Update Now’ refers to smaller updates, while the ‘Upgrade Now’ option is for major new versions of macOS with a new name — for example, Monterey. In this case, you’ll want to click ‘Upgrade Now.’

After that, follow any on-screen steps and let your Mac do its thing. When it’s done, you should have macOS Monterey installed.

As with any major software update, it’s a good idea to install it when you won’t need your computer for a while. Plus, you may want to backup any important data before installing the update just in case something goes wrong. You can find more information about Apple software updates here.

Categories
Mobile Syrup

What is Apple’s new iOS 15 Focus mode and will it work for me?

With the launch of Apple’s new software updates this fall, ranging from macOS Monterey to watchOS 7 to iOS 15, one feature that all users will encounter regardless of their device is a new spin on ‘Do Not Disturb’ called ‘Focus.’

While Do Not Disturb blocks all notifications from reaching you, you can set Focus mode to more subtly restrict who and what can send you notifications at a given time. Basically, this is Apple admitting that its notifications are overwhelming, and ‘Focus’ is a way of solving this problem.

For the purpose of this article, I’ve set up Focus on an iPhone. However, once you have it on one of your Apple devices, it will apply to all your Apple hardware running the latest software. So now that I’ve set up Focus on my Phone, it restricts notifications on my iPad, Apple Watch and MacBook. You can disable this if you’d rather have individual Focus modes on each device.

That said, not all apps can use the feature. For example, some of the critical apps I’d like to block, like Discord, don’t integrate into Focus. Hopefully, that will change as apps update to support iOS 15.

For now, Focus isn’t as helpful as I’d like it to be, and in many situations, Do Not Disturb actually works a bit better since it’s easier to just lock everything down. However, depending on how well you can separate your work time from your play time, this new feature may work well for you.

My Focus mode strategy

To test out the feature, I set up two Focuses — one for work, one for post-work — and Do Not Disturb for when I want to lock things down a little further.

For my work Focus, I kept it fairly open to allow people to call and text me, but I shut down notifications for all apps that don’t relate to work. I also kept notification badges on the Home Screen since I needed to keep track of things during the day.

The after-work Focus is a little less restricted, so I allowed lots of apps to send me notifications, but I decided to try limiting Slack and email. These are a bit tough since I’m not sure how comfortable I am with the possibility that I might miss something important for work. Still, I’ll give it a try. I also turned on a feature to hide notification badges on my Home Screen during this time.

I scheduled both of these to come on automatically during and after work. I also turned off my Do Not Disturb schedule, and I’m hoping with Focus I can just manually use Do Not Disturb when I really want zero distractions.

How to set up your own

If you want to set up your own Focus mode, there are a few ways to do it on your phone. You can either enter the Focus section in the Settings app or open Control Centre and hold down on the new Focus button.

You can also set one up on your Mac, but since the modes persist across all Apple devices, I find it makes the most sense to run it on your phone since that’s where most people will receive the majority of their notifications. 

Once you open the Focus section, you can select a new name for a Focus and then the first thing you’ll need to do is decide what contacts you want to allow to reach you when the mode is enabled. After that, you’ll choose what apps can send you notifications during that time, too.

Once that is set up, you can choose some other settings like if you want home screen badges, or you can even set a custom screen as your home screen during that time which is cool. However, you can only select from the screens you’ve already made. It would have been nice to have an option to create a custom home screen that appears when each mode is enabled.

You can also dim the lock screen and hide notifications from it if you want. Another cool feature allows you to set up automation so the Focus mode can turn on whenever you get to a particular location or open a specific app. For example, Apple showed it being used to turn on a notification blocking mode whenever you open a reading app.

If you don’t want to turn them on automatically, you can manually enable them from Control Centre. The one thing to keep in mind when you do is that your other Apple devices that are running the latest software will enable the same mode. So if you block your notifications in one place, they’ll be blocked everywhere.

Categories
Mobile Syrup

Apple’s macOS Monterey update will be available on October 25

Apple finally announced the release of macOS Monterey following its ‘Unleashed’ hardware event on October 18th. The newest version of the company’s desktop operating system will be available starting October 25th, according to the macOS preview page.

The iPhone-maker first shared details about Monterey back at its Worldwide Developers Conference (WWDC) in June. Now, four months later, we finally have an official release date for the next version of macOS.

Monterey will ship with a ton of new features and chances for Macs, including unifying features across Apple products, such as notification profiles and SharePlay. Monterey will also add ‘Universal Control,’ a feature that lets people control their iPad with a Mac keyboard and mouse.

Apple’s Shortcuts app will also come with macOS Monterey, offering users access to a whole bunch of automations and other capabilities.

Perhaps the most significant upgrade, however, will come to Safari. With the new OS, Apple’s web browser will sport a whole new design with refreshed tabs, tab groups, and other features.

Unfortunately, several of the new Monterey features will not be coming to Intel-powered Mac devices. While not a surprise, it’s disappointing that Intel Macs will be excluded from some of the upgrades — especially ones that don’t actually rely on any specific hardware benefit of the M1 chip.

Those interested in learning more about macOS Monterey can check out our coverage here, or view the update preview page on Apple’s website.

Categories
Mobile Syrup

How to backup your Mac

Our personal devices contain some of the most essential data in our lives. This data could be assignments for school, photos of family memories, or important financial documents. Any of these would be devastating to lose. While many of us buy a Mac for its build quality, they still aren’t without failures.

A backup is a copy of your data, and there are many reasons for having a backup. A device could have a malfunction, become corrupted from a virus, be stolen, get damaged, or have liquid spilt on it. Erasing a device is also a common means of troubleshooting. You’ll even receive an email asking you to backup your device and update your software whenever you visit an Apple Store for a Genius Bar appointment.

While this article focuses on Apple’s Mac lineup, there are ways to backup Apple iOS devices, Google Android devices, and Microsoft Windows devices.

MacBook Pro

There are two types of backups: an image backup and a file backup. An image backup will make a copy of the entire state of your operating system. It will copy your settings, applications, user accounts, and files. macOS uses a tool called Time Machine to do this type of complete backup. File backups are what cloud backup services can provide.

They will only backup the files on your computer, not your settings, applications, or user profiles. If you buy AppleCare+ for your device, that’s peace of mind for the hardware. However, Apple does not cover data recovery. They place that onus on their users. Think of a backup as peace of mind for your data. Apple doesn’t have a magical way of recovering your data. Meaning taking a few minutes to read this article could be the difference between saving all of your essential information and losing it.

Backup in 3-2-1

If you ask an IT professional like me, we’ll recommend that you follow a 3-2-1- backup strategy. This rule comes from the idea that you will always have a copy of your data no matter what happens. The three stands for having three separate backup copies of your data. This could be to external hard drives, network-attached storage devices, or a cloud service. The two means to have at least two different types of medium. Consider a cloud service, a hard disk drive (HDD), or a Solid State Drive (SSD). The idea being that one type of medium could be damaged or die.

While external hard drives are inexpensive, they also have a limited life span of around 3-5 years. An SSD is often considered overkill for a backup, especially at the higher upfront cost. You don’t typically need the speed an SSD would provide for a backup, but they are more durable. It’s commonly advised to spend your money on two or more external hard drives rather than one super-fast SSD for backup purposes. A cloud service is excellent in terms of reliability. Still, it does have an ongoing cost and only backs up your files compared to an external drive that does a full image backup using Time Machine in macOS.

“When I was a technician at the Apple Store, I heard people say they didn’t need to back up their Mac because it was “all in iCloud…right?”

The one represents having at least one remote or “offsite” backup. So should something happen to your home, you would still be able to recover your data. Remote backups are most easily done via a cloud service like Backblaze. However, some people prefer to keep an external drive at their workplace or with a family member and swap out the drive regularly.

You can implement many different combinations of backup strategies but always have at least one backup, whether on a physical drive or with a cloud service. If you’re willing to deal with a little redundancy, have at least two physical drives or a physical drive and a cloud backup. This 3-2-1 rule is a great way to see how your backup strategies stack up. Personally, I do a backup to three external hard drives. Two are on my network, and another is a drive I backup to monthly that I keep offsite. A fourth backup is done via the cloud through backup service Backblaze.

Cloud Syncing vs. Cloud Backup

When I was a technician at the Apple Store, I heard people say they didn’t need to back up their Mac because it was “all in iCloud…right?” On an iOS device like your iPhone or iPad, there is an iCloud backup toggle, making a full image backup of your iOS device. While someday I hope Apple brings a similar feature to macOS, we aren’t there yet. In macOS, we have a feature called iCloud Drive. iCloud Drive is a cloud syncing service.

The difference being is a backup service makes a separate copy of your data. The idea is that if a file gets deleted or lost, it’s recoverable. A syncing service keeps a real-time match of your files. Meaning if a file gets deleted from your computer, it’s removed from iCloud too. Backblaze is an excellent example of a cloud backup service. They make a copy of every file and stores it on an encrypted service. Google Drive and Dropbox both offer versions of cloud syncing and cloud backup services.

How to backup your Mac using Time Machine

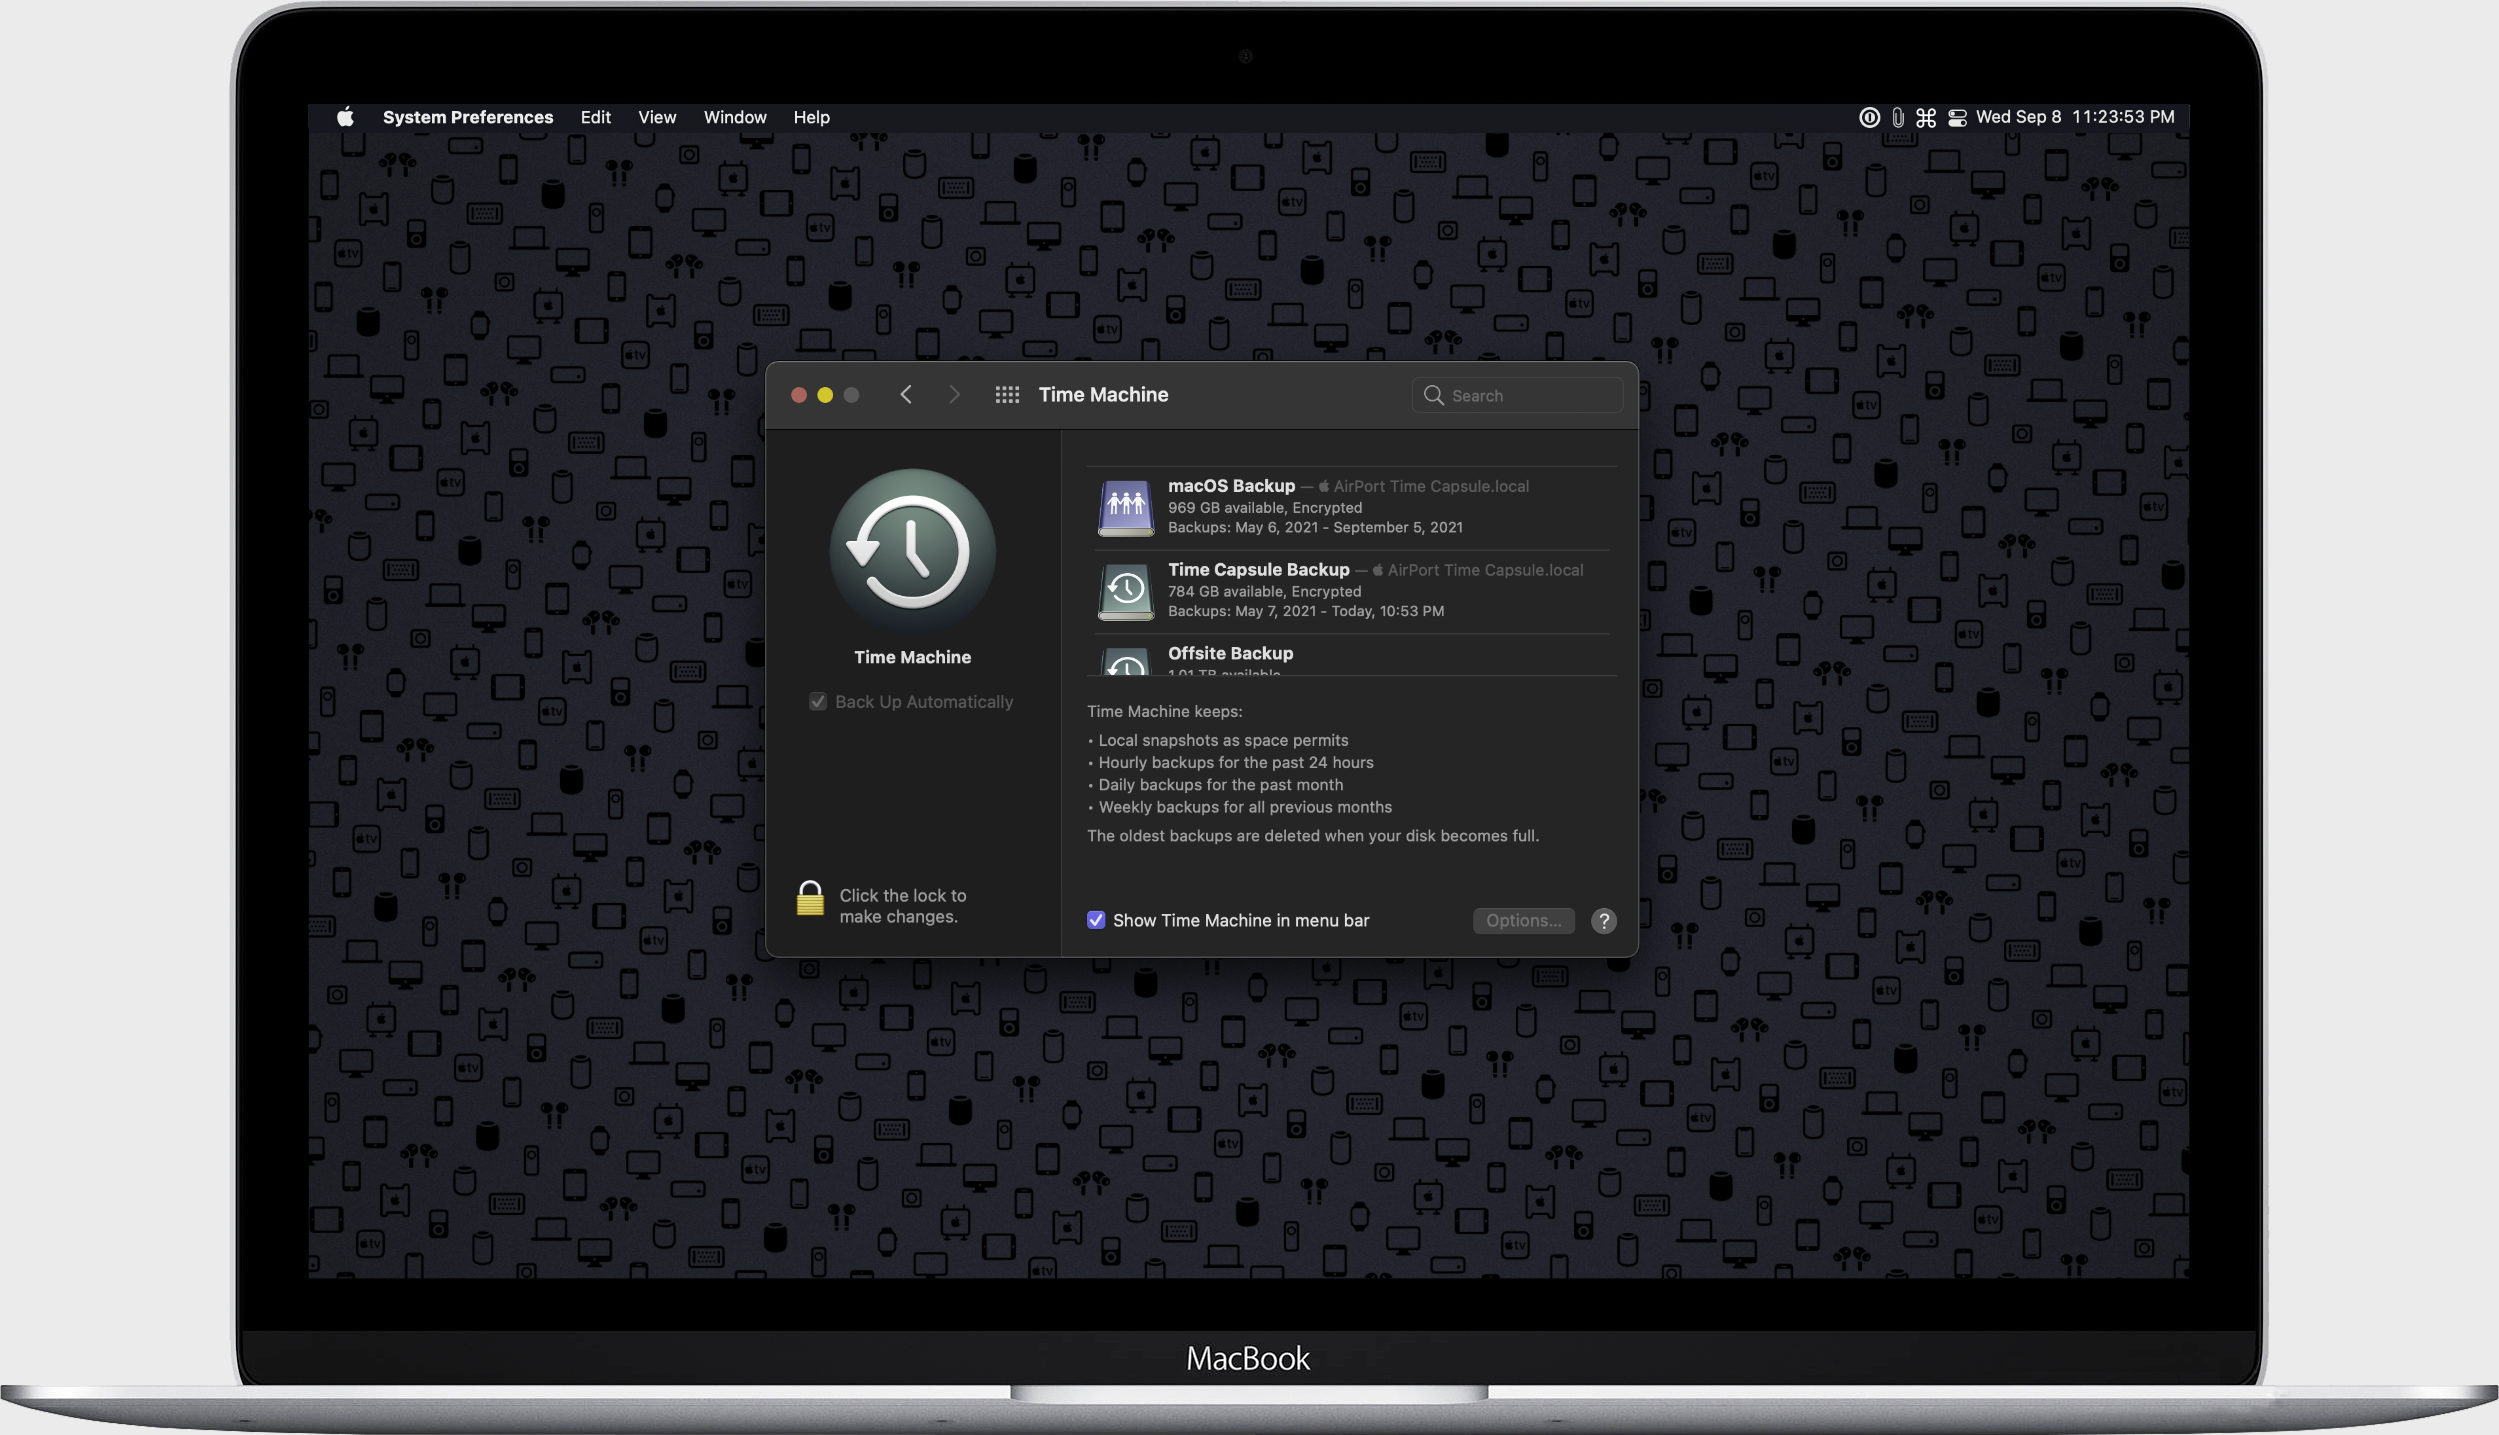
Time Machine is macOS’s built-in backup utility. All you need to do is grab an external hard drive, connect it to your Mac and follow the steps below. You can use Time Machine to back up to multiple drives if you wish. First, Time Machine will do a full backup to your computer’s drive. Meaning it will create an exact copy of your computer. After that initial backup, whenever connected, Time Machine will do incremental backups.

This is where Time Machine will take snapshots of your computer when changes are detected. If you delete a file and want that individual file back, you can “go back in time” and recover it using Time Machine. Backing up and data recovery is something I think Apple does an excellent job at making user-friendly and accessible compared to Microsoft Windows.

To set up Time Machine:

  1. Plug in your external drive to your Mac
  2. Open ‘System Preferences’
  3. Click ‘Time Machine’
  4. Click on the lock icon in the lower-left corner
  5. Enter in your administrator password or authenticate using TouchID
  6. Click ‘Add or Remove Backup Disk…’
  7. Select your drive under “Available Disks”
  8. Check ‘Encrypt Backup’ and enter a password for the backup if you’d like your backup to be encrypted (see note below)
  9. Click ‘Use Disk’

Encrypting your backup is the best idea when you’re concerned about security. An unencrypted backup could be taken, and anyone could restore your data from that drive. Encrypting the backup will give the drive its own password. You’ll want to save this password in a password manager or someplace safe. Then, if someone attempts to restore from an encrypted drive, they’ll be prompted for that password.

That’s it! Your Mac will begin to backup. Your initial backup will most likely take hours to complete. Once done, your incremental backups will be much faster.

How to backup your Mac using Backblaze

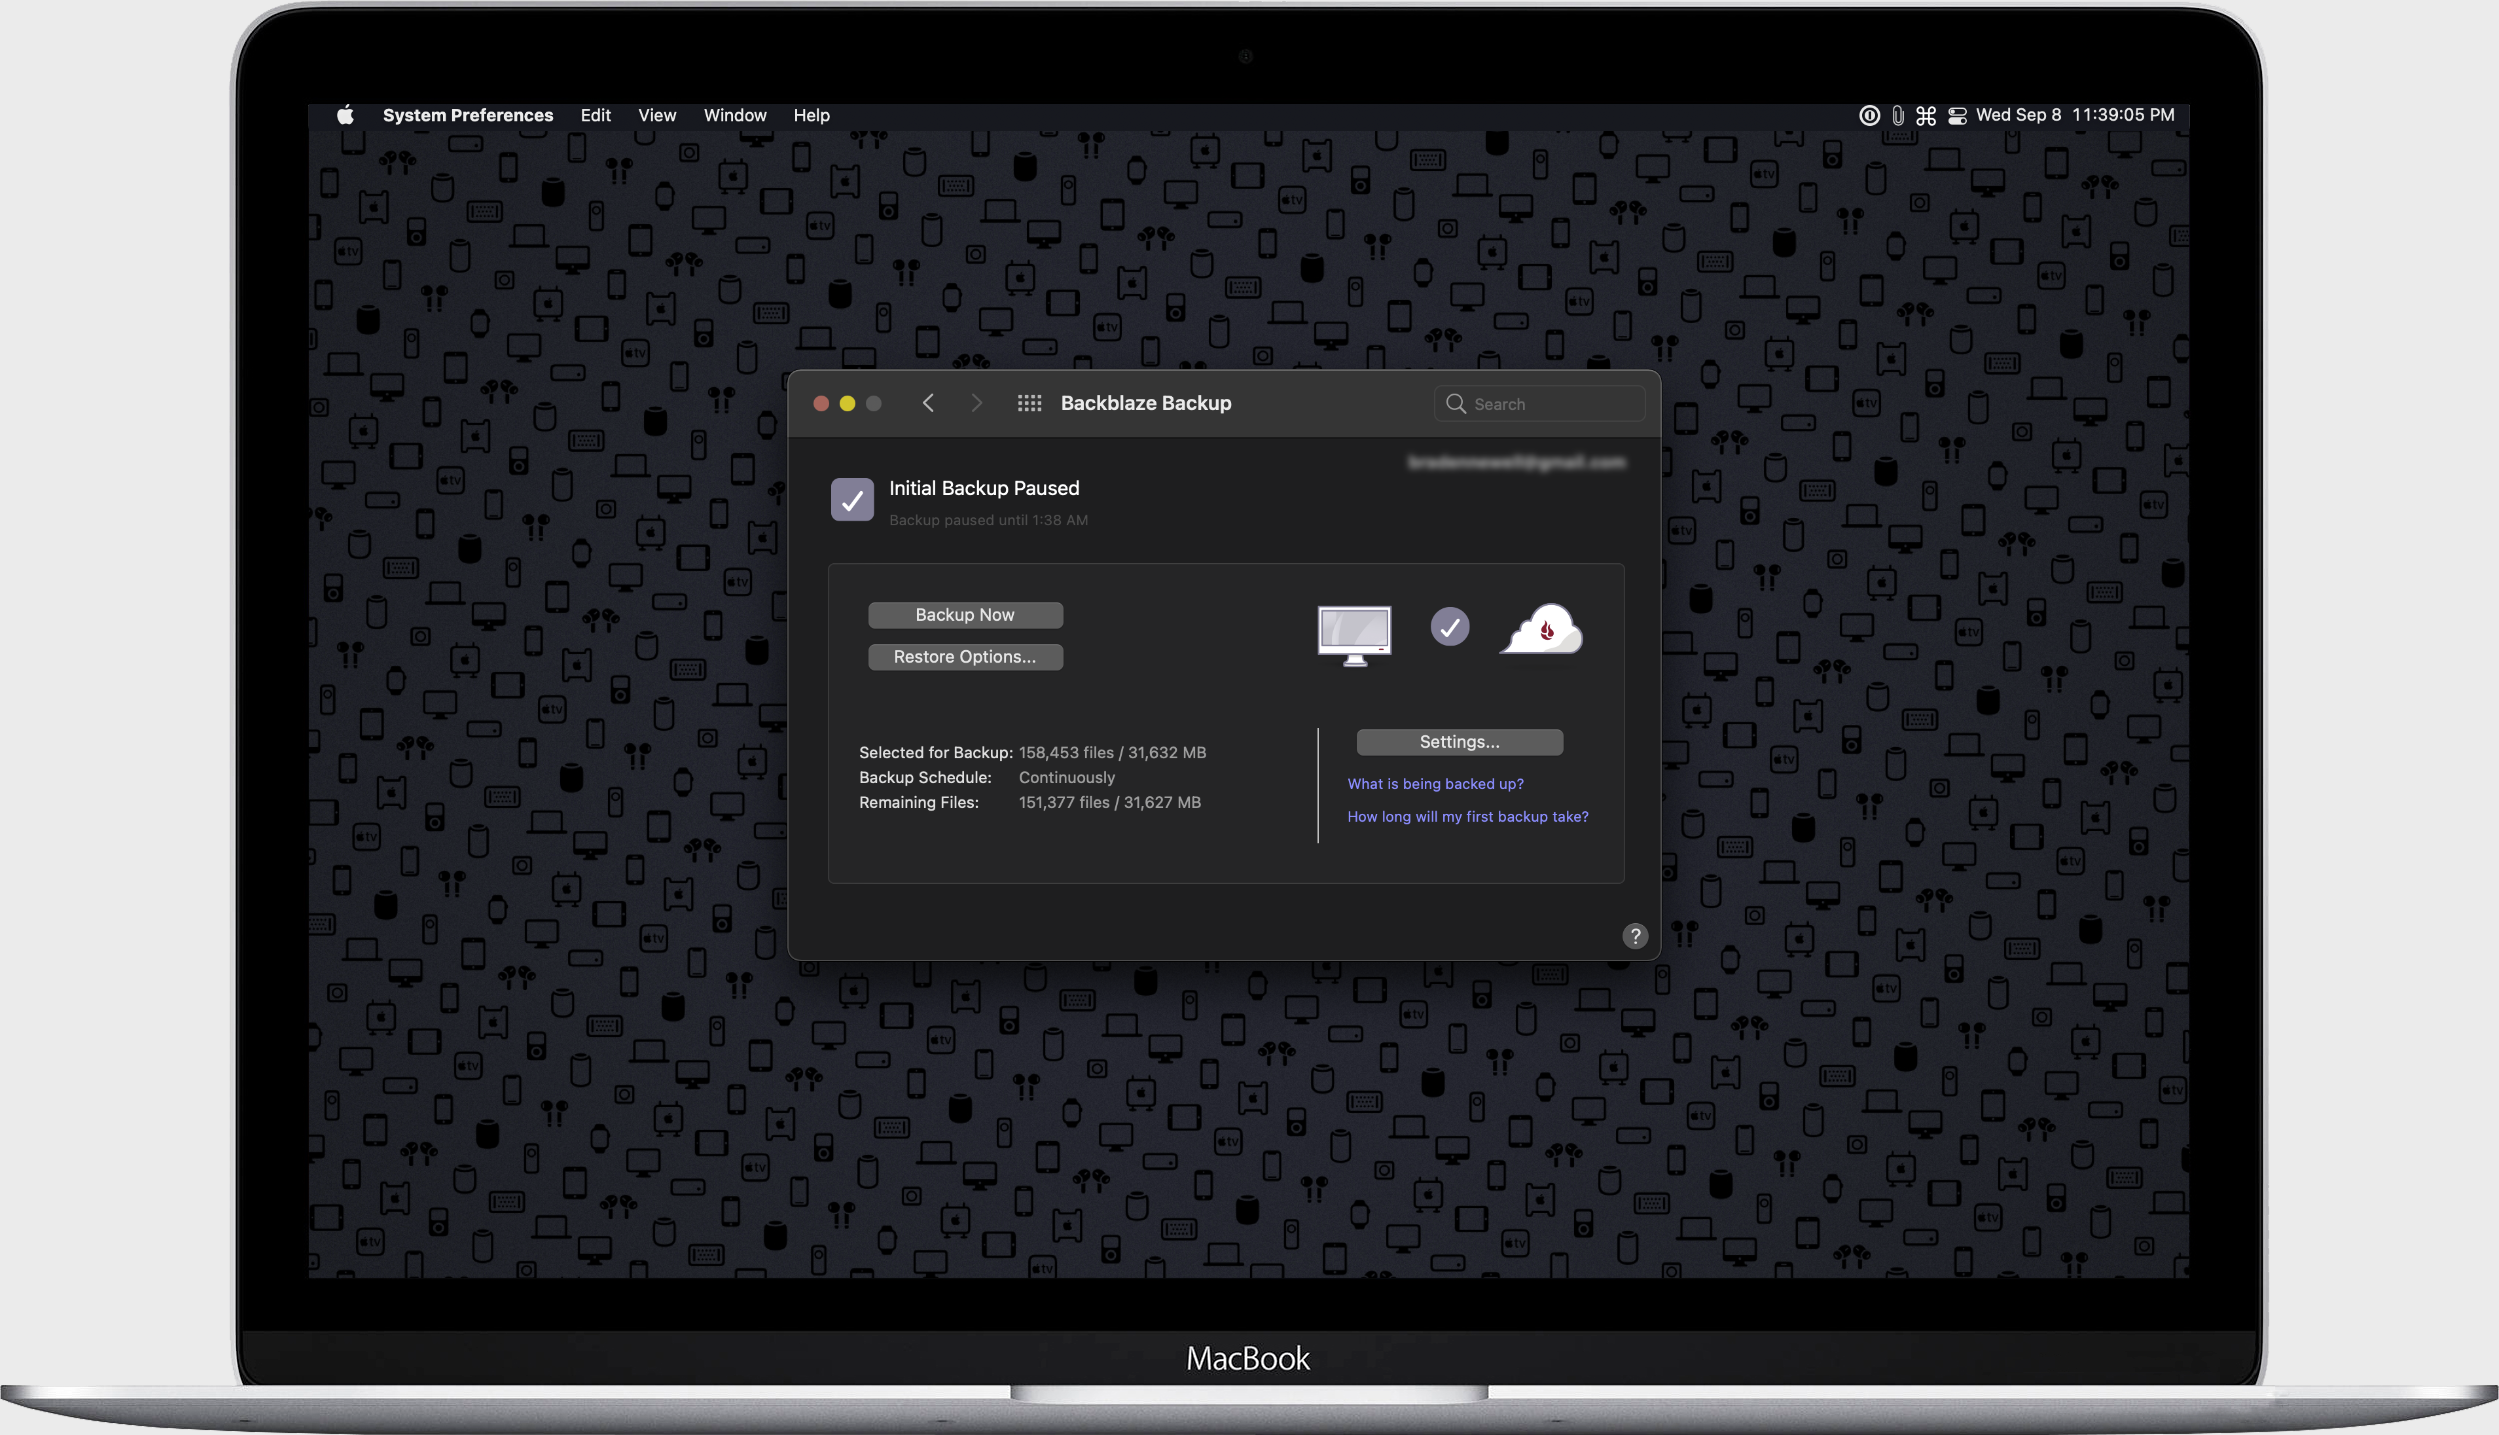
There are numerous cloud backup services on the market, including iDrive, Google Drive, Dropbox, and many others. However, I’ll be focused on Backblaze because it’s been constantly rated as the number one backup utility and is really well recommended around the tech community.

To set up Backblaze:

  1. Create an account here
  2. Click ‘Allow’ if prompted to allow downloads
  3. Your file will download to your Mac
  4. Locate the Backblaze DMG file on your Mac
  5. Double-click to launch the installer
  6. Double-click on ‘Backblaze Installer
  7. Click ‘Open’ if prompted
  8. Click ‘OK’ if prompted to grant Backblaze access to your Desktop
  9. Click ‘OK’ if prompted to grant Backblaze access to your Downloads
  10. Click ‘Install Now’
  11. Enter in your administrator password
  12. Click ‘OK’
  13. Launch ‘System Preferences’
  14. Click ‘Security & Privacy’
  15. Click the ‘Privacy’ tab
  16. Click ‘Full Disk Access’ in the left-hand menu bar
  17. Click the lock in the lower left-hand corner
  18. Enter in your administrator password or authenticate using TouchID
  19. Check off ‘Backblaze’ and ‘bzbmenu’

Backblaze will begin backing up your files to their servers in the event you might need them.

Categories
Mobile Syrup

Apple releases OS updates to fix spyware hack uncovered by University of Toronto researchers

Just ahead of Apple’s iPhone 13 reveal event, the tech giant has released iOS 14.8, iPadOS 14.8, watchOS 7.6.2 and macOS Big Sur 11.6 to solve a pair of significant security issues affecting several of its devices.

All four updates don’t add new features to their respective devices’ operating systems but include important security fixes. The first fix relates to iOS’, iPadOS’ and macOS’ CoreGraphics framework and the other is tied to Apple’s WebKit browser feature.

Pegasus security update

Apple says that it became aware of vulnerabilities that take advantage of these frameworks to run malicious code. For example, regarding the CoreGraphics exploit, apple mentions that a “maliciously crafted PDF” could lead to “arbitrary code execution.”

According to The Washington Post, one of the flaws was uncovered by the University of Toronto’s Citizen Lab and is linked directly to Pegasus spyware. Alongside Apple, Citizen Lab advises Apple users to update their devices as soon as possible.

Check out Citizen Lab’s website for a very detailed breakdown of the exploits.

Source: AppleThe Washington Post